Tutorial: Creating a game with Phaser and P2 Physics
This tutorial explains how to create a small physics enabled game with Phaser
- Creating physics collision shapes
- Working with collision groups
- Starting the physics simulation
- The difference between Arcade and P2 physics
This tutorial is a guest post from Josh Morony.
Here's a quick look at what you'll be creating — click on the top black bar to move the player:
Phaser and Physics
If you've been using Phaser, then chances are you would be familiar with the Arcade physics system. Arcade is the de facto physics system used with Phaser and provides a basic physics system that allows for collisions, acceleration, velocity and so on.
Phaser has 3 physics systems available:
- Arcade Physics
- Ninja Physics
- P2 Physics
In this tutorial we will be looking at how to use the P2 physics system in Phaser with the help of the PhysicsEditor. P2 Physics allows us to create much more complex physics interactions (things like springs and pendulums) and it also allows for much more complex collisions . When using the Arcade Physics system, the hitbox for a sprite will always be a simple bounding rectangle. This is fine in some instances, but take the following sprite for example:
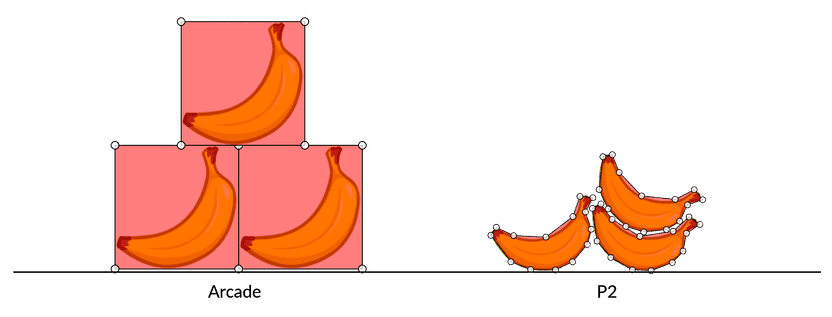
The banana is treated as a rectangle in Arcade — and also behaves like one. Bananas stack like boxes. By using P2 Physics and the PhysicsEditor program, you can create a much more accurate collision shape that will only cause a collision when there should be a collision. And look how nicely the bananas stack.
So why is the Arcade physics system the default in Phaser if P2 physics is better?
All that extra functionality comes at the cost of performance. Since the physics is so much more complex, it takes a lot more processing power, and this can be especially noticeable when running your game on mobile devices. So if your game will work with Arcade physics, you should probably use that, but for more complex games (like the crazy demo we are about to build) you can use P2 physics.
Before We Get Started
I'll be showing you how to build a crazy game (or perhaps calling it a simulation would be more accurate) using P2 physics and PhysicsEditor in Phaser. I won't be going through any of the basic Phaser set up or structure steps.
You can also get the complete source code from Github. It contains multiple folders for the different stages of the tutorial.
Creating collision shapes for P2 Physics
Phaser has no way of automatically creating an accurate collision shape like in the image above. You have to define the collision shape by supplying our Phaser game with a JSON file that looks like this:
{
    "betty": [
        {
            "shape": [ 1, 63 , 8, 54 , 11, 63 , 2, 73 ]
        } ,
        {
            "shape": [ 67, 56 , 54, 64 , 57, 56 , 67, 51 ]
        } ,
        {
            "shape": [ 14, 77 , 24, 83 , 19, 93 , 12, 94 ]
        } ,
        ...
    ],
    "banana": [
        ...
    ],
    ...
}
Easy! Yeah right… if you had a mini heart attack looking at that then don't worry. This is exactly what PhysicsEditor is for and it will make your life a whole lot easier.
PhysicsEditor allows you to define the collision shapes and then export them into the appropriate format you need. In the case of Phaser, that is JSON, but PhysicsEditor works for a bunch of different game frameworks.
Let's walk through how to do that now.
Download PhysicsEditor
You can grab PhysicsEditor and start your free trial where you will have access to all of its features.
Import your Sprite
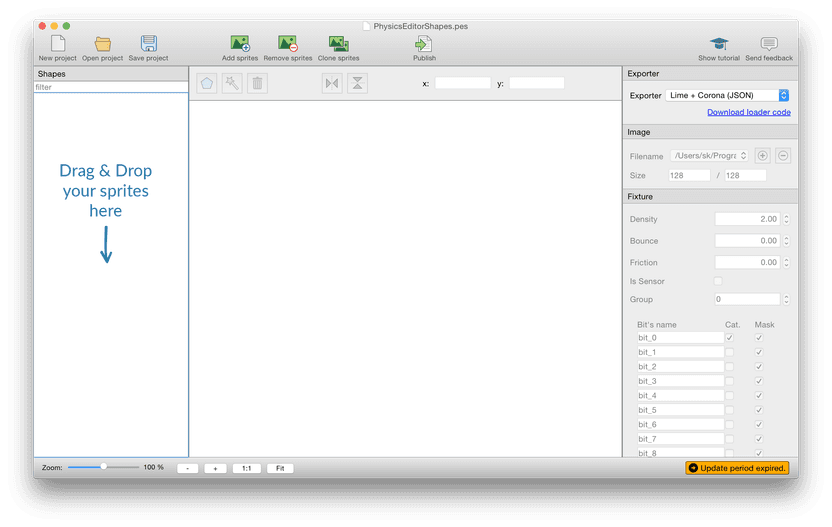
Once you've downloaded and installed PhyscisEditor you should be greeted with a screen that looks like this:
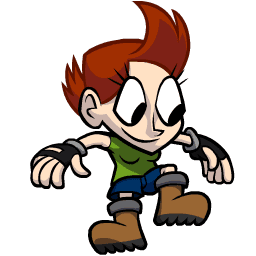
You'll be using the following sprite for the game — download and place it inside the assets folder:
Start by adding a sprite. You can drag and drop a sprite on the left panel or use the toolbar. Along the top toolbar, you will see an Add sprites button. Click this and load up the sprite that you want to use. Start with betty.png — the character sprite.
Trace your Sprite
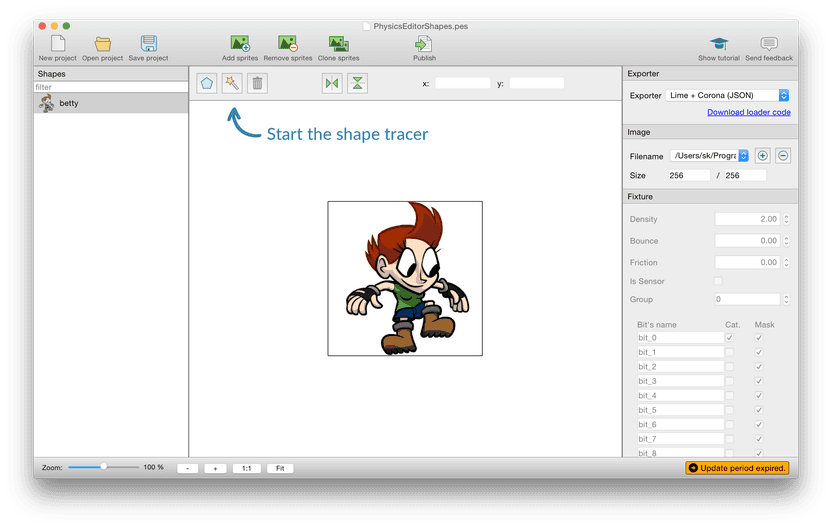
The toolbar above your sprite contains a magic wand icon. Click it. This tool makes it super fast and easy to create the appropriate collision shape. All you have to do is click the wand and you should see a screen like this:
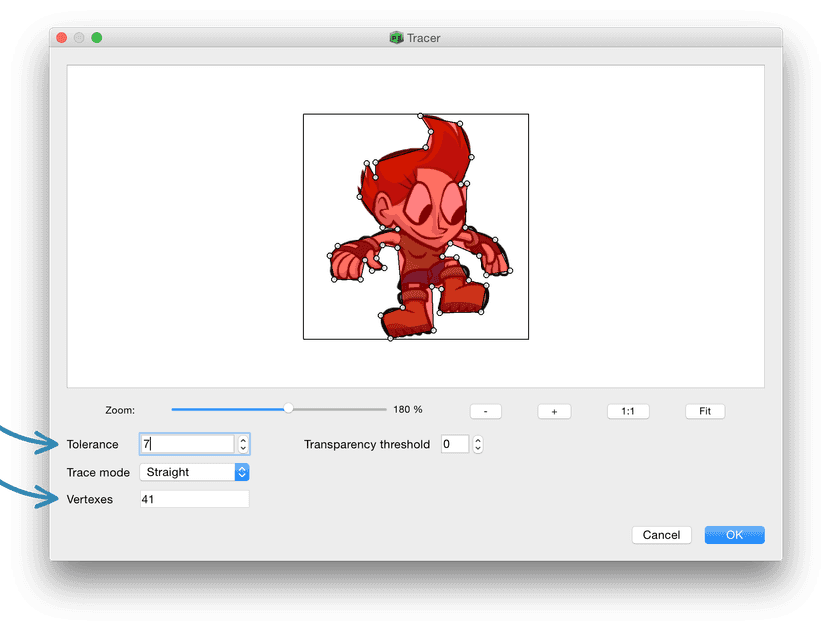
You can change tolerance to effect how many vertexes are used, the lower the tolerance, the more vertexes and the more accurate the shape. But more accuracy means it is also more complex which results in more calculations for the CPU! Everything always comes at a cost.
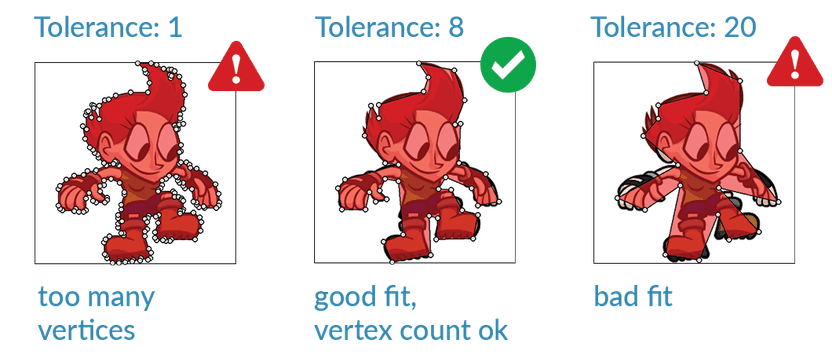
The left shape has way too many vertices. The shape in the middle of the image should be ok. The right shape does not fit too well — but it might still give you good enough collisions.
Remember: The player does not see the polygon — he just sees the reaction on a hit. And if performance is at stake it's better to go with less accuracy than fewer frames per second.
Click Ok to accept the traced shape.
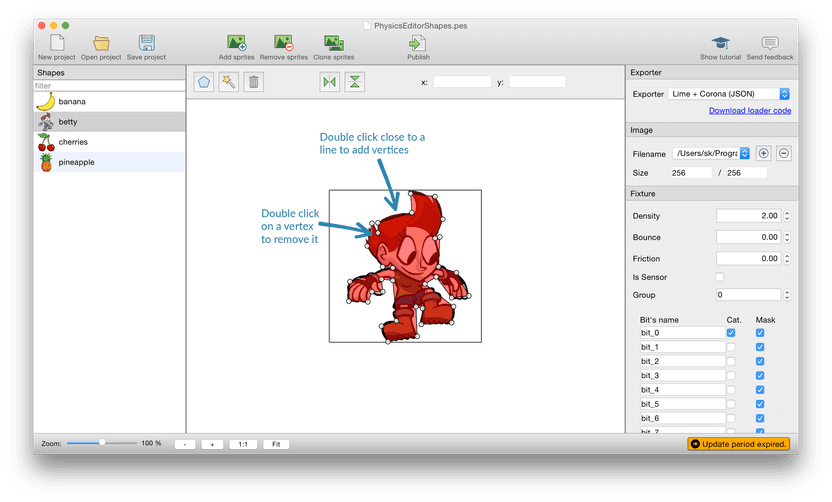
You can also tweak the polygon:
-
Press mouse button on a vertex to move it
-
Double click a vertex to remove it
-
Double click near a line to insert a new vertex
Publish your Sprites
Currently, there is no specific exporter for Phaser in PhysicsEditor, but that doesn't matter because we just need to export the result in a JSON format. Set the Lime + Corona (JSON) exporter for now:

Finally hit the publish button along the top toolbar and save the result in to your games assets folder, name the file sprite_physics.json
Also, make sure you include a copy of the same sprite you loaded into PhysicsEditor in your assets folder too, as we need to load both of these files into the game.
Loading the Sprite into Phaser
Ok, now it's time to jump into Phaser! What we're going to do first is load the sprite and JSON file we just created into Phaser.
Add the following code to your preload method in preload.js:
preload: function(){
    this.game.load.image("betty", "assets/betty.png");
    this.game.load.physics("sprite_physics", "assets/sprite_physics.json");
},
Make sure when you load sprite it has same name as in PhysicsEditor (which should just be the file name).
Load the Main State
If you are using the template I provided earlier, it is important to change the following code in preload.js:
create: function() {
    this.game.state.start("GameTitle");
}
to
create: function() {
    this.game.state.start("Main");
}
Since you are not creating a title screen, you want the game to launch right into the Main state. If you don't make this change, then you will just see a blank screen.
Set up P2 Physics and Initial Properties
Before you jump into the fun stuff, you need to set up a few basic things first like enabling the P2 Physics system and
a few other properties. Add the code below to your create method in main.js:
create: function() {
    var me = this;

    // Set the background colour to blue
    me.game.stage.backgroundColor = '#ccddff';

    // Start the P2 Physics Engine
    me.game.physics.startSystem(Phaser.Physics.P2JS);

    // Set the gravity
    me.game.physics.p2.gravity.y = 1000;

    // Create a random generator
    var seed = Date.now();
    me.random = new Phaser.RandomDataGenerator([seed]);
},
In the code above you set the games background color, enable the P2 Physics engine, change the default gravity of the game.
The code also initializes a RandomDataGenerator to generate random numbers later in the game.
The gravity value of 1000 is quite high — but it's fine for this game since it'll be more arcade style and less realistic.
Create the Roof
In the next step, you are going to create the rope swinging functionality for your player, but before you can do that, you need something for the rope to attach to. So you going to add a roof sprite that fills the entire width of the game.
Create a Roof Sprite using Bitmap Data
Rather than using an image for the sprite, you are going to use BitmapData . This allows you to draw the sprite
programmatically rather than supplying an image. The benefit of this is that you can make the sprite be whatever shape
or size you need it to be depending on the width of the game.
Add the following function to your main.js file:
createBlock: function() {
    var me = this;

    // Define a block using bitmap data rather than an image sprite
    var blockShape = me.game.add.bitmapData(me.game.world.width, 200);

    // Fill the block with black color
    blockShape.ctx.rect(0, 0, me.game.world.width, 200);
    blockShape.ctx.fillStyle = '000';
    blockShape.ctx.fill();

    // Create a new sprite using the bitmap data
    me.block = me.game.add.sprite(0, 0, blockShape);

    // Enable P2 Physics and set the block not to move
    me.game.physics.p2.enable(me.block);
    me.block.body.static = true;
    me.block.anchor.setTo(0, 0);
},
The code above creates a BitmapData object that is as wide as the game and 200 pixels high. It then
draws a black rectangle that fills that entire space. Once that object is defined, you can use it to add a sprite to our game
rather than a key to the resource like you would usually use.
After you've added the sprite, you enable P2 physics on the object and set it to static so that it does not move
(otherwise our poor Betty would get crushed by the roof).
Once that function is defined, you should call it from the bottom of your create method like this:
me.createBlock();Your game should now look something like this:

If you only see a black screen, check the javascript console. You might see something like this: Failed to load resource: The requested URL was not found on this server. XMLHttpRequest cannot load file:///.../phaser-physics-editor-and-p2-physics/02-betty-dropping/assets/sprite_physics.json. Cross origin requests are only supported for HTTP. NETWORK_ERR: XMLHttpRequest Exception 101: A network error occurred in synchronous requests.
This happens if you try to open the index.html file directly in Safari or Chrome. The browser protects your computer from asynchronous access to your file system. This is currently done in the pre-loader when trying to load the physics editor data.
To get the demo running you have 2 simple choices
- Use Firefox — the current version allows loading data from file:// urls
- Upload the data to a web server
Another way would be to remove the preloader. Load the json file
using <script> and add the data directly to the PhaserChache .
You can do this using addPhysicsData() . See the Phaser Cache documentation.
This might be good for the demo — but for a real game preloading is recommended.
Create a Rope Swinging Effect for our Player
Now you are going to make use of the sprite you have added to the game — allowing him to swing around from the rooftop. This will use a spring which is a cool feature available in P2 physics. You are also going to draw a line using Bitmap Data again to represent where the spring is (you can't see it by default).
Add the Player to the Game
First things first, you need to add your sprite to the screen. Let's do that by adding a createPlayer
function to the main.js file:
createPlayer: function() {
    var me = this;

    // Add the player to the game
    me.player = me.game.add.sprite(200, 400, 'betty');

    // Enable physics, use "true" to enable debug drawing
    me.game.physics.p2.enable([me.player], false);

    // Get rid of current bounding box
    me.player.body.clearShapes();

    // Add our PhysicsEditor bounding shape
    me.player.body.loadPolygon("sprite_physics", "betty");
},
You add your sprite like you usually would and enable P2 physics on it. By passing in true as a second parameter you can enable debug drawing of the shape. The important part though is that you clear the existing bounding box and then load in our custom defined collision area using the loadPolygon method.
Again, you should now call that function from the bottom of your create method:
me.createPlayer();Start the game — you'll now see Betty dropping down onto the floor.
The current state of the game is available in the 02-betty-dropping folder.
You'll now see the following — click to activate:
Create a Spring Between the Player and Roof
Now you are going to create a Spring between Betty and the roof, and also draw a line to represent that spring.
To do that, you are going to add the following createRope function to the main.js file:
createRope: function() {
    var me = this;

    // Add bitmap data to draw the rope
    me.ropeBitmapData = game.add.bitmapData(me.game.world.width, me.game.world.height);

    me.ropeBitmapData.ctx.beginPath();
    me.ropeBitmapData.ctx.lineWidth = "4";
    me.ropeBitmapData.ctx.strokeStyle = "#ffffff";
    me.ropeBitmapData.ctx.stroke();

    // Create a new sprite using the bitmap data
    me.line = game.add.sprite(0, 0, me.ropeBitmapData);

    // Keep track of where the rope is anchored
    me.ropeAnchorX = (me.block.world.x + 500);
    me.ropeAnchorY = (me.block.world.y + me.block.height);

    // Create a spring between the player and block to act as the rope
    me.rope = me.game.physics.p2.createSpring(
        me.block,  // sprite 1
        me.player, // sprite 2
        300,       // length of the rope
        10,        // stiffness
        3,         // damping
        [-(me.block.world.x + 500), -(me.block.world.y + me.block.height)]
    );

    // Draw a line from the player to the block to visually represent the spring
    me.line = new Phaser.Line(me.player.x, me.player.y,
        (me.block.world.x + 500), (me.block.world.y + me.block.height));
},
You should be pretty familiar with most of what you are doing here, the only stuff that is really new are the last
few lines. You're creating a spring using the createSpring method, and you do this by passing in the two sprites
that you want to connect with the spring. The other parameters give you control over the spring's behaviour: restLength , stiffness , and damping . You can experiment with different values later.
After you have supplied those parameters you also then supply the world coordinates for where it should hook the two
ends of the spring. These parameters are optional but since you want to allow the player to move where the rope
attaches to you need to define this specifically. What you're doing for these values is getting the x and y
coordinates of the roof and then adding to them. You wanted the rope to start 500 pixels from the left so you have to add 500 , and you wanted the rope to start at the bottom of the block vertically so add me.block.height .
The weird thing here is that I'm negating these values, this is just due to differences in the way P2 and Phaser handle coordinates, for some reason P2 uses the inverse value.
The createSpring method is quite a complex one, so if you would like you can view the full documentation
here.
After we create the spring, we also simply draw a line along the same coordinates so that we can see what's going on. Remember to call this function from the end of your create method as well:
me.createRope();You'll now see the following — click to activate:
Betty is dangling in the air — but no rope!?!?!?
Update the Rope Line
The player is going to be constantly moving, so for the rope to display correctly, your are going to have to update it.
To do that, first create a drawRope function in main.js:
drawRope: function() {
    var me = this;

    // Change the bitmap data to reflect the new rope position
    me.ropeBitmapData.clear();
    me.ropeBitmapData.ctx.beginPath();
    me.ropeBitmapData.ctx.beginPath();
    me.ropeBitmapData.ctx.moveTo(me.player.x, me.player.y);
    me.ropeBitmapData.ctx.lineTo(me.ropeAnchorX, me.ropeAnchorY);
    me.ropeBitmapData.ctx.lineWidth = 4;
    me.ropeBitmapData.ctx.stroke();
    me.ropeBitmapData.ctx.closePath();
    me.ropeBitmapData.render();
},
This will find out the players current position and update the rope accordingly, and the anchor point on the roof
will also change when the me.ropeAnchorX and me.ropeAnchorY values change (which we will handle soon).
Rather than calling this from the create method, you should call it from the update method:
update: function() {
    var me = this;

    //Update the position of the rope
    me.drawRope();
},
Allow the Rope to be Moved
At this point, the rope effect will be working quite nicely, but now you still need to allow the player to change the position of the rope. You will do this by allowing the player to click anywhere on the roof sprite and move the ropes anchor position to there.
First, you should modify the createBlock method to reflect the following:
createBlock: function() {
    var me = this;

    // Define our block using bitmap data rather than an image sprite
    var blockShape = me.game.add.bitmapData(me.game.world.width, 200);

    blockShape.ctx.rect(0, 0, me.game.world.width, 200);
    blockShape.ctx.fillStyle = '000';
    blockShape.ctx.fill();

    // Create a new sprite using the bitmap data
    me.block = me.game.add.sprite(0, 0, blockShape);

    // Enable P2 Physics and set the block not to move
    me.game.physics.p2.enable(me.block);
    me.block.body.static = true;
    me.block.anchor.setTo(0, 0); **// Enable clicking on the block and trigger a function when it is clicked
me.block.inputEnabled = true;
me.block.events.onInputDown.add(me.changeRope, this);**
},
Now you have enabled input on the roof sprite, and when we detect that the user has clicked somewhere on it we
call the changeRope function. This will pass both the sprite clicked and the coordinates where the click occurred
to this function.
So now, you have to create that changeRope function by adding the following to main.js:
changeRope: function(sprite, pointer) {
    var me = this;

    //Remove last spring
    me.game.physics.p2.removeSpring(me.rope);

    //Create new spring at pointer x and y
    me.rope = me.game.physics.p2.createSpring(me.block, me.player, 200, 10, 3, [-pointer.x, -pointer.y]);
    me.ropeAnchorX = pointer.x;
    me.ropeAnchorY = pointer.y
},
This function first removes the spring you already have added, and then creates a new one using the coordinates where
the user clicked. You also update the ropeAnchorX and ropeAnchorY points so that the drawRope function
knows what to do.
The rope swinging functionality should now be complete, and should look something like in the image below.
The current state of the project is available in 03-betty-dangling
You'll now see the following — click to activate:
Add more collision objects
Now you're going to add some fruit sprites to see that collision shape we defined on our sprite in action.
Tracing the new sprites
Add the following new objects to the assets folder and trace them using PhysicsEditor.
Use the tolerance values written below the sprites:

banana.png
Tolerance: 5.0

pineapple.png
Tolerance: 5.0

cherries.png
Tolerance: 4.0
You can put them all in the same PhysicsEditor project and switch between them using the left side panel.
After setting up the sprite, press publish to update the assets/sprite_physics.json
Load the new sprites
Update preload.js:
preload: function() {
    this.game.load.image("betty", "assets/betty.png");
    this.game.load.image("pineapple", "assets/pineapple.png");
    this.game.load.image("banana", "assets/banana.png");
    this.game.load.image("cherries", "assets/cherries.png");
    this.game.load.physics("sprite_physics", "assets/sprite_physics.json");
},
Create a Group for the Object
First create a function to create the new game objects. You'll be re-using this code for the other objects.
Add this function to main.js:
createObjects: function(objectName) {
    var me = this;

    // Create a group to hold the collision shapes
    var objects = game.add.group();
    objects.enableBody = true;
    objects.physicsBodyType = Phaser.Physics.P2JS;
    objects.createMultiple(40, objectName);

    objects.forEach(function(child){
        child.body.clearShapes();
        child.body.loadPolygon('sprite_physics', objectName);
    }, me);

    return objects;
},
It creates and returns a bunch of sprites and attaches the physics bodies to each of them.
Add the following lines to create method in main.js to
create the bananas:
// Create a bunch of bananas
me.bananas = me.createObjects("banana");

// This is required so that the groups will collide with the world bounds
me.game.physics.p2.updateBoundsCollisionGroup();
The only thing out of the ordinary here is the last line where you call updateBoundsCollisionGroup , this is
important to add so that the objects you are adding to the screen don't just fall right out of the screen. You want
them to pile up at the bottom so that you can better see the effect the collision area is having.
Create Functions to Spawn Objects
Add the following function to the main.js file:
spawnObject: function() {
    var me = this;

    // Spawn a new banana on the left and give it a random velocity
    var object = me.bananas.getFirstDead();
    object.lifespan = 6000;
    },
getFirstDead takes the first object from the group which is currently not on screen.
You set the lifespan to 6 seconds so that the bananas will automatically be removed after that time.
There's currently no check if the game runs out of bananas — so make sure not to set
the lifespan too high.
Add 2 more functions to main.js:
spawnObjectLeft: function() {
    var me = this;

    // Spawn new object
    var object = me.spawnObject();

    // Set object's position and velocity
    object.reset(1, 600);
    object.body.velocity.x = me.random.integerInRange(100, 800);
    object.body.velocity.y = -me.random.integerInRange(1000, 1500);
},

spawnObjectRight: function() {
    var me = this;

    // Spawn new object
    var object = me.spawnObject();

    // Set object's position and velocity
    object.reset(me.game.world.width, 600);
    object.body.velocity.x = -me.random.integerInRange(100, 800);
    object.body.velocity.y = -me.random.integerInRange(1000, 1500);
},
These function spawn a new object and reset the position — to be left / right out of the screen. After that a random velocity aiming at the screen is set.
Call the Spawn Functions
All that's left to do now is call these spawn functions, and to do that we are going to create a timer that calls
them every 600ms. Simply add the following code to the bottom of your create method:
// Spawn bananas every 600ms
me.timer = game.time.events.loop(600, function() {
    me.spawnObjectRight();
    me.spawnObjectLeft();
});
Any code that is within this block will run every 0.6 seconds (which means a lot of banana fun).
The current state of the project is available inside the 04-adding-objects folder.
You'll now see the following — click to activate:
Create Collisions
Collision groups allow you to define which objects collide with which other objects.
Creating Collision Groups
Add the following code to create in mail.js,
before creating the player and block:
// Create collision groups
me.playerCollisionGroup = me.game.physics.p2.createCollisionGroup();
me.blockCollisionGroup = me.game.physics.p2.createCollisionGroup();
me.bananasCollisionGroup = me.game.physics.p2.createCollisionGroup();
me.cherriesCollisionGroup = me.game.physics.p2.createCollisionGroup();
me.pineapplesCollisionGroup = me.game.physics.p2.createCollisionGroup();

// Create the ceiling
You'll be using the bananasCollisionGroup first, the others will be used later.
There are 2 functions to set up collision groups and collisions on an object:
-
setCollisionGroup()
sets the collision group the body belongs to -
collides()
defines with which collision groups the body will collide
Everything should be working now but we still need to set the collision groups properly, so you should modify all of these functions in main.js to reflect the following.
Make the player collide with all collision objects:
createPlayer: function() {
    …
    // Define the players collision group and make it collide with the block and fruits
    me.player.body.setCollisionGroup(me.playerCollisionGroup);
    me.player.body.collides([
        me.blockCollisionGroup,
        me.bananasCollisionGroup,
        me.cherriesCollisionGroup,
        me.pineapplesCollisionGroup
    ]);
},
Make the ceiling block collide with the player
createBlock: function() {
    …
    // Enable the blocks collisions
    me.block.body.setCollisionGroup(me.blockCollisionGroup);
    me.block.body.collides([me.playerCollisionGroup]);
},
Make the bananas collide with the player and with other bananas
spawnObject: function() {
    …
    // Bananas collide with bananas and the player
    object.body.setCollisionGroup(me.bananasCollisionGroup);
    object.body.collides([me.bananasCollisionGroup, me.playerCollisionGroup]);

    return object;
},
You'll now see the following — click to activate:
The current state is available as 05-collisions.
Adding the new objects to the game
Bananas — ok — but what about other objects?
Start by creating groups of new objects in create in main.js:
/   / Create a bunch of fruits
    me.bananas = me.createObjects("banana");
    me.pineapples = me.createObjects("pineapple");
    me.cherries = me.createObjects("cherries");
Now it's time to spawn the new fruit types.
spawnObject: function() {
    var me = this;

    // Create random object
    var objectToSpawn = me.random.integerInRange(1,3);

    if(objectToSpawn == 1){
        var object = me.bananas.getFirstDead();
        object.body.setCollisionGroup(me.bananasCollisionGroup);
    }
    else if (objectToSpawn == 2){
        var object = me.pineapples.getFirstDead();
        object.body.setCollisionGroup(me.pineapplesCollisionGroup);
    }
    else {
        var object = me.cherries.getFirstDead();
        object.body.setCollisionGroup(me.cherriesCollisionGroup);
    }

    // set the lifespan
    object.lifespan = 6000;

    // Fruits collide with fruit and the player
    object.body.collides([
        me.blockCollisionGroup,
        me.playerCollisionGroup,
        me.bananasCollisionGroup,
        me.cherriesCollisionGroup,
        me.pineapplesCollisionGroup
    ]);

    return object;
},
The code picks a random number and spawns an object according to the number. Each object is initialized with its collision group.
You could move the object.body.collides into each of the if statements.
E.g. if you want to have no collisions between bananas and cherries remove the me.cherriesCollisionGroup from
the bananas and the me.bananasCollisionGroup from the cherries.
Load up the game and see the new objects in action.
Currently, all objects behave in the same way. You could add a material to the objects to change the bounce and weight.
You might be surprised what happens when you change the mass of an object: It does not change the flight path of the object! The P2 physics does not calculate air resistance — thus all objects are affected by the same gravity.
If you want object to have different paths you could set the gravity scale for each:
    if(objectToSpawn == 1){
        var object = me.bananas.getFirstDead();
        object.body.setCollisionGroup(me.bananasCollisionGroup);
    }
    else if (objectToSpawn == 2){
        var object = me.pineapples.getFirstDead();
        object.body.setCollisionGroup(me.pineapplesCollisionGroup);
        object.body.data.gravityScale = 1.5;
    }
    else {
        var object = me.cherries.getFirstDead();
        object.body.setCollisionGroup(me.cherriesCollisionGroup);
        object.body.data.gravityScale = 0.5;
    }
The current state is available in the folder 06-more-objects. You'll now see the following — click to activate:
Create a Scoring Mechanism
Finally, you are going to add a simple scoring mechanism to the game. You will create a counter that increments every time the player is hit by one of the objects.
You have to add a collision handler that will increment the score when the player is hit, but to do that you
first need to enable impact events by adding the following code to the create method:
// Enable collision callbacks
me.game.physics.p2.setImpactEvents(true);
This will allow you to detect collisions, but it is also a very expensive operation, so it is not enabled by default.
Before you can track the players score, you will need to create a score label on the screen. Add the following function to main.js:
createScore: function() {
    var me = this;

    var scoreFont = "100px Arial";

    me.scoreLabel = me.game.add.text((me.game.world.centerX), 100, "0", {font: scoreFont, fill: "#fff"});
    me.scoreLabel.anchor.setTo(0.5, 0.5);
    me.scoreLabel.align = 'center';
},
and call it from your create method by adding:
me.createScore();Now let's create a new function in main.js to increment the users score:
playerCollision: function() {
    var me = this;

    if(!me.hitCooldown) {
        me.hitCooldown = true;
        me.timesHit++;
        me.scoreLabel.text = me.timesHit;

        me.game.time.events.add(1000, function(){
            me.hitCooldown = false;
        }, me);
    }
},
This function is triggered whenever a collision occurs, and when it does it will increment the score and update the score label. The only problem is though that a collision can be triggered multiple times if different parts of the same sprite collide with each other. To avoid this add a cooldown that lasts 1 second during which the player is invulnerable. This function also uses a timesHit variable, which you add to the create method by adding:
me.timesHit = 0;Update the collide method in the createPlayer function to call this new function every time a collision occurs:
    me.player.body.collides([
        me.bananasCollisionGroup,
        me.cherriesCollisionGroup,
        me.pineapplesCollisionGroup
    ], me.playerCollision, me);
You can create different collision functions for each collision type. This is useful for playing different sounds, adding different scores etc.
The game is now finished and should look like this:
The current state is available in the folder 07-scoring. You'll now see the following — click to activate:
Summary
The "game" we've created here is pretty crazy, but I think it demonstrates the concept of both P2 physics and how to use the PhysicsEditor program to define accurate collision shapes really well. Perhaps from here you could…
-
Create even more shapes and enemies with PhysicsEditor
-
Play around more with the physical properties of the sprites and springs
-
Make the game world bigger and allow the player to swing around like Spiderman
Of course that's the beautiful thing about games: your creativity is the limit and with the P2 physics engine and PhysicsEditor, those limits can be pushed a lot further.