TexturePacker Content Protection

Learn how to protect your sprites
With TexturePacker's Content Protection feature, you can encrypt your sprite sheets to prevent them from being stolen. Your app or game will still be able to decrypt the data, but somebody else is going to have a hard time getting it done.
Content Protection is available for the following frameworks:
- Cocos2D 3.5
- Cocos2d-x 3.17 / 4.0
- Axmol engine
When designing the encryption, we had the following goals in mind:
- Ease of use Enter the encryption key in TexturePacker and add 4 lines of code - that's all.
- Memory consumption The runtime requires 4kB while decrypting the spritesheets. The file sizes stay the same.
- Performance The decryption uses nearly no time at all since only parts of the spritesheet are encrypted.
- Security It should be hard to decrypt the data.
All of this works! Encrypting your assets is a straightforward process — it requires almost no effort and has no impact on your game.
The decoder and key are stored in your app - otherwise it would not be possible to use the assets in your game at all. In theory, it would be possible for somebody to extract the key and decoder from the app. But this will require knowledge, time and a significant amount of effort. So instead of stealing your assets, it's more likely that they would seek easier targets.
Setting up TexturePacker for encryption
If you have not yet installed TexturePacker, you can download it here — it's available for Windows, macOS and Linux:
An introduction about how to create a sprite sheet with TexturePacker can be found here.
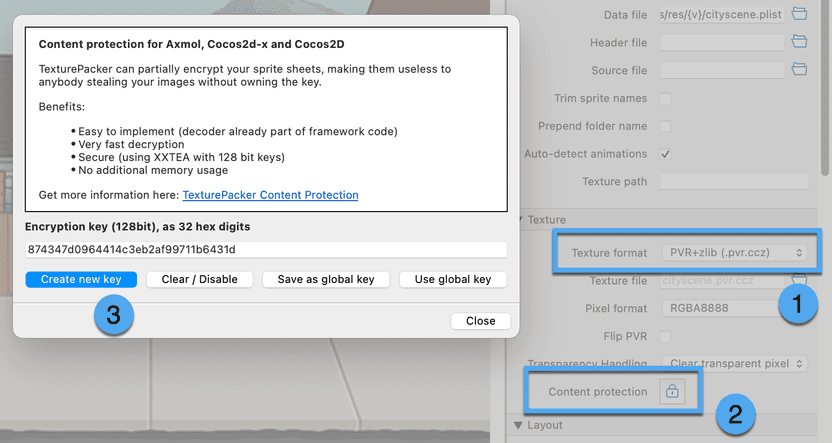
In this tutorial, we assume that you already have TexturePacker running to create sprite sheets. So, simply open your existing .tps file. It is important that you change the Texture format to pvr.ccz — which is currently the only file format that supports encryption.
Once you've selected this format, a new button is displayed: Content Protection. Press the "lock" icon, and a new dialog will open:

You can enter your custom key in the line edit - or you can create a new one by clicking on Create new key.
To disable encryption use Clear / Disable. If you click on Save as global key, the key will be stored in TexturePacker as global key. This key is used for decryption in the PVR viewer and can be easily pasted into other sprite sheets by clicking on Use global key.
Press Publish, and you are done in TexturePacker.
The corresponding command line option is --content-protection <key>, where the key must be a 32-digit hex value.
Preparing your Axmol / Cocos project for content protection
The only thing you have to do in your app is to set the encryption key you've used for your sprite sheet in TexturePacker. You can do this by placing four calls within your app's startup sequence, before the first sprite sheet is loaded. To enhance security, consider distributing these calls across multiple files to make them more challenging to identify.
If your hexadecimal license key is aaaaaaaabbbbbbbbccccccccdddddddd,
you have to split it into 4 parts with 8 digits each:
aaaaaaaabbbbbbbbccccccccdddddddd
Each value is a 32-bit part of the entire 128-bit encryption key. It's quite hard to spot them inside the app since it's simply another value passed to a function.
If you're using Axmol or Cocos2d-x, you can set the key using the following function calls.
In files where you've included a framework header, ZipUtils should already be visible. If not,
you can manually include the header file base/ZipUtils.h.
ZipUtils::setPvrEncryptionKeyPart(0, 0xaaaaaaaa);
ZipUtils::setPvrEncryptionKeyPart(1, 0xbbbbbbbb);
ZipUtils::setPvrEncryptionKeyPart(2, 0xcccccccc);
ZipUtils::setPvrEncryptionKeyPart(3, 0xdddddddd);
For Cocos2D, use the following code:
#import "Support/ZipUtils.h"

// ...

caw_setkey_part(0, 0xaaaaaaaa);
caw_setkey_part(1, 0xbbbbbbbb);
caw_setkey_part(2, 0xcccccccc);
caw_setkey_part(3, 0xdddddddd);
If you had to change the file format, make sure to now load the .pvr.ccz file instead of whatever you used before. Also, add the new files to your project.
That's it!
Conclusion
Protecting your game assets from content thieves is easy. Setting up the Content Protection feature can be done in less than 5 minutes!