In this tutorial you are going to learn:
- How physics enabled games work in cocos2d-x
- How to create physics collision shapes for cocos2d-x
- How to load the shapes in your game
- How to set up a simple scene with dropping objects
What you are going to learn from this tutorial
In this tutorial you are going to learn:
-
How physics enabled games work in cocos2d-x
-
How to create physics collision shapes for cocos2d-x
-
How to load the shapes in your game
-
How to set up a simple scene with dropping objects
I assume that you already have basic knowledge about cocos2d-x. If not please check out our tutorial Using sprite sheet animations in cocos2d-x — it explains the basics setting up a simple game scene.
The complete source code for this tutorial is available on github.
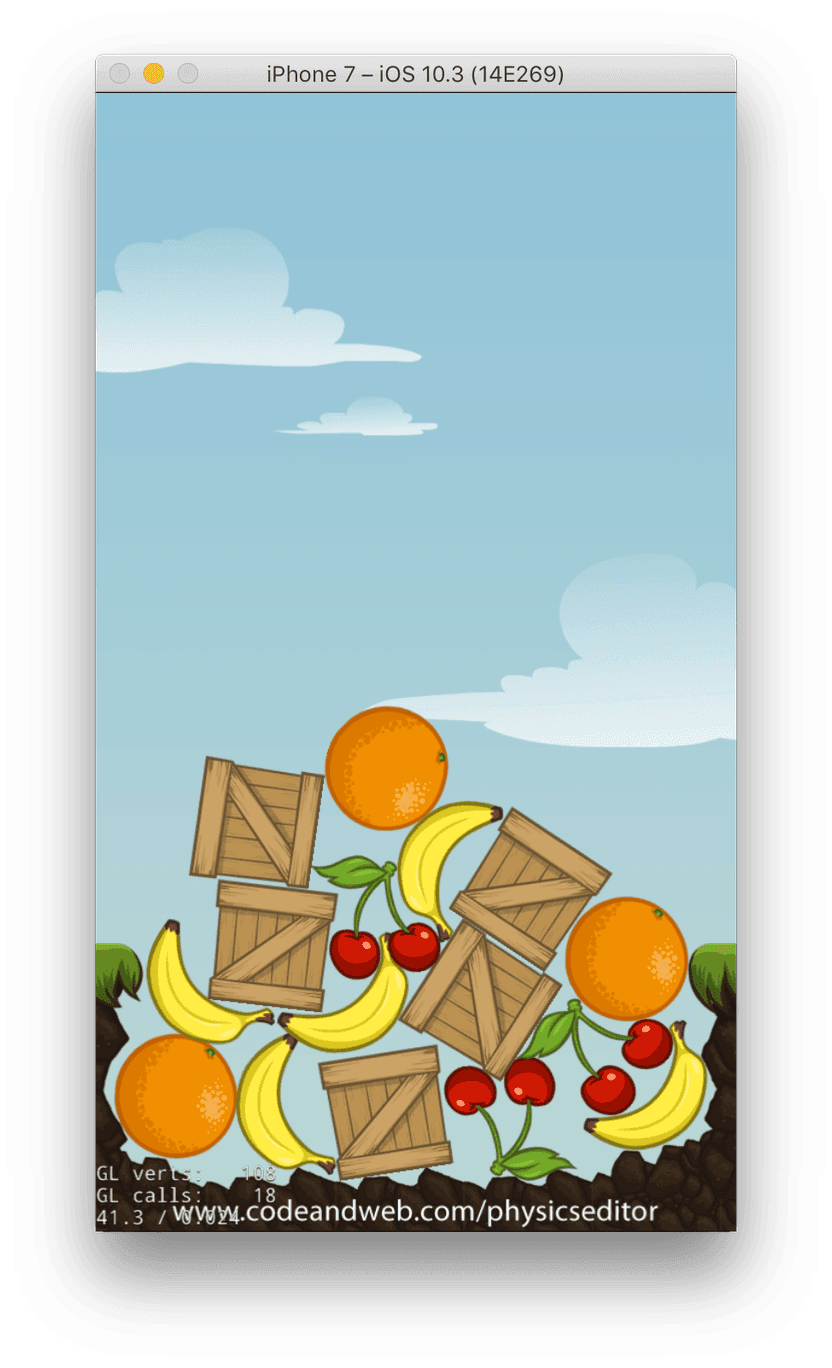
This screenshot shows you what the demo project from the tutorial looks like:
There's a bunch of different objects that you can drop on the scene by tapping / clicking in the game scene.
The objects fall down and nicely collide with other objects.
How do I enable the physics in cococs2d-x?
The nice thing about cocos2d-x is that it already comes with everything you need to create cool games. This includes a physics engine called Chipmunk.
So everything you need to get the engine running is to initialize it during scene creation:
auto scene = Scene::createWithPhysics();The next step is to set the gravity vector (if you want to enable gravity):
scene->getPhysicsWorld()->setGravity(Vec2(0, -900));You can also enable debug drawing during — which is quite helpful to see if your collision shapes are created as you expect them to be or if you expect some strange behaviour:
// optional: enable debug draw
scene->getPhysicsWorld()->setDebugDrawMask(0xffff);
With this setup your, are ready to add sprites to your scene:
auto sprite = Sprite::create("banana.png");
sprite->setPhysicsBody(body);
sprite->setPosition(pos);
addChild(sprite);
The important line of code is the sprite->setPhysicsBody(body) —
it converts your normal sprite into a shape controlled by the simulation.
But where to get the PhysicsBody body from?
cocos2d-x contains several constructors for PhysicsBody objects:
-
PhysicsBody::createCircle— which creates a circle shape with a given radius -
PhysicsBody::createBox— which creates a rectangle shape with a given size -
PhysicsBody::createPolygon— which creates collision polygon
Creating a circle or box is simple — but creating the collision shapes for a complex object is not. Especially since the polygon has to meet 2 conditions:
-
The vertices of the polygon have to be in clockwise winding.
-
The polygon must be convex.
This means that every convex polygon is ok. But concave polygons have to be split into multiple convex polygons:

Yes — you are right — this is a tedious job. I personally got fed up with it directly after creating my first object...
How to create collision shapes — the easy way
We've developed an application for you to simplify the whole work: It's called PhysicsEditor. The editor looks like this:
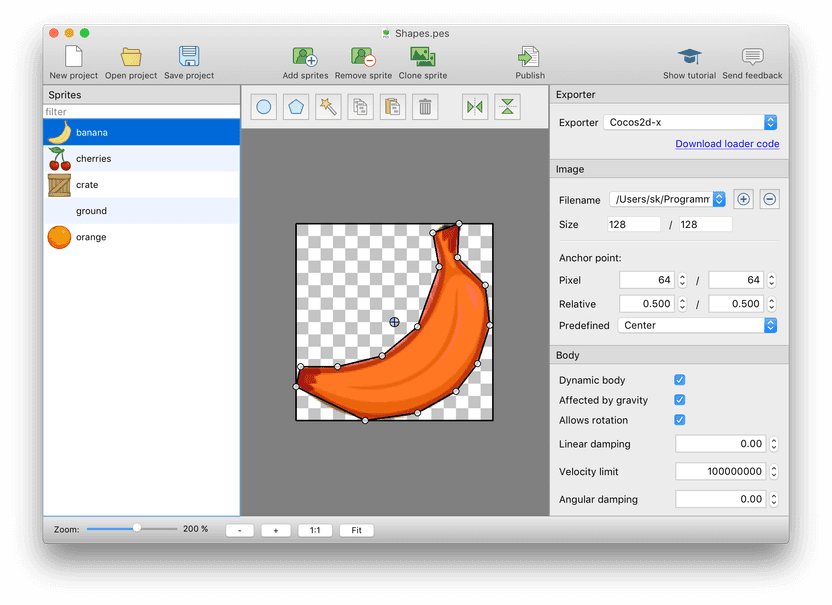
And you can download it from here — It's available for Windows, MacOS and Linux:
PhysicsEditor costs some bucks but believe me: You'll love it. Instead of creating the shapes manually it'll really help you speed up your development. It comes with a 7 days trial — long enough to get through this tutorial.
After installing PhysicsEditor you'll first have to choose the framework you want to develop with — which is of course cocos2d-x . Choose it from the Exporter settings in the top right panel.
Now drag & drop your sprites on the left panel.
Creating shapes manually
Let's create some shapes manually — before doing it all automatically. E.g. let's start with the crate.png from the demo project.
Click on the Polygon shape in the toolbar to create a triangle.
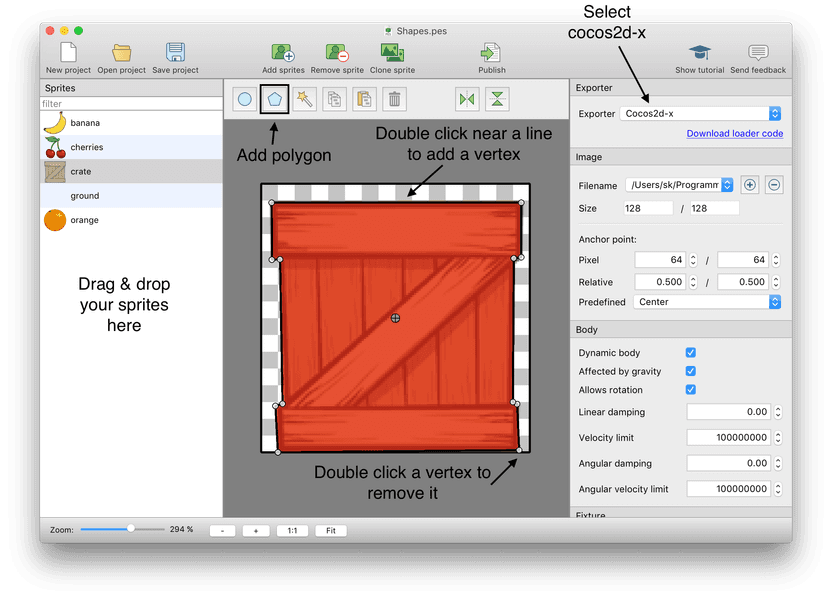
Basic editing:
- You can drag the whole shape or just the vertices with the left mouse button
- Double-click near a line to add a vertex
- Double-click a vertex to remove it
- CMD / CTRL click near a line to add a vertex
- CMD / CTRL click a vertex to remove it
- Use ALT + Mousewheel to zoom in / out.
- Hold Space and drag with the mouse to pan the view while zoomed in
You can also add multiple fixtures to a single body to build more complex objects. Use the Circle tool to add circles.
The small blue circle with the cross is the pivot / anchor point of your sprite. It's applied to the sprite and can be used for aligning and positioning the sprite in your game scene.
This is already a big improvement over creating the shapes by looking up coordinates in a graphics tool. But it gets even better....
Creating shapes automatically
The Shape tracer reduces your work even more:
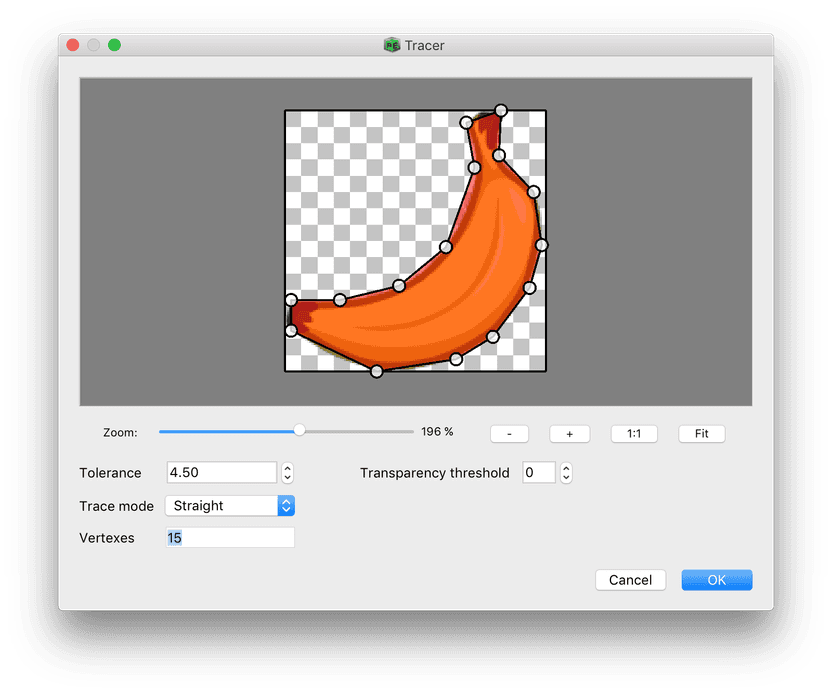
The most important setting here is the Tolerance . It allows you to control the shape creation.
It's now an act of balance: Find the best tolerance value that gives you a good shape coverage while keeping the vertex count low.
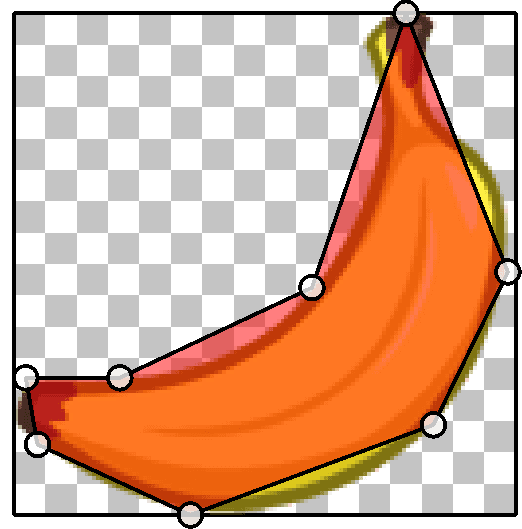
Not enough vertices, bad shape coverage.
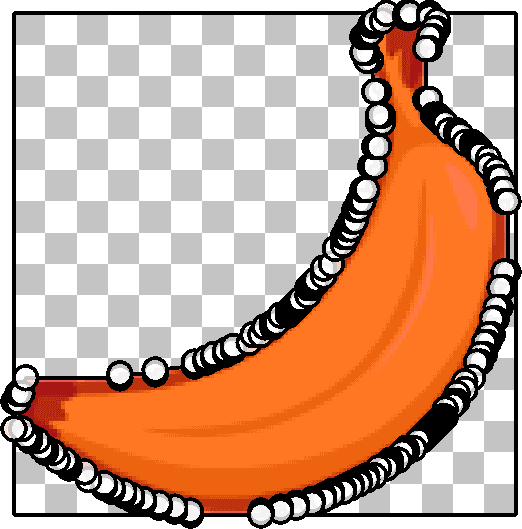
Good shape coverage, but way too many vertices.
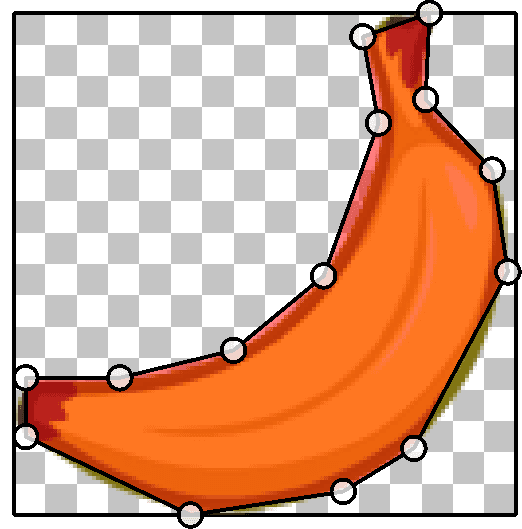
Good shape coverage, good amount of vertices.
Setting physics parameters
There are 2 levels of physics parameters: Body and fixture level. The body level parameters effect the whole body and all fixtures inside. The fixture level parameters only effect the fixture itself.
Body parameters
- Dynamic body
This flag is required if you want the shape to move. If this is ticked off the shape participates in collision detection but never moves. You can use this for e.g. floor, walls, obstacles. - Affected by gravity
The body is accelerated by the gravity in the game scene. - Allows rotation
The body can rotate. You usually want this enabled to get a realistic behaviour of objects. You might not want to enable it on your game character to keep his head up all the time. - Linear damping
Reduce the speed of a shape over time. - Velocity limit
Use this to set a maximum speed for the object. - Angular damping
Reduce rotation of an object over time. - Angular velocity limit
Sets the maximum rotation speed of a body
Fixture parameters
These parameters belong to only 1 part of the body.
- Density
Controls how heavy an object is: The higher the density value and the bigger the object the heavier it is. - Restitution
This is the bounciness of the fixture. Higher values let objects bounce off from others. - Friction
Reduce the sprite's speed if it glides over other objects. - Tag
The tag can be used to identify a specific fixture — e.g. a character's head or feet. - Collision group
Only bodies in the same group can collide with each other. You can use this to layer your game scene. - The bit masks
Each fixture has 3 bit masks which help filter what happens in case of collisions:- Category - defines what this fixture is
- Collision - defines what this object collides with — and creates a physical reaction
- Contact - defines which collisions report contact
This allows you to create fixtures for different purposes:
-
Object that collide with others — e.g. the fruit shapes from the demo project.
-
Object that collide and report collisions — e.g. a bullet hitting an enemy.
-
Sensors that don't collide but report contact with a certain type of other object. You can use this to trigger events if the hero passes a certain spot in a game scene. Or you can make the hero look up if something is dropping going to drop onto his head.
These parameters are all stored as part of the data file PhysicsEditor creates for you. The parameters are automatically applied as soon as you create an object.
Exporting and importing the physics data
If you finished editing the sprites press the Publish button in the top toolbar. This exports an xml file that you can load in your game. Make sure that the data file is written to your Resources folder and that you include it in your project.
Adding the loader
PhysicsEditor requires a loader to read the shapes at runtime. The loader code is open source and available from our loader repository. The example project already contains the loader for cocos2d-x.
The loader class is called PhysicsShapeCache and is implemented as a singleton to make
it easy to access the data from everywhere. You can access the loader instance using PhysicsShapeCache::getInstance() .
Use addShapesWithFile("filename") to load a shapes definition file.
You can also load multiple files at once. Just make sure that the sprites have different names.
To unload the shapes use removeShapesWithFile("filename") .
To get the PhysicsBody structure of a shape use createBodyWithName("name of the sprite") .
The convenience method setBodyOnSprite("name of the sprite", sprite)
directly sets the body on the given sprite.
A quick walk through the example project
Creating the scene, physics setup
The createScene method creates the physics world scene, and the
gravity vector.
Scene* HelloWorld::createScene()
{
    // create the scene with physics enabled
    auto scene = Scene::createWithPhysics();

    // set gravity
    scene->getPhysicsWorld()->setGravity(Vec2(0, -900));

    // optional: set debug draw
    // scene->getPhysicsWorld()->setDebugDrawMask(0xffff);

    auto layer = HelloWorld::create();
    scene->addChild(layer);

    return scene;
}
Initialising the game scene
This code block loads the physics shapes from the Shapes.plist created with PhysicsEditor.
It also adds a background image which has no physics properties, the ground sprite (static
physics object) and drops a banana. The spawnSprite("name") loads a sprite and
sets the physics shape.
Finally there's a touch listener setup to add new shapes when the screen is touched or the mouse is clicked in the scene.
bool HelloWorld::init()
{
    if ( !Layer::init() )
    {
        return false;
    }

    auto pos = Vec2(Director::getInstance()->getVisibleSize()) / 2 +
    Director::getInstance()->getVisibleOrigin();

    // Load shapes
    shapeCache = PhysicsShapeCache::getInstance();
    shapeCache->addShapesWithFile("Shapes.plist");

    // Load background image
    Sprite *background = Sprite::create("background.png");
    background->setPosition(pos);
    addChild(background);

    // Add ground sprite and drop a banana
    spawnSprite("ground.png", pos);
    spawnSprite("banana.png", pos);

    // Add touch listener
    auto listener = EventListenerTouchOneByOne::create();
    listener->onTouchBegan = CC_CALLBACK_2(HelloWorld::onTouchesBegan, this);
    _eventDispatcher->addEventListenerWithSceneGraphPriority(listener, this);

    return true;
}
Creating sprites with physics enabled
This code block creates a sprite and sets its physics body. It also adds the sprite to the scene.
void HelloWorld::spawnSprite(const std::string &name, Vec2 pos)
{
    // create a sprite with the given image name
    auto sprite = Sprite::create(name);

    // attach physics body
    shapeCache->setBodyOnSprite(name, sprite);

    // set position and add it to the scene
    sprite->setPosition(pos);
    addChild(sprite);
}
Adding random sprites
The onTouchesBegan() method spawns random objects at the
position where the touch was detected.
bool HelloWorld::onTouchesBegan(Touch *touch, Event *event)
{
    auto touchLoc = touch->getLocation();

    static int i = 0;
    static std::string sprites[] = { "banana.png", "cherries.png", "crate.png", "orange.png" };

    spawnSprite(sprites[i], touchLoc);
    i = (i + 1) % (sizeof(sprites)/sizeof(sprites[0]));

    return false;
}
Conclusion
Well — that's it for the start. You've now learned how easy it is to add physics shapes to your game.

