How to create a physics enabled game with Axmol Engine
In this tutorial you are going to learn:
- How physics enabled games work in Axmol Engine
- How to create physics collision shapes
- How to load the shapes in your game
- How to set up a simple scene with dropping objects
I assume that you already have basic knowledge about Axmol Engine or cocos2d-x. If not please check out our tutorial Using sprite sheet animations in Axmol Engine — it explains the basics setting up a simple game scene.
This screenshot shows you what the demo project from the tutorial looks like:
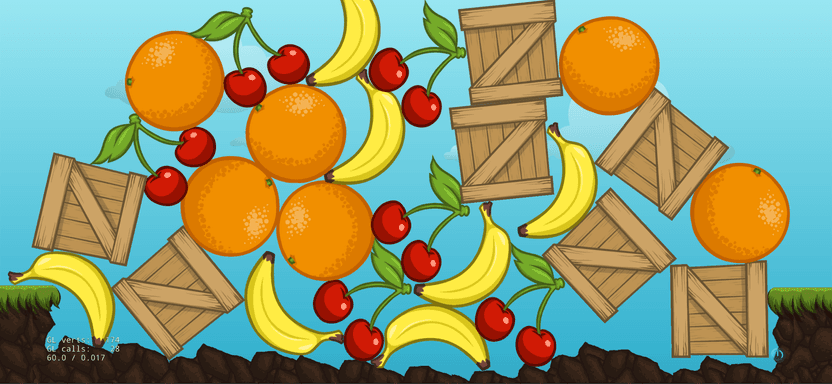
There's a bunch of different objects that you can drop on the scene by tapping / clicking in the game scene. The objects fall down and nicely collide with other objects.
Preparation
Install Axmol Engine
For the installation follow the instructions at the start of this tutorial: Using sprite sheet animations in Axmol Engine
Create an empty game
axmol new --package com.codeandweb.physicsdemo --language cpp PhysicsDemoThis creates a game setup called PhysicsDemo using c++ for development.
You can also download the full source code from here: axmol-physics-example
Build the project files for XCode / VisualStudio / Android
Change into the project folder using
cd PhysicsDemoTo build the project for iOS Simulator use
cmake . -B build-ios -GXcode -DCMAKE_TOOLCHAIN_FILE=$AX_ROOT/cmake/ios.toolchain.cmake -DPLATFORM=SIMULATOR64cmake -S . -B build -GXcode -DCMAKE_TOOLCHAIN_FILE=$AX_ROOT/cmake/ios.toolchain.cmake -DPLATFORM=OS64cmake -S . -B build -GXcode -DCMAKE_TOOLCHAIN_FILE=$AX_ROOT/cmake/ios.toolchain.cmake -DPLATFORM=TVOScmake -S . -B build -GXcode -DCMAKE_TOOLCHAIN_FILE=$AX_ROOT/cmake/ios.toolchain.cmake -DPLATFORM=SIMULATOR_TVOScmake -S . -B build -GXcode -DCMAKE_OSX_ARCHITECTURES=x86_64cmake -S . -B build -GXcode -DCMAKE_OSX_ARCHITECTURES=arm64cmake -S . -B build -G "Visual Studio 16 2019" -A Win32cmake -S . -B build -G "Visual Studio 16 2019" -A x64cmake -S . -B build -G "Visual Studio 17 2022" -A Win32cmake -S . -B build -G "Visual Studio 17 2022" -A x64See Axmol's description on how to build for Android.
Depending on your platform, you should see a directory build-... in your project folder.
It contains the project file for your dev environment - e.g. XCode or Visual Studio.
Open it and select the PhysicsDemo target for building and running.
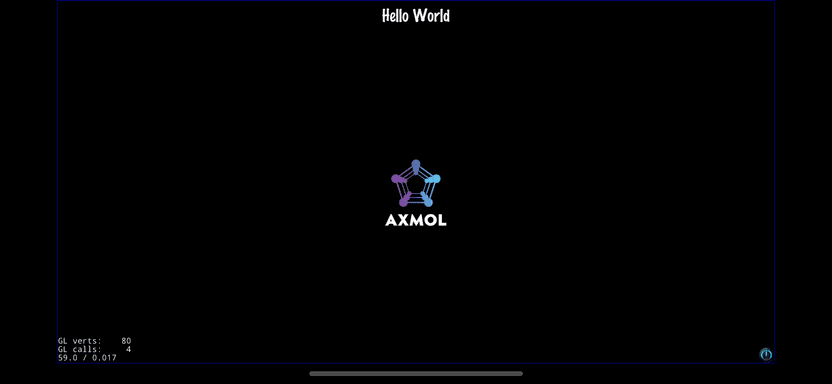
After some time, you should see the hello world application:
How do I enable the physics in Axmol Engine?
The nice thing about Axmol is that it already comes with everything you need to create cool games. This includes a physics engine called Chipmunk.
So everything you need to get the engine running is to initialize it during scene creation.
In the HelloWorldScene.cpp, remove the code after // 3. add your codes below... line and replace
it with the following:
    /////////////////////////////
    // 3. add your codes below...

    initPhysicsWorld();

    getPhysicsWorld()->setGravity(Vec2(0, -900));

    // optional: enable debug draw
    getPhysicsWorld()->setDebugDrawMask(0xffff);

     // scheduleUpdate() is required to ensure update(float) is called on every loop
    scheduleUpdate();

    return true;
}
initPhysicsWorld(); initialises the default physics engine in Axmol: Chipmunk.
The getPhysicsWorld() gives you access to the main object, here you can set
global parameters such as the gravity, add or remove shapes and a lot more.
The next step is to set the gravity vector (if you want to enable gravity) using setGravity().
The vector for our demo points straight down.
You can also enable debug drawing during — which is quite helpful to see if your collision shapes are created as you expect them to be or if you want to debug some strange behaviour.
With this setup you would be ready to add some sprites to the scene (don't add that code!):
auto sprite = Sprite::create("banana.png");
sprite->setPhysicsBody(body);
sprite->setPosition(pos);
addChild(sprite);
The important line of code is the sprite->setPhysicsBody(body) —
it converts your normal sprite into a shape controlled by the simulation.
But what is the body?
Axmol contains several constructors for PhysicsBody objects:
PhysicsBody::createCircle— which creates a circle shape with a given radiusPhysicsBody::createBox— which creates a rectangle shape with a given sizePhysicsBody::createPolygon— which creates collision polygon
Creating a circle or box is simple — but what game object consists only of circles and rectangles? Most shapes are polygon based - and these are not easy to create. Especially not since you have to meet 2 conditions:
- the vertices of the polygon have to be in clockwise winding
- the polygon must be convex
- the number of vertices in the polygon is limited
This means that every convex polygon is ok. Concave polygons have to be split into multiple convex polygons - and you have to join them in Axmol to create a compound shape:

Yes — you are right — this is a tedious job. I personally got fed up with it directly after creating my first object...
How to create collision shapes — the easy way
We've developed an application for you to simplify the whole work: It's called PhysicsEditor. The editor looks like this:
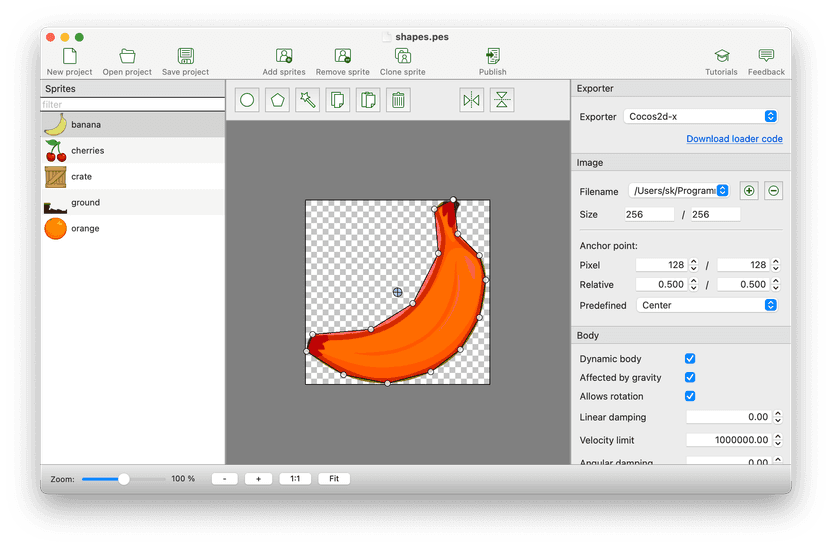
And you can download it from here:
PhysicsEditor runs on Windows, macOS and Linux. It costs some bucks but believe me: You'll love it. Instead of creating the shapes manually it'll really help you speed up your development. Especially since it handles all the hard parts of creating the shapes for you. It comes with a 7 days trial — long enough to get through this tutorial.
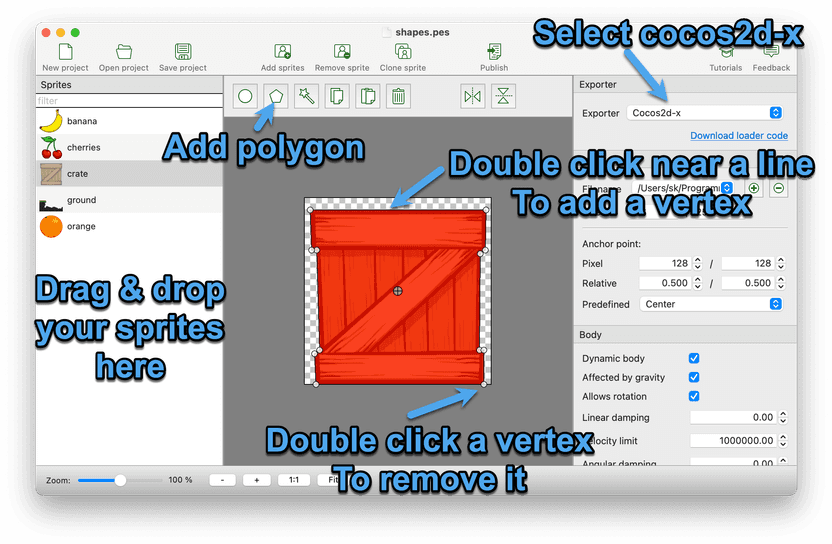
After installing PhysicsEditor you'll first have to choose the framework you want to develop with — which is of course cocos2d-x . Choose it from the Exporter settings in the top right panel.
Now drag & drop your sprites on the left panel.
Creating shapes manually
Let's create some shapes manually — before doing it all automatically. E.g. let's start with the crate.png from the demo project. You can find the sprites inside the Assets folder.
Click on the Polygon shape in the toolbar to create a triangle.
Basic editing:
- You can drag the whole shape or just the vertices with the left mouse button
- Double-click near a line to add a vertex
- Double-click a vertex to remove it
- CMD / CTRL click near a line to add a vertex
- CMD / CTRL click a vertex to remove it
- Use ALT + Mousewheel to zoom in / out.
- Hold Space and drag with the mouse to pan the view while zoomed in
You can also add multiple fixtures to a single body to build more complex objects. Use the Circle tool to add circles.
The small blue circle with the cross is the pivot / anchor point of your sprite. It's applied to the sprite and can be used for aligning and positioning the sprite in your game scene.
This is already a big improvement over creating the shapes by looking up coordinates in a graphics tool. But it gets even better....
Creating shapes automatically
The Shape tracer reduces your work even more:
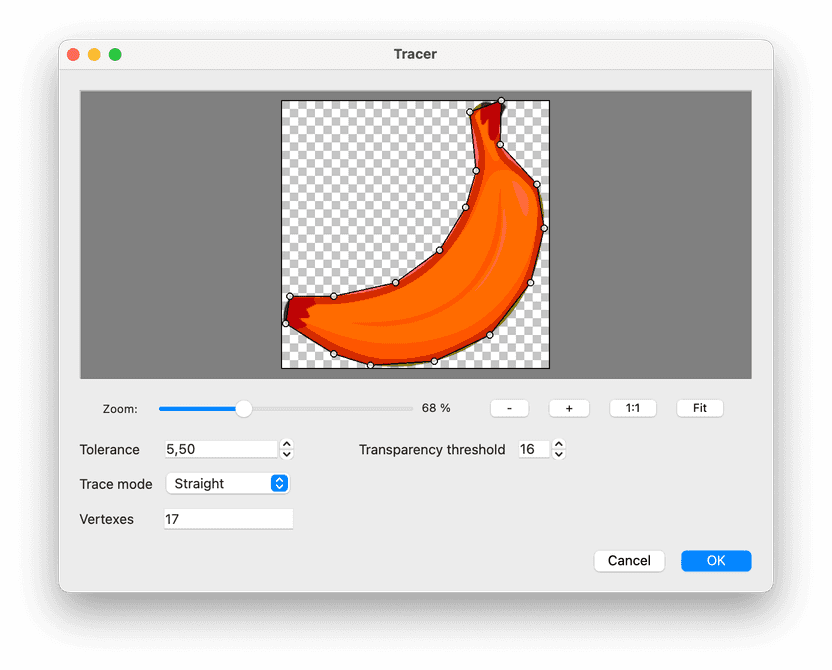
The most important setting here is the Tolerance . It allows you to control the shape creation.
It's now an act of balance: Find the best tolerance value that gives you a good shape coverage while keeping the vertex count low.
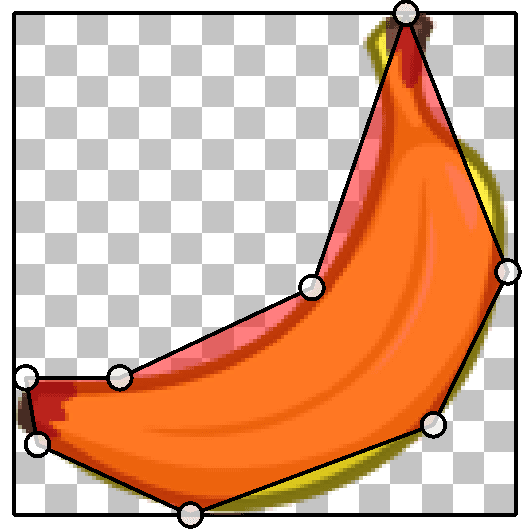
Not enough vertices, bad shape coverage.

Good shape coverage, but way too many vertices.

Good shape coverage, good amount of vertices.
The tracer does not always give you perfect shapes - but with the tools you learned in the previous chapter it's easy to adjust them to your needs.
Setting physics parameters
There are 2 levels of physics parameters: Body and fixture level. The body level parameters effect the whole body and all fixtures inside. The fixture level parameters only effect the fixture itself.
Body parameters
- Dynamic body
This flag is required if you want the shape to move. If this is ticked off the shape participates in collision detection but never moves. You can use this for e.g. floor, walls, obstacles. - Affected by gravity
The body is accelerated by the gravity in the game scene. - Allows rotation
The body can rotate. You usually want this enabled to get a realistic behaviour of objects. You might not want to enable it on your game character to keep his head up all the time. - Linear damping
Reduce the speed of a shape over time. - Velocity limit
Use this to set a maximum speed for the object. - Angular damping
Reduce rotation of an object over time. - Angular velocity limit
Sets the maximum rotation speed of a body
Fixture parameters
These parameters belong to only 1 part of the body.
- Density
Controls how heavy an object is: The higher the density value and the bigger the object the heavier it is. - Restitution
This is the bounciness of the fixture. Higher values let objects bounce off from others. - Friction
Reduce the sprite's speed if it glides over other objects. - Tag
The tag can be used to identify a specific fixture — e.g. a character's head or feet. - Collision group
Only bodies in the same group can collide with each other. You can use this to layer your game scene. - The bit masks
Each fixture has 3 bit masks which help filter what happens in case of collisions:- Category - defines what this fixture is
- Collision - defines what this object collides with — and creates a physical reaction
- Contact - defines which collisions report contact
This allows you to create fixtures for different purposes:
- Object that collide with others — e.g. the fruit shapes from the demo project.
- Object that collide and report collisions — e.g. a bullet hitting an enemy.
- Sensors that don't collide but report contact with a certain type of other object. You can use this to trigger events if the hero passes a certain spot in a game scene. Or you can make the hero look up if something is dropping going to drop onto his head.
These parameters are all stored as part of the data file PhysicsEditor creates for you. The parameters are automatically applied as soon as you create an object.
Parameters for your shapes
Create the shapes as described in this section:
background - no physics shapes required. It's just a background image that has no physics properties.
For the objects use the following methods to create the shapes:
- banana, crate, cherries - use the shape tracer
- orange - use a circle shape
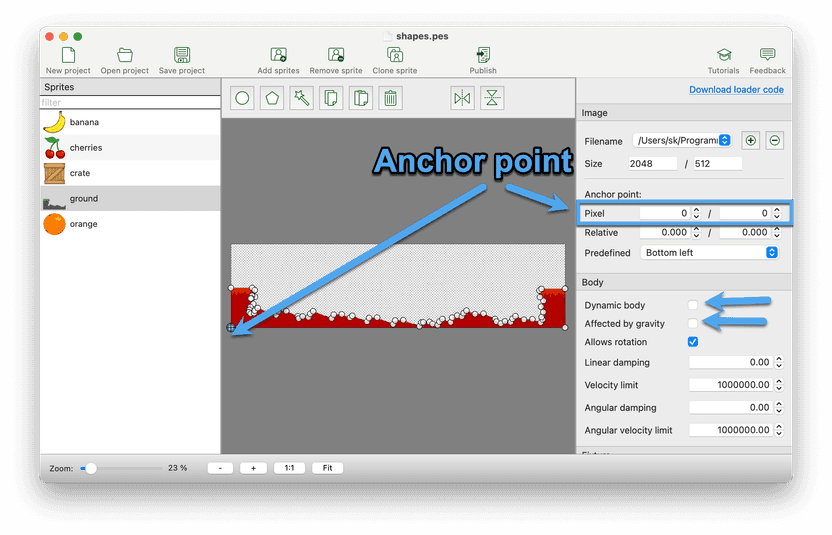
The ground is special. Use the tracer and remove the checkmarks before the following body parameters:
- Dynamic Body - off
- Affected by gravity - off
Setting these values for the ground makes it a static object that does not move, but other objects can bounce of or rest of it.
Exporting and importing the physics data
If you finished editing the sprites press the Publish button in the top toolbar. This exports an xml file that you can load in your game. Make sure that the data file is written as Resources/shapes.plist in your project folder.
After saving the file the first time, re-run the CMake command to deploy the file on the target system.
Adding the loader
PhysicsEditor requires a loader to read the shapes at runtime. The loader code is open source and available from our loader repository. The example project already contains the loader for the Axmol Engine.
The loader class is called PhysicsShapeCache and is implemented using the singleton pattern to make
it easy to access the data from everywhere in your project.
You can access the loader instance using PhysicsShapeCache::getInstance().
Use addShapesWithFile("filename") to load a shapes definition file.
You can also load multiple files - e.g. if your want to create separate files for sprite groups.
Just make sure that the sprites have different names.
To unload the shapes use removeShapesWithFile("filename").
To get the PhysicsBody structure of a shape use createBodyWithName("name of the sprite") .
The convenience method setBodyOnSprite("name of the sprite", sprite)
directly sets the body on the given sprite.
Don't forget to call cmake to add that file to your project.
App setup
Disable device specific scaling for this demo
For the simplicity of this demo, we only work with one resolution.
At the top of the AppDelegate.cpp set the designResolutionSize to the size of our background.png:
USING_NS_AX;

static ax::Size designResolutionSize = ax::Size(2048, 1152);

AppDelegate::AppDelegate() {}
later in the same file, make the following changes to the applicationDidFinishLaunching().
Remove the complete device scaling code:
bool AppDelegate::applicationDidFinishLaunching()
{
    ...

    // turn on display FPS
    director->setStatsDisplay(true);

    // set FPS. the default value is 1.0/60 if you don't call this
    director->setAnimationInterval(1.0f / 60);

    // Set the design resolution
    glView->setDesignResolutionSize(designResolutionSize.width, designResolutionSize.height,
                                    ResolutionPolicy::SHOW_ALL);

    auto frameSize = glView->getFrameSize();

    register_all_packages();

    ...
}
Initialise the scene
Open HelloWorldScene.cpp add the following line at the top:
#include "PhysicsShapeCache.h"We need the PhysicsShapeCache to load the shapes.
Next, change the code below the // 3. add your codes below... to this:
bool HelloWorld::init()
{
    ...

    /////////////////////////////
    // 3. add your codes below...

    initPhysicsWorld();

    getPhysicsWorld()->setGravity(Vec2(0, -900));

    // optional: enable debug draw
    // getPhysicsWorld()->setDebugDrawMask(0xffff);

    // Load the sprite sheet
    SpriteFrameCache::getInstance()->addSpriteFramesWithFile("spritesheet.plist");

    // Load shapes
    PhysicsShapeCache::getInstance()->addShapesWithFile("shapes.plist");

    // Add background image
    Sprite *background = Sprite::createWithSpriteFrameName("background.png");
    Vec2 pos = origin + visibleSize/2;
    background->setPosition(pos);
    addChild(background);

    // Set the ground
    spawnSprite("ground.png", origin);

    // and add a physics sprite
    spawnSprite("banana.png", Vec2(600,800));

    // scheduleUpdate() is required to ensure update(float) is called on every loop
    scheduleUpdate();

    return true;
}
The first lines in that block initialize the physics engine and set the gravity.
Debug draw is off for now - you can enable it by uncommenting the setDebugDrawMask() line.
Next, we load the sprite sheet with the background images, the objects and the ground. The project already contains the pre-built sprite sheet. If you want to learn how create sprite sheets, take a look at our tutorial Using sprite sheet animations in Axmol Engine.
Then we load the physics shapes from PhysicsEditor using the addShapesWithFile() method.
The following block adds a background image to the scene - it's centered in the view and has no physics functionality. It's just a plain sprite for decoration.
After that, we add the ground and the banana sprite.
What is missing is the spawnSprite() method. For this, add the following line to the HelloWorldScene.h
private:
    void spawnSprite(const std::string &name, const ax::Vec2 &pos);
add the implementation for this method to the HelloWorldScene.cpp
void HelloWorld::spawnSprite(const std::string &name, const Vec2 &pos)
{
    // create a sprite with the given image name
    auto sprite = Sprite::createWithSpriteFrameName(name);

    // attach physics body
    PhysicsShapeCache::getInstance()->setBodyOnSprite(name, sprite);

    // set position and add it to the scene
    sprite->setPosition(pos);
    addChild(sprite);
}
The first line create the sprite using a frame from the sprite sheet. The next command enables the physics body on the sprite and applies the shape parameters from PhysicsEditor.
The important part here is, that the name of the sprite in the sprite sheet and the name of the physics shape must be identical.
The last lines add the sprite to the scene and set the position.
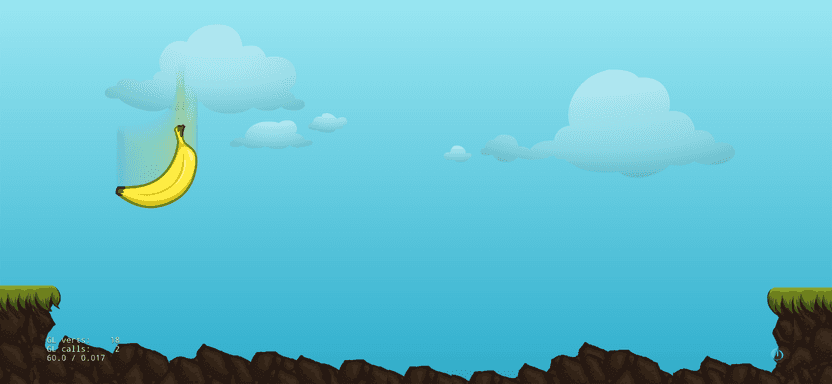
Running this code, you should see the scene with a dropping banana:
Let's make it a bit more interesting
Let's now create a touch listener so that you can spawn sprites with a tap or click.
For this, add the following code at the end of the init() method:
bool HelloWorld::init()
{
    ...

    // Add touch listener
    auto listener = EventListenerTouchOneByOne::create();
    listener->onTouchBegan = AX_CALLBACK_2(HelloWorld::onTouchesBegan, this);
    _eventDispatcher->addEventListenerWithSceneGraphPriority(listener, this);

    // scheduleUpdate() is required to ensure update(float) is called on every loop
    scheduleUpdate();

    return true;
}
Also add this new method:
bool HelloWorld::onTouchesBegan(Touch *touch, Event *event)
{
    auto touchLoc = touch->getLocation();

    static std::vector<std::string> sprites {"banana.png", "cherries.png", "crate.png", "orange.png"};

    int i = rand() % sprites.size();
    spawnSprite(sprites[i], touchLoc);

    return false;
}
It takes the touch location, selects a random sprite and spawns it.
Also add the following declaration to the HelloWorldScene.h:
private:
    void spawnSprite(const std::string &name, const ax::Vec2 &pos);
    bool onTouchesBegan(ax::Touch *touch, ax::Event *event);
Conclusion
Creating a physics enabled game with Axmol Engine and PhysicsEditor is really easy and fun.
