---
title: "How to create sprite sheets & animations for PixiJS 8"
description: "Free tutorial: Create optimized animations & sprite sheets for PixiJS 8, speed up startup of your app, reduce download size. Full demo source code included."
canonical: "https://www.codeandweb.com/texturepacker/tutorials/how-to-create-sprite-sheets-and-animations-with-pixijs"
date: "2026-08-24T00:00:00.000Z"
modified: "2026-08-24T00:00:00.000Z"
source: "html"
---
# How to create sprite sheets & animations for PixiJS 8
Andreas Löw, Joachim Grill
Last updated: August 24, 2026
[texturepacker](https://www.codeandweb.com/texturepacker/tutorials.md), [tutorial](https://www.codeandweb.com/tags/tutorial), [pixijs](https://www.codeandweb.com/tutorials/pixijs.md), [sprite-sheets](https://www.codeandweb.com/tags/sprite-sheets), [animation](https://www.codeandweb.com/tags/animation)
[GitHub](https://github.com/CodeAndWeb/pixijs-sprite-sheet-example)
## Who is this tutorial for?
This tutorial is for anyone interested in using PixiJS with sprite sheets. It covers the basics of adding sprites and animations to a scene, as well as advanced techniques like setting pivot points, packing sprite sheets, and optimizing loading times.
This tutorial uses **PixiJS 8**. If you are still using an older version, see: [How to create sprite sheets and animations for PixiJS 7.x](https://www.codeandweb.com/texturepacker/tutorials/how-to-create-sprite-sheets-and-animations-with-pixijs7)
This is the scene you are going to create in this tutorial:
We also offer you the full source code for this tutorial on [GitHub](https://github.com/CodeAndWeb/pixijs-sprite-sheet-example).
## Creating a simple PixiJS game scene
### Setting up the project
We use [Vite](https://vite.dev/) as a development server and bundler — it gives you instant hot-reload during development and optimized builds for production.
Make sure you have **Node.js** installed. Create a new project folder, open a terminal in it, and run:
```bash
npm init -y
npm install pixi.js
npm install --save-dev vite
```
Open the generated **package.json** and replace the `scripts` section with:
```json
"scripts": {
"dev": "vite",
"build": "vite build",
"preview": "vite preview"
},
```
Vite serves every file inside a `public/` folder at the root URL `/`.
### Downloading the assets
Download the sprites and background images from here: [assets.zip](https://www.codeandweb.com/assets/texturepacker/how-to-create-sprite-sheets-and-animations-with-pixijs/assets.zip). You can use these assets for learning purposes. Please don't publish them in your own blog, tutorial or use them in a game or app without my written consent.
Extract the archive into an **assets** subfolder in your project directory. It contains the graphics you see in the demo above.
* Move **assets/scene/background.png** into the **public** folder. We want to load this image directly, without packing it on a sprite sheet.
* Keep the other assets where they are, we will add them to a sprite sheet later.
After this step, your project folder should look like this:
```
my-project/
├── package.json
├── assets/
│ ├── scene/
│ │ └── middleground.png
│ └── sprites/
│ ├── button.png
│ └── character/
│ └── walk_01.png ... walk_08.png
└── public/
└── background.png
```
### Getting started with a simple scene
Start by creating an **index.html** file in the project root with this content:
index.html
```html
PixiJS Sprite Sheet Demo
```
Create your game file: _pixijs-spritesheet-example.js_ in the same folder:
pixijs-spritesheet-example.js
```js
import { Application, Assets, Sprite, Texture, AnimatedSprite, NineSliceSprite } from 'pixi.js';
(async () => {
// Create a PixiJS application
const app = new Application();
await app.init({
width: 960, height: 540,
resolution: window.devicePixelRatio,
autoDensity: true,
});
// add the canvas that Pixi created for you to the DOM
document.body.appendChild(app.canvas);
// load the assets
await Assets.load([ "background.png" ]);
// initialize background image
const background = Sprite.from("background.png");
app.stage.addChild(background);
// scale stage container to match the background size
app.stage.scale.x = app.screen.width / background.width;
app.stage.scale.y = app.screen.height / background.height;
})();
```
Let's take a look at this code:
The first lines initialize the PixiJS application with a logical size of 960 × 540. The `resolution` option makes PixiJS render at the display's physical pixel density — without it, the scene looks blurry on high-DPI screens. `autoDensity` keeps the canvas at its logical CSS size of 960 × 540 on the page. The canvas is then added to the DOM.
PixiJS 8 selects the renderer automatically: it uses **WebGPU** where the browser supports it and falls back to WebGL otherwise — you don't have to configure anything.
The next lines load the **background.png** image, `Sprite.from("background.png")` creates a sprite from that resource, the next line adds it to the stage.
The images I included are high-resolution — the background is much larger than the 960 × 540 scene. The last two lines scale the stage down so that the background exactly fills the canvas, and all other sprites shrink with it. I'll show you how to serve smaller versions of the images to match different device resolutions [later](#scaling-variants).
### Testing the scene in your browser
Start the Vite development server by running:
```bash
npm run dev
```
Now open http://localhost:5173 in your browser. Vite automatically reloads when you edit files. You should see the background of the game scene:

## Creating a sprite sheet
To create the sprite sheets, we use [TexturePacker](https://www.codeandweb.com/texturepacker.md), a robust desktop application, for creating sprite sheets and optimizing images for game development. Since its initial release in 2010, TexturePacker has been continually updated with new features and bug fixes, making it a reliable and efficient tool for game developers.
Please download TexturePacker from here:
[Download TexturePacker 8.3.0](https://www.codeandweb.com/texturepacker/download/8.3.0/win)
for Windows
[Also available for macOS and Linux](https://www.codeandweb.com/texturepacker/download.md)
After installation, activate the trial by clicking on **Try TexturePacker Pro**. You can now use all features of TexturePacker for the next 7 days. After that, you can still use TexturePacker for free, but only with a reduced set of features.
In the main screen:
1. Choose **PixiJS** from the center screen
2. Drop the **assets/sprites** and **assets/scene** folders onto the left panel
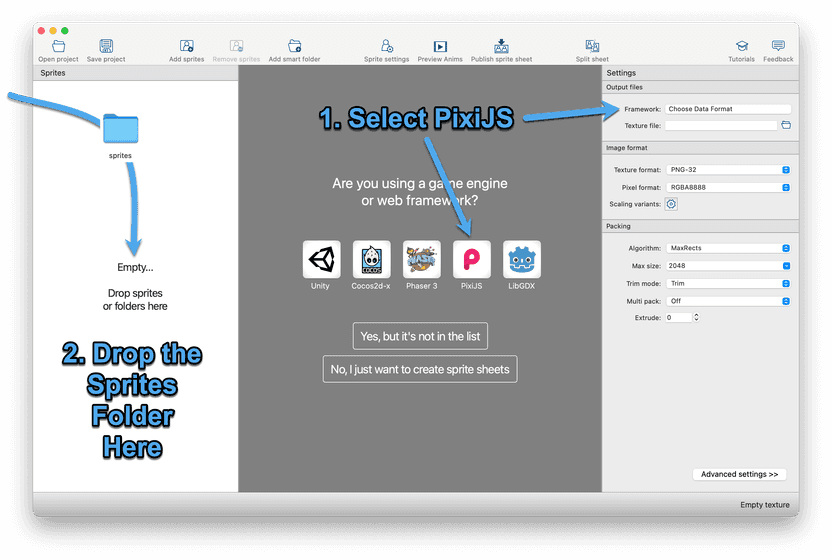
Select PixiJS and drop the sprites folder onto TexturePacker
In case you dropped the sprites first, or you already used TexturePacker for a project, click on **Framework** and select PixiJS from the dialog that opens here.
If a folder is added to TexturePacker, it collects all sprites in that folder recursively, the sub-folder names are prepended to the sprite names. In our example the sprites will be accessible using names like **character/walk\_01.png**, **character/walk\_02.png**, and so on.
> **Note:** The main folder name (**sprites**) is omitted by default - if you want to include it as part of the sprite name use **Prepend folder name** from the **Advanced settings**. You can also remove the **.png** extension from the sprite names by enabling **Trim sprite names**, also in the **Advanced Settings**.
Create a new folder called **public/spritesheets** in the project directory. In TexturePacker, click on the folder icon next to **Data file** and navigate to the **spritesheets** folder. Name the data file **character.json**.
Finally, press **Publish sprite sheet** to write the sprite sheet to your project folder.
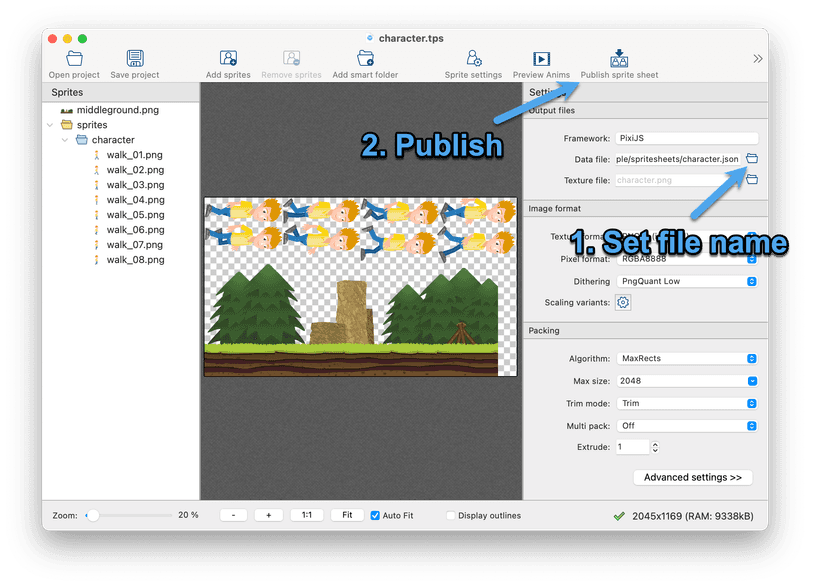
Set the file name and press publish sprite sheet
This automatically creates 2 files:
* **character.png** - the sprite sheet image
* **character.json** - the sprite sheet data file that contains the positions and names of your sprites
### Optimizing your sprite sheets for faster loading
The resulting **character.png** is now about 700kb in size. But we can do better. TexturePacker can dramatically reduce the file size of your sprite sheets, making game loading faster.
All you need to do is change the **Texture format** from **PNG-32** to **PNG-8 (indexed)** and press **Publish sprite sheet** again. The result is a sprite sheet that looks almost identical but is now only 194kb.
That's less than 1/3 of the original sprite sheet size — and it works right out of the box by simply changing a setting in TexturePacker. If you want to learn more, read [A Beginner's Guide To PNG Optimization](https://www.codeandweb.com/texturepacker/tutorials/beginners-guide-to-lossless-and-lossy-png-optimization.md).
## Loading the sprite sheet in your game
Back to your **pixijs-spritesheet-example.js**. Add the **spritesheets/character.json** to the list of assets to load:
pixijs-spritesheet-example.js
```js
await Assets.load([
"spritesheets/character.json",
"background.png"
]);
```
## Adding a sprite to your scene
Adding the sprite from the sprite sheet looks identical to adding the background image:
pixijs-spritesheet-example.js
```js
// add the middle ground from the sprite sheet
const middleground = Sprite.from("middleground.png");
app.stage.addChild(middleground);
```
The background and middle ground images are perfectly aligned because the middle ground contains transparency at the top.
But is adding transparency a bad thing? Doesn't it waste RAM and hurt performance? Usually it would — that's right. But thanks to TexturePacker, that's not the case. When you add an image with transparency to a sprite sheet, the transparency is removed — this feature is called **trim**. PixiJS is smart enough to compensate for that. When working with the sprite, it's like working with the original image.
## Adding and playing animations
TexturePacker detects animations in your sprites and creates lists of all frames. This makes creating animations in PixiJS very simple.
This works with files named **01.png**, **02.png**, ... but also for files ending with a `_` or `-` and a number. For example, **character/walk-01.png**, **character/walk-02.png** will also be detected.
The animations are named the same as the sprites, but without the numbers and the .png. In our case: **character/walk**.
First, get the `Spritesheet` object that was created while loading the assets. It contains a ready-to-use array of textures for each animation TexturePacker detected:
pixijs-spritesheet-example.js
```js
// get the sprite sheet, it contains the animations detected by TexturePacker
const sheet = Assets.get("spritesheets/character.json");
```
Now create a new `AnimatedSprite` from the animation's textures. Configure the main parameters for it: The position and the speed. Finally, start playing the animation by calling `play()` and add it to the stage:
pixijs-spritesheet-example.js
```js
// create an animated sprite
const character = new AnimatedSprite(sheet.animations["character/walk"]);
// configure + start animation:
character.animationSpeed = 1 / 6; // 6 fps
character.position.set(150, background.height - 780); // almost bottom-left corner of the canvas
character.play();
// add it to the stage and render!
app.stage.addChild(character);
```
Go back to your browser and refresh the scene. You should see the character doing a moon-walk in place.
Add these lines to make him walk from left to right:
pixijs-spritesheet-example.js
```js
// move the character to the right, restart on the left
app.ticker.add(ticker => {
const speed = 6;
character.x = (character.x + speed * ticker.deltaTime) % (background.width + 200);
});
```
This function is called at regular intervals. We use it to update the `x` position of the sprite. The function gets a `Ticker` object passed. It has a property called `deltaTime`, which is the time passed since the last call of the function. We use this to calculate the distance to move the character by multiplying the value with the speed.
This makes the character move at the same speed on all devices — regardless of the frame rate. If you do not use `deltaTime` for that calculation, the character may walk faster or slower on different devices.
The final trick is the `%` which is a modulo division that makes the character appear on the left side after it disappears on the right (`x` greater or equal to `background.width + 200`). The extra 200 pixels ensure that the character has completely left the scene on the right before it re-enters on the left.
## Setting anchor points for your PixiJS sprites
The anchor point is the point around which the sprite rotates and scales, and it also determines the position of the sprite when it is placed on the `x` and `y` coordinates. Essentially, the anchor point acts as the center of the sprite and is used to control its orientation and movement in the game.
To show you what I mean, please update the ticker function to the following and refresh your browser:
```
app.ticker.add(ticker => {
const speed = 6;
character.x = 500;
character.rotation += ticker.deltaTime/100;
});
```
At first glance, the sprite may appear to rotate around a point that seems disconnected from the sprite itself. This is because the default anchor point is set to the coordinate `(0,0)`, and there are large areas of transparency within the sprite's frame.
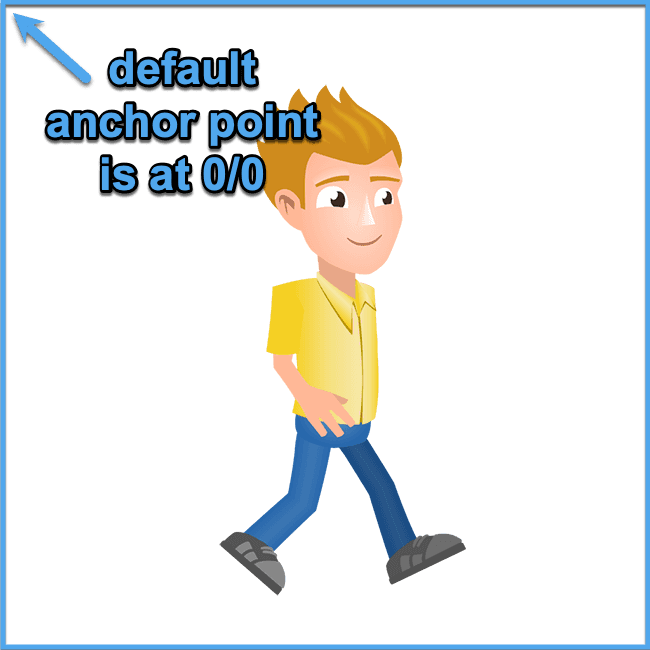
The default anchor point is at 0/0
To overcome this issue, adjust the anchor point to a suitable location within the sprite. This can be done in TexturePacker and will ensure that the sprite rotates and scales correctly in PixiJS.
To do so, click on **Sprite settings** in TexturePacker's toolbar and select all character sprites in the left panel. Click **Fit** to see all sprites at once in the center view.
Select all sprites in the center view by pressing the mouse button at the top left of the first sprite and dragging to the bottom right of the last sprite.
The circle in the sprite frames is the **anchor point** - which are called **pivot points** in TexturePacker. Move these to the bottom center of the sprite:
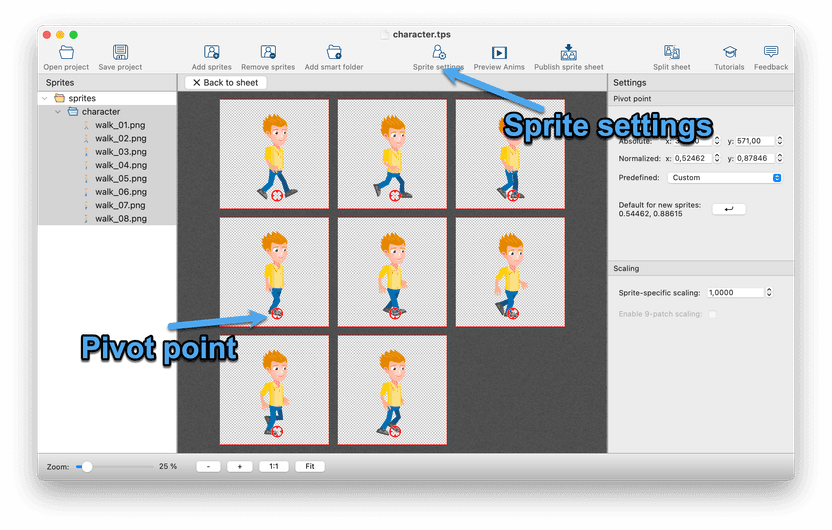
The pivot point / anchor point editor in TexturePacker
Press **Publish sprite sheet** to export the updated pivot points and reload the scene in your browser. You should now see the character rotating around this point.
Change the code to this to make him walk again:
pixijs-spritesheet-example.js
```js
// configure + start animation:
character.animationSpeed = 1 / 6; // 6 fps
character.position.set(150, background.height - 180); // almost bottom-left corner of the canvas
character.play();
// Enable this to update the anchor points with each animation frame
character.updateAnchor = true;
// add it to the stage and render!
app.stage.addChild(character);
app.ticker.add(ticker => {
const speed = 6;
character.x = (character.x + speed * ticker.deltaTime) % (background.width + 200);
});
```
TexturePacker allows you to set individual anchor points for each frame of the animation. In PixiJS, this isn't enabled by default. To update the anchor point for each sprite frame, set the `updateAnchor` property on the `AnimatedSprite` to `true`.
## Using 9-slice / 9-scale sprites in PixiJS
PixiJS provides support for 9-slice scaling, a technique designed to enhance image scalability. If you're unfamiliar with the concept: It divides an image into nine segments — four corners, four edges, and the center. When scaling, only the center and edges adjust in size, leaving the corners unchanged. This ensures that elements like buttons or panels retain their original visual appeal even when scaled across various aspect ratios.
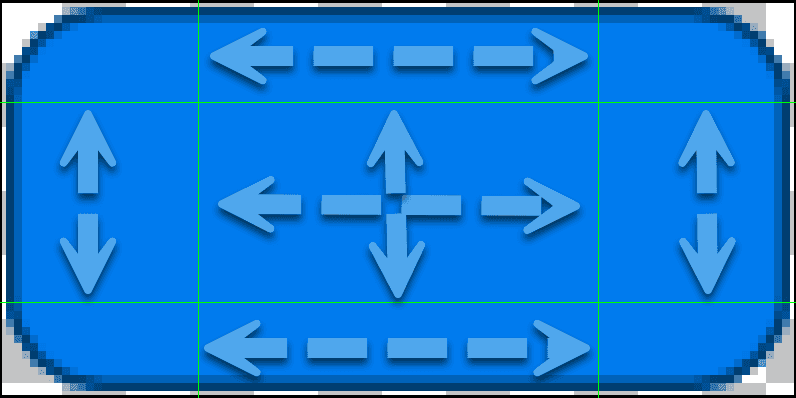
In TexturePacker, click **Sprite Settings** in the toolbar and select the button sprite. In the right panel, activate the checkbox **Enable 9-patch scaling**.
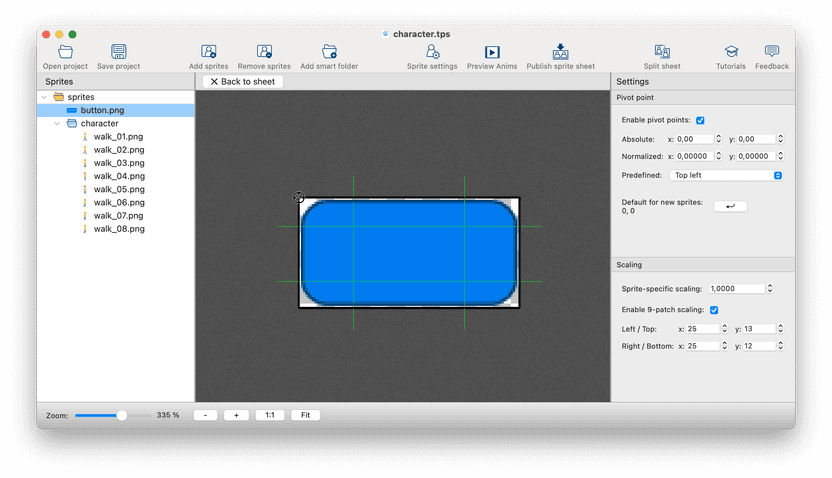
Using TexturePacker's 9 slice editor with PixiJS
You can drag the green lines to match the scaling and non-scaling parts of your sprite. Finally, publish the sprite sheet.
Adding the sprite is straightforward:
pixijs-spritesheet-example.js
```js
const sprite9a = new NineSliceSprite(Texture.from("button.png"));
sprite9a.position.set(10,10);
sprite9a.width = 200;
sprite9a.height = 200;
app.stage.addChild(sprite9a);
```
Change the width and height to whatever you need — the border of the button image stays crisp and is not blurred when the sprite is resized.
## Using MultiPack with PixiJS
MultiPack is a feature of TexturePacker that allows you to pack many sprites at once. It automatically adds new sprite sheets if there isn't enough space. This makes handling many sprites much easier.
### Enabling MultiPack in TexturePacker
To enable the feature, you have to use TexturePacker 7.0.2 or newer because older versions are not fully compatible.
To enable MultiPack, you have 2 choices:
* `Auto` - if you use this variant, TexturePacker does the whole work for you.
* `Manual` - you have to add sprite-sheets manually and can then assign folders or sprites to a sheet. This is great — e.g. if you have multiple levels that don't share sprites. To assign the sprites, use the tree view on the left. The limitation is that you can't move sprites inside a smart folder. You can only move the smart folder itself.
TexturePacker requires a name extension for the base name of the sprite sheet. `{n}` now has to be part of the file name and is either replaced with the sheet number (auto multipack) or the sheet name (manual multipack). For example, you can name your files `sheet-{n}.png` and `sheet-{n}.json`, which creates sheet-0.png, sheet-1.png, or sheet-level1.png, sheet-level2.png, etc.
Make sure that all your sprite names are unique - using the same name is not possible.
### Using MultiPack in PixiJS
In PixiJS it's now sufficient to only load the first sprite sheet — it returns the `Spritesheet` object, and the other sheets of the set are loaded automatically:
pixijs-spritesheet-example.js
```js
const sheet = await Assets.load("spritesheets/sheet-0.json");
```
> **Danger:** Make sure to only load the **first sprite sheet** of your multipack set. If you load more than one sheet from the same set, PixiJS deadlocks and does not complete the loading process.
TexturePacker stores all animation information in the first JSON file of the multipack set — no matter on which sprite sheet the images are located.
Unlike in the single-sheet case, you can't use `sheet.animations` here — it only contains the textures located on the first sheet (see the restrictions below). Instead, read the animation frame names from the sheet's raw JSON data — note the extra `.data` in the highlighted line:
pixijs-spritesheet-example.js
```js
// get all animations of the multipack set (stored in the first data file)
const animations = sheet.data.animations;
```
To create the animation, use `AnimatedSprite.fromFrames()` — it resolves the frame names across all sheets of the set:
pixijs-spritesheet-example.js
```js
// create an animated sprite
const character = AnimatedSprite.fromFrames(animations["character/walk"]);
```
### Restrictions in PixiJS
PixiJS works with multipack — but there are some calls that won't work.
When you create a `Sprite`, **always** use the static method `Sprite.from()`:
pixijs-spritesheet-example.js
```js
// this works 👍
const sprite = Sprite.from("image.png");
// this does not work 👎
const sprite = new Sprite(sheet.textures["image.png"]);
```
There are also restrictions for the `NineSliceSprite`. You have to use `Texture.from()` to get the texture to pass into the constructor. Accessing the textures on the sheet directly might lead to `null` in case the sprite is not located on the first sheet of the multipack set.
pixijs-spritesheet-example.js
```js
// this works 👍
const sprite9 = new NineSliceSprite(Texture.from("button.png"));
// this does not work 👎
const sprite9 = new NineSliceSprite(sheet.textures["button.png"]);
```
And for the `AnimatedSprite`, you have to go through `sheet.data.animations[]` to get the frame names. `sheet.animations[]` is `null` for all frames that are not located on that sheet.
pixijs-spritesheet-example.js
```js
// this works 👍
const anim = AnimatedSprite.fromFrames(sheet.data.animations["character/walk"]);
// this does not work 👎
const anim = new AnimatedSprite(sheet.animations["character/walk"]);
```
## Supporting multiple device resolutions
Remember the high-resolution images we scaled down to fit the stage at the beginning? Serving the full-size sprite sheet to a device with a low-resolution display wastes bandwidth and memory. TexturePacker and PixiJS solve this together: TexturePacker publishes the same sprite sheet in multiple sizes, and PixiJS picks the best one for the device.
### Creating scaling variants in TexturePacker
Press the **cog wheel button** next to **Scaling variants** in TexturePacker's settings panel and add two variants — the full-resolution sheet gets the common `@2x` suffix, the downscaled one no suffix at all:
| Variant name | Scale |
| --- | --- |
| `@2x` | 1 |
| _(leave empty)_ | 0.5 |
Add the `{v}` placeholder to the data file name — e.g. `character{v}.json`. During publish it is replaced with the variant name, creating **[character@2x.json](mailto:character@2x.json)** / **character.json** and the matching **.png** files. TexturePacker writes the scale factor into the data file's `meta.scale` field — PixiJS uses it to render all variants at the same logical size, so your positioning code stays untouched.
### Selecting the resolution in PixiJS
Select the sheet matching the display and load it under an alias. Replace the `"spritesheets/character.json"` entry in your `Assets.load()` call with:
pixijs-spritesheet-example.js
```js
await Assets.load({
alias: "character",
src: window.devicePixelRatio >= 2
? "spritesheets/character@2x.json"
: "spritesheets/character.json",
});
```
High-DPI displays load the full-resolution sheet, while standard displays only download the quarter-size (0.5 × 0.5) variant — our artwork is twice the size it appears on screen, so nothing is lost there.
The `alias` gives the sheet a stable name regardless of which file was loaded. This requires one last change: the asset is now cached under its alias, so the URL-based sheet lookup from the animations section would come up empty. Use the alias instead:
pixijs-spritesheet-example.js
```js
const sheet = Assets.get("character");
```
## Using texture compression
Texture compression reduces the amount of GPU memory a texture occupies and can speed up rendering. Unlike PNG or JPEG, which are decompressed into raw pixels before they reach the GPU, compressed textures stay compressed in video memory. This means lower memory usage and faster texture uploads.
For a full overview of all formats supported by TexturePacker, see [Texture compression](https://www.codeandweb.com/texturepacker/documentation/texture-compression.md).
### Using Basis Universal
PixiJS supports **Basis Universal** compressed textures. Basis Universal is a "supercompressed" GPU texture format that can be transcoded to whatever format the device supports at runtime.
You can use Basis Universal in two ways, TexturePacker can export both variants:
* as a standalone **.basis** file
* as Basis data inside a **.ktx2** container
Basis Universal offers two encoding modes with different quality/size trade-offs:
| Encoding | Bits per pixel | Quality | Best for |
| --- | --- | --- | --- |
| ETC1S | 0.3 - 1.25 | Good | Smaller download size, lower quality |
| UASTC | 4 - 8 | Excellent | Higher quality, larger files |
**ETC1S** gives the best compression ratio and is a good default for most game assets. **UASTC** provides near-lossless quality at the cost of larger file sizes and is better suited for assets where visual fidelity is critical.
PixiJS does not include compressed texture support by default. Enable the loaders you need by importing them at the top of your file, before the first `Assets.load()` call:
pixijs-spritesheet-example.js
```js
import 'pixi.js/ktx2';
import 'pixi.js/basis';
```
### Formats not supported by PixiJS
KTX is an outdated container format, please use KTX2 instead. KTX2 files with DXT/ETC/ASTC encoded data are not supported, use Basis Universal instead.
## Structured data
```json
{
"@context": "https://schema.org",
"@type": "TechArticle",
"headline": "How to create sprite sheets & animations for PixiJS 8",
"author": [
{
"@type": "Person",
"name": "Andreas Löw"
},
{
"@type": "Person",
"name": "Joachim Grill"
}
],
"dateModified": "2026-08-24T00:00:00.000Z",
"image": "/static/24388430288d6b75a0b6a9b12de42db1/a6312/how-to-create-sprite-sheets-for-pixijs.png"
}
```
```json
{
"@context": "https://schema.org",
"@type": "HowTo",
"name": "How to create and use sprite sheets with PixiJS",
"image": {
"@type": "ImageObject",
"url": "https://www.codeandweb.com/static/24388430288d6b75a0b6a9b12de42db1/f3583/how-to-create-sprite-sheets-for-pixijs.png",
"height": "600 px",
"width": "1200 px"
},
"step": [
{
"@type": "HowToStep",
"url": "https://www.codeandweb.com/texturepacker/tutorials/how-to-create-sprite-sheets-and-animations-with-pixijs#create-game-scene",
"text": "Creating a PixiJS game scene"
},
{
"@type": "HowToStep",
"url": "https://www.codeandweb.com/texturepacker/tutorials/how-to-create-sprite-sheets-and-animations-with-pixijs#create-sprite-sheet",
"text": "Creating a sprite sheet"
},
{
"@type": "HowToStep",
"url": "https://www.codeandweb.com/texturepacker/tutorials/how-to-create-sprite-sheets-and-animations-with-pixijs#optimize-sprite-sheet",
"text": "Optimizing the sprite sheet for faster load times"
},
{
"@type": "HowToStep",
"url": "https://www.codeandweb.com/texturepacker/tutorials/how-to-create-sprite-sheets-and-animations-with-pixijs#add-sprite-to-scene",
"text": "Adding a sprite to the scene"
},
{
"@type": "HowToStep",
"url": "https://www.codeandweb.com/texturepacker/tutorials/how-to-create-sprite-sheets-and-animations-with-pixijs#adding-and-playing-animations",
"text": "Playing the animation in PixiJS"
},
{
"@type": "HowToStep",
"url": "https://www.codeandweb.com/texturepacker/tutorials/how-to-create-sprite-sheets-and-animations-with-pixijs#set-pivot-points",
"text": "Setting pivot points for your PixiJS sprites"
},
{
"@type": "HowToStep",
"url": "https://www.codeandweb.com/texturepacker/tutorials/how-to-create-sprite-sheets-and-animations-with-pixijs#nine-slice",
"text": "Using 9-slice sprites"
},
{
"@type": "HowToStep",
"url": "https://www.codeandweb.com/texturepacker/tutorials/how-to-create-sprite-sheets-and-animations-with-pixijs#multipack",
"text": "Using Multipack with PixiJS"
},
{
"@type": "HowToStep",
"url": "https://www.codeandweb.com/texturepacker/tutorials/how-to-create-sprite-sheets-and-animations-with-pixijs#scaling-variants",
"text": "Supporting multiple device resolutions"
},
{
"@type": "HowToStep",
"url": "https://www.codeandweb.com/texturepacker/tutorials/how-to-create-sprite-sheets-and-animations-with-pixijs#texture-compression",
"text": "Using texture compression"
}
],
"totalTime": "PT9M"
}
```