How to translate Angular 14 apps: @angular/localize and xlf
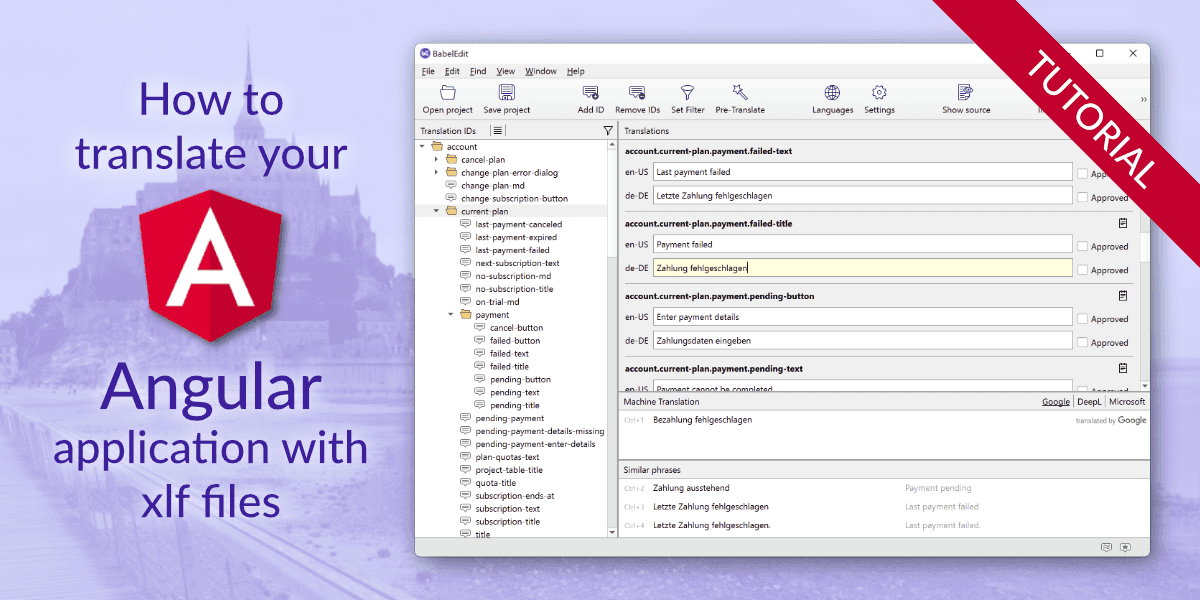
How to translate your Angular application - a matter of choice
Angular comes with a package called @angular/localize which is Angular's native way of translating your application.
But there are also other packages - e.g. ngx-translate
which has several advantages over @angular/localize.
If you've already made your decision - this is the right tutorial for you. You might otherwise want to consider the following restrictions:
-
Angular compiles your application with a specific locale. You have to build a separate application for each language.
-
You can't change the locale at runtime
-
Angular can only translate messaged found in your templates. You can't use translations in your source code (.ts files).
If one of this is a restriction you can't live with checkout ngx-translate.
This tutorial build a simple application with Angular 14 and adds translations to it. You can easily skip the first steps if you already have an application to work with. The example application is available as source code on github.
Optional: Create a simple app to translate
Now set up an application that you can use to experiment with some use-cases. You can skip this if want to work on an existing application.
- Simple text
- Text with a simple parameter
- Text with a counter and a selection
First, create a new, empty application:
ng new angular-localization-demoAnswer the questions like this:
? Would you like to add Angular routing? No
? Which stylesheet format would you like to use? SCSS
Run ng serve and open your browser on http://localhost:4200
Replace the content of the /app/app.component.html with the following code:
<style>
    h1 {margin-bottom: 4rem}
    p {margin-bottom: 2rem}
    div {margin: 4rem; font-family: sans-serif; font-size: 14px;}
</style>

<div>
    <!-- static text -->
    <h1>Translation demo</h1>
</div>
Replace /app/app.component.ts with the following code:
import { Component } from '@angular/core';

type Fruit = 'apple' | 'pear';

@Component({
  selector: 'app-root',
  templateUrl: './app.component.html'
})
export class AppComponent {
  name = "John Doe";

  counter = 1;
  fruit:Fruit = 'apple';

  public changeCounter(change:number)
  {
      this.counter = Math.max(0, this.counter+change);
  }

  public toggleFruit()
  {
      this.fruit = this.fruit === 'apple' ? 'pear' : 'apple';
  }
}
Prepare your app for translation
ng add @angular/localizeLocale IDs
Angular uses locale identifiers defined by BSP47.
These identifiers consist of 2 parts:
- language
- country code
Examples:
en-US- English (en) spoken in the United States (US)en-GB- English (en) spoken in the Great Britain (GB)fr-FR- French (fr) spoken in France (FR)fr-CA- French (fr) spoken in Canada (CA)
The country code has effects on the language (e.g. gray vs grey in en-US vs en-GB) but also
effects how Angular formats numbers, dates, times, currencies and other values when you are using
DatePipe, CurrencyPipe, DecimalPipe or PercentPipe.
Angular's default locale is en-US.
How to translate Angular template files
The translation process for Angular applications consists of 5 steps:
- Mark all text you want to translate in your templates.
- Use the
ng xi18ncommand line tool to extract the translations and create an XLIFF translation file - Translate the messages in the file (e.g. by using BabelEdit)
- Edit the applications' configuration to recognize the new locale
- Compile your application with the locales
This tutorial takes you though all of these steps.
We start with simple static text and go through the whole process. After that we'll cover pluralization and more complex stuff using the ICU syntax.
Translating your first message
The /app/app.component.html contains the following line:
<h1>Translation demo</h1>To mark it as translatable text, you simply have to add an i18n attribute:
<h1 i18n>Translation demo</h1>Simple. Now run
ng xi18n --out-file src/locale/messages.en.xlfThis generates a file called src/locale/messages.en.xlf - an XML based translation file in an industry standard
format called XLIFF. This file contains all messages extracted from your source.
Understanding translation IDs
It now seems a bit low-level to take a deeper look at this file — but I am taking you here to help you understand and avoid problems in your project.
In this file you see a so called trans-unit:
<trans-unit id="fa498c44c35a9590523ab6de3c689aedcb33fb1d" datatype="html">
    <source>Translation demo</source>
    <context-group purpose="location">
        <context context-type="sourcefile">src/app/app.component.html</context>
        <context context-type="linenumber">9</context>
    </context-group>
</trans-unit>
The trans-unit contains the source text in <source> and a file location.
It also contains an attribute called id - that's an (ugly hexadecimal) identifier derived from the
source text.
Angular created this identifier for you because we did not specify any identifier manually. The problem with this identifier is that it changes each time you edit the source text!
Add a simple ! after the text and run ng xi18n --out-file src/locale/messages.en.xlf
<h1 i18n>Translation demo!</h1>See how the ID changed from fa498c44c35a9590523ab6de3c689aedcb33fb1d
to 354127914de0aba23b09f129dcfbb0ba840bbecd. This is a problem because Angular uses the ID to reference
the messages belonging together across multiple language files. If you've not created your translation in
another file, the translation is now lost! Ouch!
The better way is to specify translation IDs manually. The title has to start with @@.
<h1 i18n="@@main.title">Title with manual ID</h1>You can use . in the title which allows you to structure your IDs. If you use BabelEdit
you'll see the translations in a nice tree view which gives you even more control.
Take a look at the messages.en.xlf: This is much better now:
<trans-unit id="main.title" datatype="html">
    <source>Title with ID</source>
    ...
</trans-unit>
If you absolutely don't want to set IDs manually read the section Dealing with auto ids.
The translation process with BabelEdit
I'll show you how to translate the file into German — simply because this is the language I know best :) Feel free to translate the file into a language of your choice.
XLF is not meant to be edited by hand. Yes — you can do this. But: It's a real pain because you have to keep all your language files in sync. After adding a new message in one file you have to update all other language files.
Do yourself a favor and download BabelEdit — for the sake of this tutorial. It comes with a free trial of 7 days, and it's quite inexpensive for a translation tool.
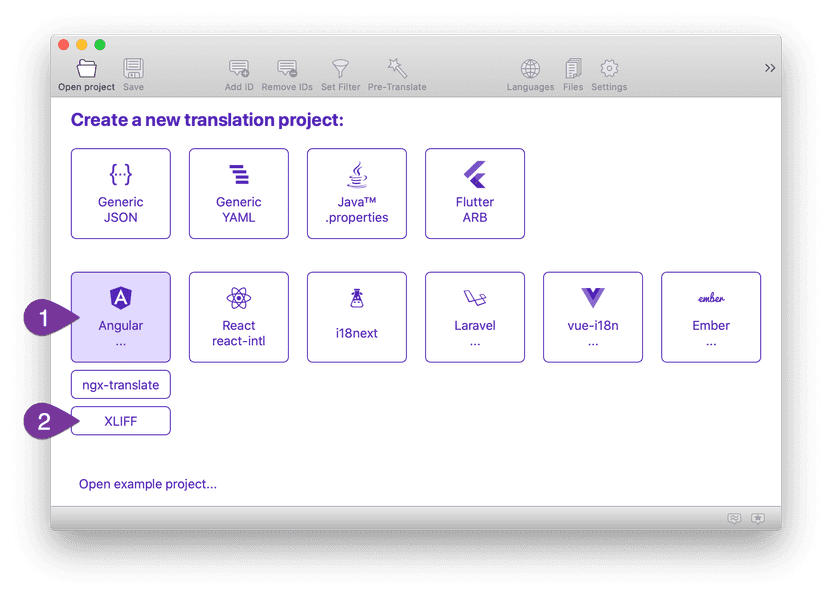
Install and start the tool. Click on Angular and XLIFF to start a new translation project:
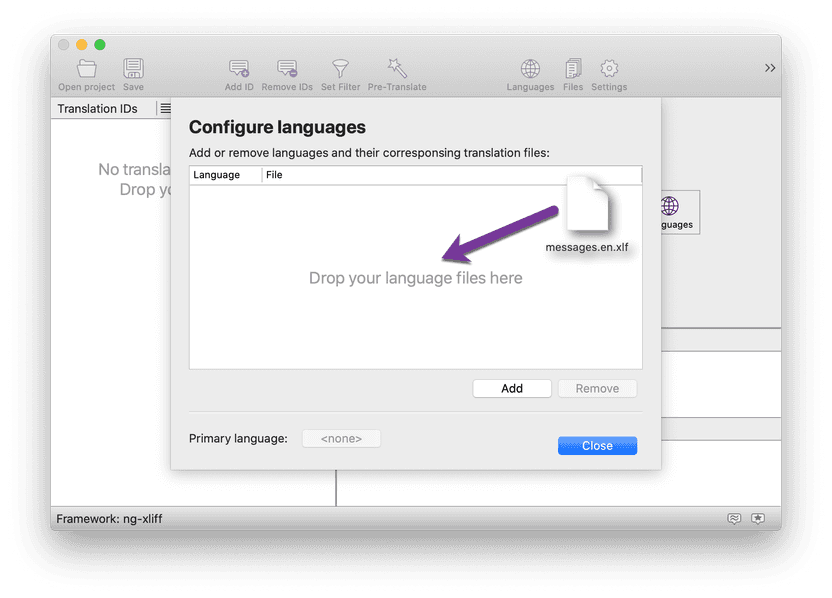
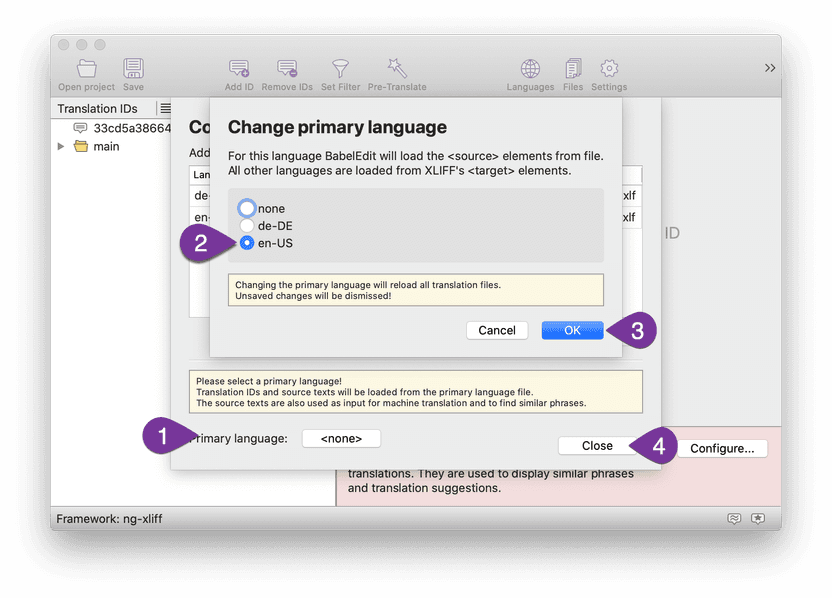
Next drop your src/locale/message.en.xml onto the language configuration dialog.
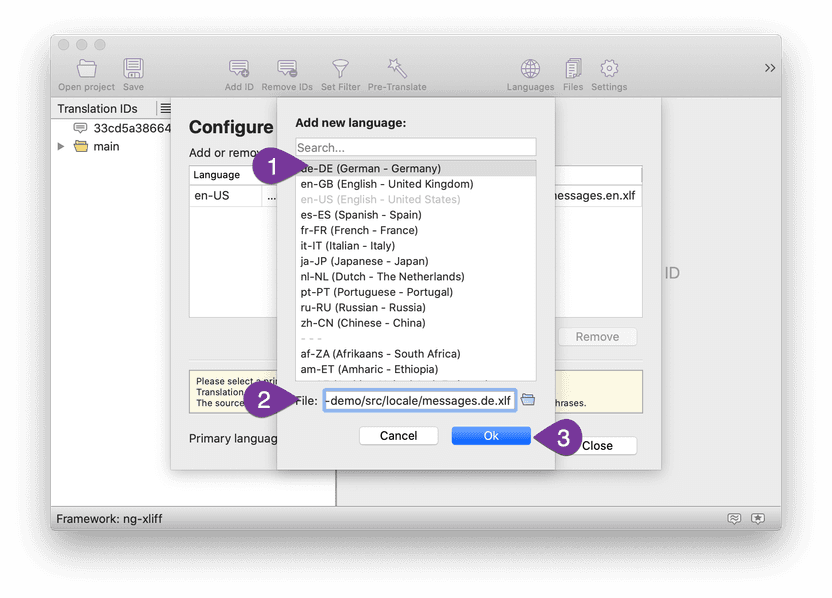
Select en-US as language. Click Add and New to add your first target language. Choose de-DE and
change the file name to messages.de.xlf.
In the last step select en-US as primary language. The primary language is the source language
you use in your code. BabelEdit uses it for features like machine translations and suggestions.
It also becomes read-only and can't be edited. The reason for this is that all changes you make
to your source language would be over-written the next time you run ng xi18n.
With these steps you should now see a screen similar to the following:
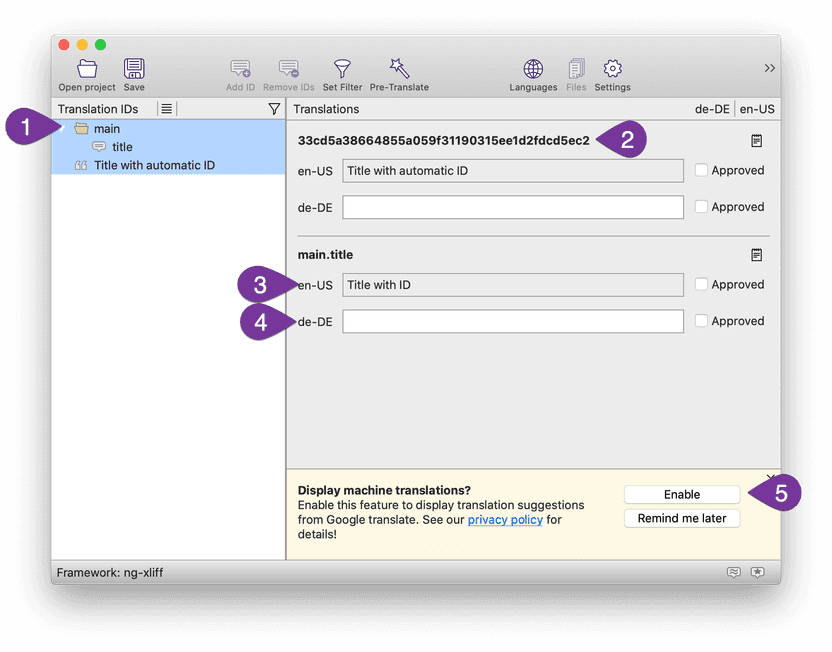
- The left side shows you the translation IDs available in your source code files. Note that the manually
set translation ID
main.titlehas a speech bubble icon. Translations with '.' automatically create a tree structure. Automatic IDs from Angular always create a flat list. The hard-to-read IDs are replaced with parts of the source text. - The center view shows the selected translations from the left tree. Here is where you can see the full ID of the translation in the first line.
- The text in the
en-USedit fields is read only (primary language). - The text in the
de-DErow is editable. - Click Enable if you want to send your source messages to Google Translate (TM) for suggestions and automatic translation of your files.
BabelEdit now suggests translations for you:
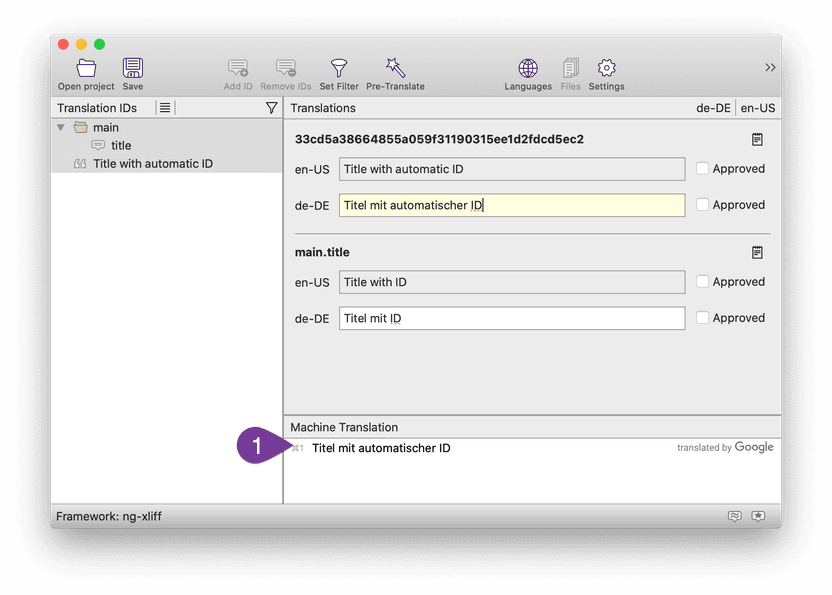
Fill the German text fields and press Save. BabelEdit asks you to enter the name of a project file — this is used to save you the setup time. The file does not contain translation data — everything is stored in the xlf files directly.
Adding the xlf translation file to your Angular app
In your angular.json you have to specify the source language.
For all target languages you set the file name from which the translated messages should be loaded:
"angular-localization-demo": {
      "projectType": "application",
      "i18n": {
          "sourceLocale": "en",
          "locales": {
              "de": "src/locale/messages.de.xlf"
          }
      },
      ...
To build the app for all configured languages you have to add the following options to the project
configuration in your angular.json:
"architect": {
  "build": {
      "configurations": {
          "production": {
              "localize": true,
              "aot": true,
              "i18nMissingTranslation": "error"
...- the
localizeoption tells Angular to build variants of your app for all languages. Instead oftrueyou can pass a subset of your configured languages here, e.g."localize": [ "en", "fr" ] - the
aotoption enables ahead-of-time compilation. Angular does not support building localized apps in JIT (just-in-time) compilation mode. - the
i18nMissingTranslationdefines what should happen if a translation is missing: by default a warning is displayed at compile-time, and the app uses the source language text as fallback. If this option is set to error an error message is displayed, and the build process is aborted.
Note: If you enable save empty translations in the BabelEdit settings, missing translations will be saved as empty strings in the XLIFF file. Angular will no longer report these empty strings as "missing translation".
ng serve can only serve one language. So you might want to define one build configuration per language, and refer to these build configurations in the serve configurations:
"architect": {
  "build": {
    "configurations": {
      "de": {
        "localize": [ "de" ],
        "aot": true
      },
      "en": {
        "localize": [ "en" ],
        "aot": true
      },
      ...

  "serve": {
      "de": {
        "browserTarget": "angular-localization-demo:build:de"
      },
      "en": {
        "browserTarget": "angular-localization-demo:build:en"
      },
      ...
With this configuration you can serve the localized app:
ng serve --configuration=deYou should now see the title in German.
Providing more information to your translators
With the manual IDs you can already give the translator some context. main.title says that this
text is on the main screen, and it's the title - that's not perfect but at least better than nothing.
You can give more context to the translator by altering the i18n attribute in the template: Add
a more clear description before the @@:
<h1 i18n="Long title on the main screen.@@main.title">Title with ID</h1>Run ng xi18n --out-file src/locale/messages.en.xlf and return to BabelEdit.
The translation instruction from the file appears right after the translation ID.

You can also add more detailed instructions by clicking on the little note-icon on the right.
Messages with parameters (interpolation)
Let's add a welcome message with the name as parameter to the template:
<p i18n="Welcome message.@@main.hello">Hello {{name}}!</p>This simply places the value of the name variable in the text.
In BabelEdit (after running ng xi18n) you'll see something like this:
Hello <x id="INTERPOLATION" equiv-text="{{name}}"/>!For the translation simply copy the <x.../> to the target language. Don't change it.
So the German translation is:
Hallo <x id="INTERPOLATION" equiv-text="{{name}}"/>!I must admit that this is not quite nice - but you should look at it as work in progress. We have plans to add an ICU syntax editor to BabelEdit. With this you'll get a better representation of placeholders, too.
Save in BabelEdit... and nothing happens in your Angular app. Yes. ng serve does not look
for changes in .xlf files... you have to restart ng serve to see the changes.
Number parameters and pluralization
First run
ng serveto switch back to the main language (English).
Add a new message and 2 buttons (one for an increment, one for a decrement) to the project:
<p i18n="@@icu.plural">There are {{counter}} apples in the basket.<p>

<button (click)="changeCounter(-1)">+</button>
<button (click)="changeCounter(1)">-</button>
Ok... not exactly what you want?
- There are 0 apples in the basket.
- There are 1 apples in the basket.
- There are 5 apples in the basket.
Yes - we can do better! With ICU syntax and something that is called pluralization:
<p i18n="@@icu.plural">There {counter, plural,
        =0 {are no apples}
        one {is one apple}
        other {are {{counter}} apples}
    } in the basket.<p>
The syntax consists of the following:
counter- the variable that is used for the choice - see app.component.tsplural- a keyword that triggers the pluralization<selector> {text}- the selector activates the following text in{}if the condition is met
<selector> can be one of the following:
=0,=1,=2, ...onetwofew- not available in all localesmany- not available in all localesother
The {text} can be any text — you can even create nested ICU messages.
ICU supports # as placeholder for the current value. Angular does not.
If you want to write the counter value you have to use {{counter}}.
Click on the + and - buttons to see the message change:
- There are no apples in the basket.
- There is one apple in the basket.
- There are 5 apples in the basket.
That's way better!
ICU pluralization is not working!
If only the first entry works (=0) the reason is usually that you added a comma ,
after the first entry.
Run
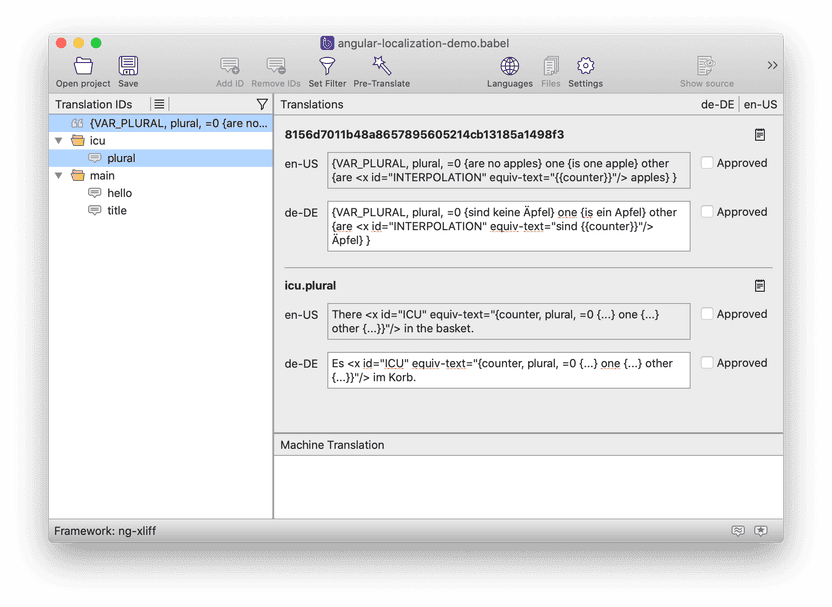
ng xi18n --out-file src/locale/messages.en.xlfand open BabelEdit. Ok — now something unexpected happens: Instead of one you now get 2 new entries!
I don't know why the Angular developers do this. There is practically no reference
from the message you created to the sub-entry Angular creates.
You might say: The text {counter, plural, =0 {...} one {...} other {...}} is the reference - that's
right in this case. But the reference is exactly the same for each other entry that uses =0,
one and other.
Angular's manual states that the automatically generated entry is directly below the manual one. But this
is also not always the case...
I've opened a ticket in 2017:
Translate select and plural looses references in xliff, xliff2 and xmb files... but nothing
changed since. I am sorry to say so: We have to live with this for now...
Another sad thing is that Angular automatically drops all formatting and newlines we added to the ICU messages for better readability. As I already mentioned: We have plans to add an ICU editor to BabelEdit to solve this. :)
The manually generated messages are:
en-US:
There <x id="ICU" equiv-text="{counter, plural, =0 {...} one {...} other {...}}"/> in the basket.de-DE:
Es <x id="ICU" equiv-text="{counter, plural, =0 {...} one {...} other {...}}"/> im Korb.and the automatically generated ones are:
en-US:
{VAR_PLURAL, plural,
    =0 {are no apples}
    one {is one apple}
    other {are <x id="INTERPOLATION" equiv-text="{{counter}}"/> apples}
}
de-DE:
{VAR_PLURAL, plural,
    =0 {sind keine Äpfel}
    one {ist ein Apfel}
    other {sind <x id="INTERPOLATION" equiv-text="sind {{counter}}"/> Äpfel}
}
Selections in ICU syntax
Let's assume you also want to extend the application to not only support apples but also pears. We don't apply plurals later. Let's deal with one entry for the start.
fruit is a variable of an enum type:
enum Fruit { apple='apple', pear='pear' };with this you could write:
<!-- simple select -->
<p i18n="@@icu.selection">There is one {{fruit}} in the basket.<p>

<button (click)="toggleFruit()">Change fruit</button>
Ok... so... this renders to There is one 0 in the basket.. Right. Enums are numbers. We can use
an ICU select for this:
<p i18n="@@icu.selection">There is {fruit,select,
    0 {apple}
    1 {pear}
} in the basket.<p>
There is unfortunately no way to use the enum values instead of the numbers in the template. The only way I know around this is to set a string value for each enum entry:
enum Fruit { apple='apple', pear='pear' };Now you can write the following in the template:
<p i18n="@@icu.selection">There is one {fruit,select,
    apple {apple}
    pear {pear}
} in the basket.<p>
You can of course use defined strings instead:
type Fruit = 'apple' | 'pear';Run the extraction and open BabelEdit. In German and several other languages (e.g. French) you have to put the article or numerals ("one") inside the select.
The reason is that these languages use different articles/numerals depending on the gender of the noun.
en-US:
There is one <x id="ICU" equiv-text="{fruit, select, apple {...} pear {...}}"/> in the basket.

{VAR_SELECT, select, apple {apple} pear {pear} }
de-DE:
Es ist <x id="ICU" equiv-text="{fruit, select, apple {...} pear {...}}"/> im Korb.

{VAR_SELECT, select, apple {ein Apfel} pear {eine Birne} }
Dealing with Angular's auto-generated IDs
For the sake of consistency I'd recommend putting the "one" inside the selection - but you don't have too. ICU is clever enough to deal with both variations... anyways let's do it because I'd like to show you another pitfall with Angulars' translation module:
Change the template to this:
<p i18n="@@icu.selection">There is {fruit,select,
    apple {one apple}
    pear {one pear}
} in the basket.<p>
Extract the messages with
ng xi18n --out-file src/locale/messages.en.xlfand open BabelEdit:
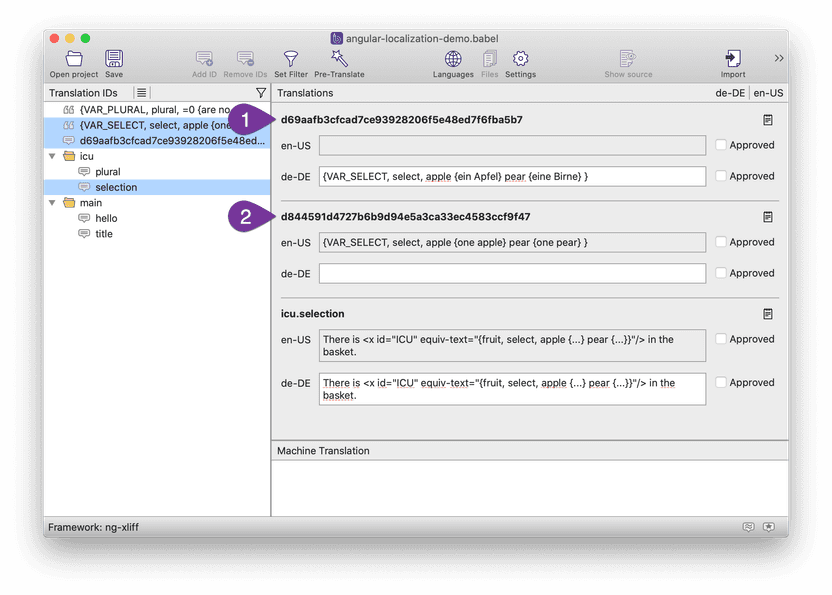
What you see here is:
- The ID that was removed by Angular - the source language is empty.
- The new ID with no translation.
BabelEdit keeps it open for you so that you can copy the texts to the new IDs. You can find these orphaned translations using BabelEdits filter function:
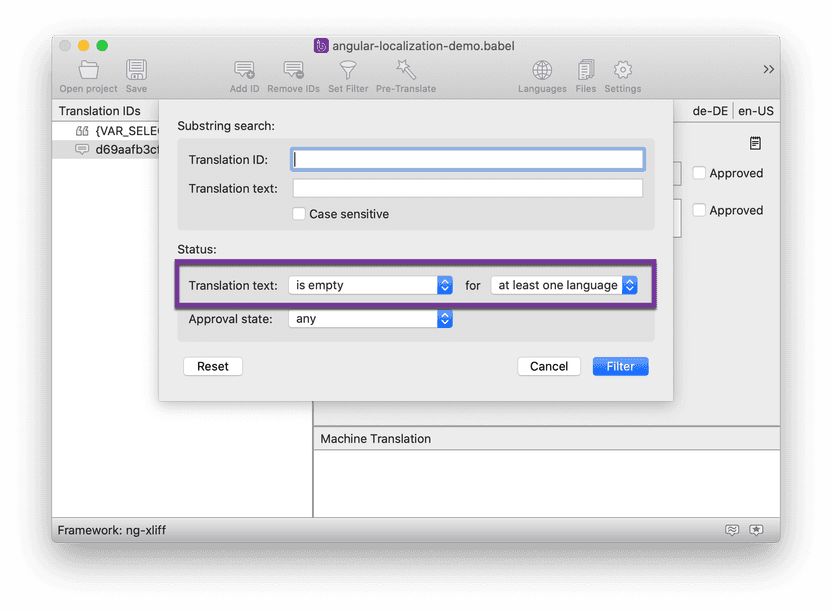
Now copy the text from the deleted translation to the new id.
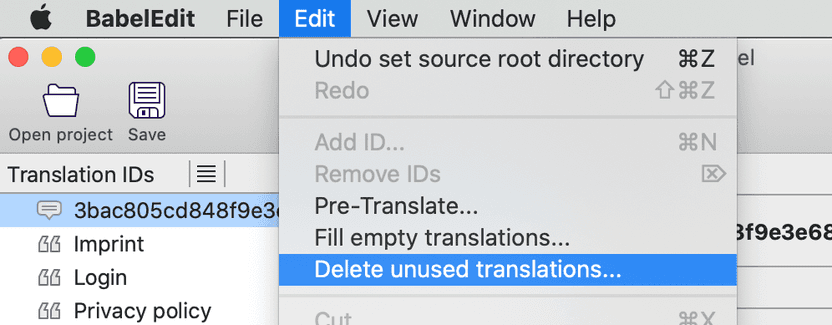
After that use the menu item Edit / Delete unused translation... to get rid of them.
Nesting ICU message
Let's now combine both examples: We want to change the counter and the fruit type.
| English | German |
|---|---|
| There are no apples in the basket. | Es sind keine Äpfel im Korb. |
| There is one apple in the basket. | Es ist ein Äpfel im Korb. |
| There are 5 apples in the basket. | Es sind 5 Äpfel im Korb. |
| There are no pears in the basket. | Es sind keine Birnen im Korb. |
| There is one pear in the basket. | Es ist eine Birne im Korb. |
| There are 5 pears in the basket. | Es sind 5 Birnen im Korb. |
The English sentence is simple - because the gender of the fruit does not influence the numeral:
<p i18n="@@icu.combined">
    There
        {counter, plural,
            =0 {are no {fruit, select, apple {apples} pear {pears}} }
            one {is one {fruit, select, apple {apple} pear {pear}} }
            other {are {{counter}} {fruit,select, apple {apples} pear {pears}} }
        }
    in the basket.
<p>
Ok - this works in English. Now run ng xi18n --out-file src/locale/messages.en.xlf and open BabelEdit:
You now see a new entry icu.combined with this text:
There
<x id="ICU" equiv-text="{counter, plural, =0 {...} one {...} other {...}}"/>in the basket.
Add the German translation:
Es
<x id="ICU" equiv-text="{counter, plural, =0 {...} one {...} other {...}}"/>im Korb.
Easy.
The nested ICU part of the translation now became:
en-US: {VAR_PLURAL, plural,
            =0 {are no {VAR_SELECT, select, apple {apples} pear {pears} } }
            one {is one {VAR_SELECT_1, select, apple {apple} pear {pear} } }
            other {are <x id="INTERPOLATION" equiv-text="{{counter}}"/>
                   {VAR_SELECT_2, select, apple {apples} pear {pears} } } }
What you see here is that Angular for some strange reason does not create nested entries beyond the first level. So... let's translate this. As seen in our table from above we have to move the "is one" into the select:
de-DE: {VAR_PLURAL, plural,
            =0 {sind keine {VAR_SELECT, select, apple {Äpfel} pear {Birnen} } }
            one {ist {VAR_SELECT_1, select, apple {ein Apfel} pear {eine Birne} } }
            other {es sind <x id="INTERPOLATION" equiv-text="{{counter}}"/>
                   {VAR_SELECT_2, select, apple {Äpfel} pear {Birnen} } } }
Ok... it works!
My opinion about @angular/localize
If you've read through this text you might already sense that I am no fan of @angular/localize.
When I am comparing it to ngx-translate, I don't see any advantage in using it.
@angular/localize requires you to
- Build separate apps for each language
- Does not allow changing translations at runtime
- Has several quirks when creating xlf files
- Does not allow translating stuff in source code - only templates
- Changing translations during development requires restarting
ng serve
If you think otherwise or have a great solution for these issues: Please contact me :)
If you (or your boss) decides that you have to use it I can only recommend trying BabelEdit. It'll be a big help for you: It keeps your translation files consistent across all languages. Without it you'll end up copying new messages from one language file to another manually. It also takes the pain out of editing XLF files.