How to translate your Svelte Web App.
Create and empty application
I assume that you've already installed NodeJS on your computer.
Use npm to create an empty Svelte project. You can skip this part of the
tutorial if you already have an application you want to update with
translations.
npm create svelte@latest svelte-translation-exampleAnswer the questions as follows:
- Which Svelte app template? Skeleton project
- Add type checking with TypeScript? Yes, using TypeScript syntax
- Select additional options - whatever you want
cd svelte-translation-example
npm install
npm run dev -- --open
This should open the browser and display the Welcome to SvelteKit page.
Add svelte-i18n
To translate and add other i18n features to your Svelte app, I recommend to use
svelte-i18n. It's quite powerful because it not only supports text but also
parameter formatting like time, date and numbers. You can also use ICU message
syntax for pluralization.
To add svelte-i18n simply use npm:
npm add svelte-i18nInit svelte-i18n
The library first needs to know which translations are available. For this, create a new file to keep the initialization and some convenience functions:
lib/i18n.ts
import { browser } from '$app/environment';
import { derived } from 'svelte/store';
import { init, register, locale } from 'svelte-i18n';

register('en', () => import('../lang/en.json'));
register('de', () => import('../lang/de.json'));
register('fr', () => import('../lang/fr.json'));

init({
    initialLocale: browser ? window.navigator.language : 'en',
    fallbackLocale: 'en'
});
The register block registers dynamic loaders for the languages English, German and French.
The JSON files are loaded on demand.
You can also embed the languages directly. This increases the initial startup time but might be faster when switching languages.
Dynamic loading of the languages comes with a small disadvantage: The app starts before the first language is loaded. For this, we need a function that lets us check if we are ready to present the application.
initialLocale is the main locale for your application. The code uses
the default locale provided by your browser. If svelte-i18n does not find a
file for a language, it uses fallbackLocale instead.
The result of this implementation is that it uses English, French or German if set in your browser. It falls back to English in all other cases.
export const isLocaleLoaded = derived(locale, ($locale) => typeof $locale === 'string');isLocaleLoaded is a value derived that monitors the locale value
provided by svelte-i18n. It's true if a locale is activated, false otherwise.
Let's also add another function we'll use later to escape parameters:
export const escapeHtml = (unsafe: string): string => {
const replacements: { [key: string]: string } = {
'&': '&',
'<': '<',
'>': '>',
'"': '"',
"'": '''
};
return unsafe.replace(/[&<>"']/g, match => replacements[match]);
}Create empty translation files for all languages
Lets for now create empty translation files so that the application can start without errors. We'll add the translations later.
{}{}{}Loading the configuration
Now let's load the translation configuration. The easiest way to do this is to add a +layout.svelte file to the root of the routes folder. This file is loaded for every page in your application.
<script>
    import '$lib/i18n';
    import {isLocaleLoaded} from "$lib/i18n";
</script>

<div class="container">
    <div>
        {#if $isLocaleLoaded}
            <slot></slot>
        {:else}
            <div>Loading...</div>
        {/if}
    </div>
</div>

<style>
    .container {
        display: flex;
        justify-content: center;
        margin: 2rem;
        font-family: sans-serif;
    }
</style>
This code does 3 things:
- It loads the translation configuration by importing it.
- It prevents the app from rendering until a translation file is loaded. This is done
using our
isLocaleLoadedvalue. - It applies a tiny bit of formatting.
Translating your app
Replace the content of the +page.svelte with the following content:
<script lang="ts">
    import {_, locale, time, date, number} from 'svelte-i18n';
    import {escapeHtml} from "$lib/i18n";
</script>

<h1>{$_('main.heading')}</h1>

<style>
    h2 { margin-top: 2rem; margin-bottom: 0.4rem; }
    p { line-height: 1.75; }
</style>
The _ function is provided my svelte-i18n. It takes a translation identifier main.heading,
looks the translation up in the translation file. If no translation exists (like in our case),
the ID is displayed.
Let's not update the translations in the en.json file. You could do that manually — which sooner or later leads to missing IDs — or you use the extraction tool built into svelte-i18n.
Add this to your package.json file:
    "scripts": {
        ...
        "extract": "svelte-i18n extract \"src/**/*.svelte\" src/lang/en.json"
    },
Now run
npm run extractThis updates the en.json file and with the following content:
{
  "main": {
    "heading": ""
  }
}
As you see the . in the main.heading is converted into a nested structure in the json file.
This is useful, because you can use the names to provide context for the translator.
Update the file as follows:
{
  "main": {
    "heading": "Svelte i18n Example"
  }
}
Svelte does not automatically reload the application if a translation file changes. Reload the application manually in your browser and see the title change from main.heading to Svelte i18n Example.
Adding translations
You could now copy and paste the content to the other two languages and update their texts. That's easy to do for a handful of translations but when your application grows, it soon becomes a tedious job.
Especially during development, adding and removing translations soon leads to inconsistencies between the language files. Sorting these out might get hard because a diff tool will show you changes in all lines due to the translated messages.
You also might not know all the languages you want to test in the application - would it not be nice to press a magic button and the files update automatically?
Let me introduce BabelEdit. It's a translation editor designed for developers. It handles all these problems and many more. Download it from here - it works on all major operating systems.
After the installation, drag & drop the root folder of the app onto BabelEdit and configure the languages:
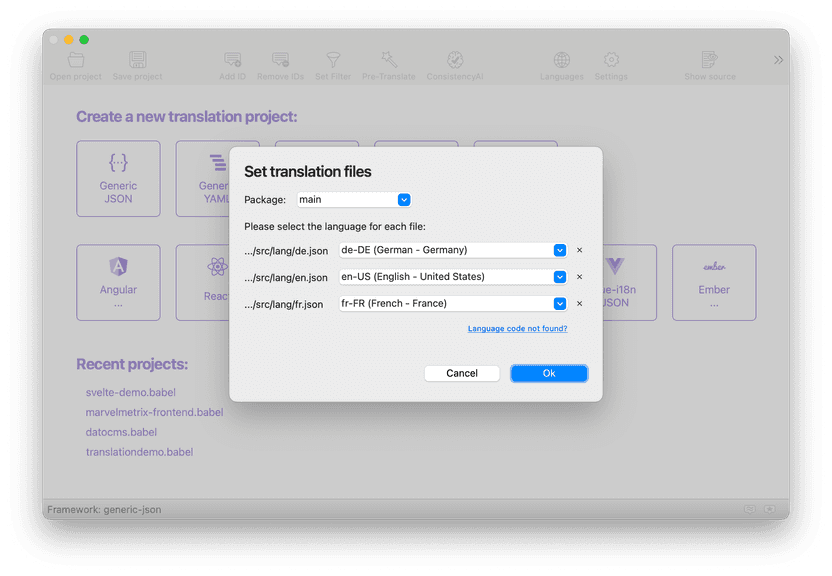
Click Ok..
Click Configure... in the yellow box and set en-US as primary language and close the dialog. The primary language is the source language used for the machine translation feature of BabelEdit.
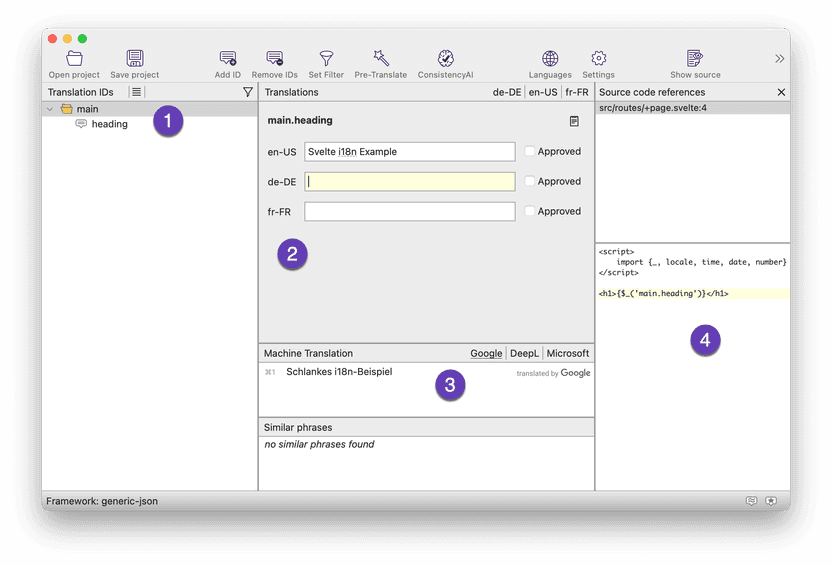
Here's a quick overview over BabelEdit's UI.
- Translation ID tree - This is an overview over all translation IDs. BabelEdit displays them as a tree. Selected branches and IDs are displayed in the center view.
- Translations - The center view shows you the selected translations. You can select which translations you want to see in the upper right corner of the view.
- Machine Translation - When entering a field that is not the primary language, you'll see the text translated from your primary language. You can choose the translation engine to use. E.g. DeepL, Google or Microsoft Bing.
- Source code location - BabelEdit shows you in which files a translation ID is used. If not visible, you can enable this feature in the toolbar (Show source).
You can click on the machine translation entry to copy it into the German and French translations.
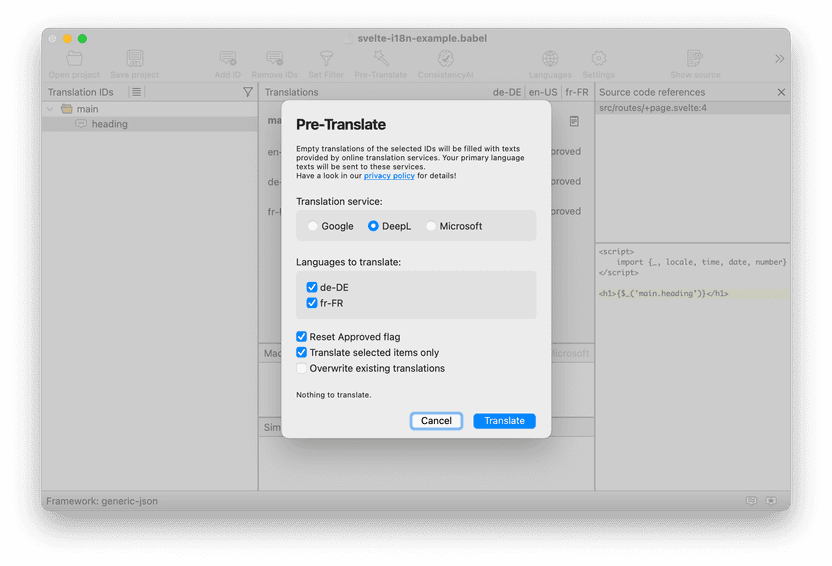
But there's an even faster way: Click Pre-Translate in the toolbar. Pre-translate translates all your untranslated messages at once.
Finally, click Save project. BabelEdit asks you to save its project file first. Save it as "svelte-translation-example.babel" in your project root folder.
Switching languages
We can't preview the new translations because we have no way to switch between the languages in the applicaton.
Let's add a language switch!
<div>
    <h2>{$_('locale-switch.heading')}</h2>
    <span>{$_('locale-switch.label')}: </span>
    <select {value} on:change={handleLocaleChange}>
        <option value="en" selected>{$_('locale-switch.lang.en')}</option>
        <option value="de">{$_('locale-switch.lang.de')}</option>
        <option value="fr">{$_('locale-switch.lang.fr')}</option>
    </select>
</div>
And add this to the <script> section at the top of the file:
    let value: string = 'en';

    const handleLocaleChange = (event: any) => {
        event.preventDefault();
        value = event?.target?.value;
        $locale = value;
    }
The text of the locale switch is not yet translated - but you can already switch between the languages and see the title text change.
Run
npm run extractand switch to BabelEdit. It automatically reloaded the file.
Update the en with the following content:
| Translation ID | Text |
|---|---|
locale-switch.heading | Locale switch |
locale-switch.label | Select your language |
locale-switch.lang.de | German |
locale-switch.lang.en | English |
locale-switch.lang.fr | French |
Select the locale-switch root folder and use Pre-Translate to create the translations for the other languages.
Save and refresh your app. You can now switch the languages.
Parameter interpolation and formatting
The _() function accepts a 2nd parameter with configuration values.
You pass the interpolation values as an object in the form of {value: { ...your values... }}.
The use the functions number(), date() and time() to format the values.
<div>
    <h2>{$_('simple-parameters.heading')}</h2>
    <p>{$_('simple-parameters.content', {
        values: {
            name: "Andreas",
            pi: $number(3.1415926, {minimumFractionDigits:5, maximumFractionDigits:5 }),
            date: $date(Date.now(), {year: "numeric", month: "long", day: "numeric"})
        }
    })}</p>
</div>
In the translation messages, use the name of the value in curly braces {} as a placeholder.
| Translation ID | Text |
|---|---|
simple-parameters.heading | Parameters and formatting |
simple-parameters.content | My name is {name}. The number pi has the value {pi}. The current date: {date}. |
Using HTML markup in translations
You can use HTML markup in your translations using the @html. This is potentially dangerous!
When using @html you have to make sure that you escape the parameters before using them.
This is especially important for values you get from external sources such as user input!
Otherwise, Cross Site Scripting will be possible!
For this, you can use the escapeHtml() function we added to the i18n.ts file earlier.
<div>
    <h2>{$_('markup.heading')}</h2>
    <p>{@html $_('markup.content', {
        values: {
            warning: "<strong>THIS IS DANGEROUS</strong>",
            escaped: escapeHtml("<strong>The escape function solved this issue</strong>")
        }
    })}</p>
</div>| Translation ID | Text |
|---|---|
markup.heading | HTML markup in translations |
markup.content | You can use <strong>HTML markup</strong> using <code>@html</code>. Parameters are not escaped: {warning} |
Pluralization and ICU formatting
With pluralization, you can display different translations depending on numerical values.
E.g.
- 0: You have no apples.
- 1: You have one apple.
- 10: You have 10 apples.
Start by adding a new variable to the <script> section:
<script lang="ts">
    ...
    let n=0;
</script>
Add this block to the bottom of the file. It contains 3 simple buttons
to change the value of n:
<div>
    <h2>{$_('pluralization.heading')}</h2>
    <div>
        <button on:click={() => n = 0}>0</button>
        <button on:click={() => n = 1}>1</button>
        <button on:click={() => n = 2}>2</button>
    </div>
    <p>{$_('pluralization.content', {values: {n}})}</p>
</div>| Translation ID | Text |
|---|---|
pluralization.heading | Pluralization with ICU syntax |
pluralization.content | n={n}: You have {n, plural, =0 {no apples} one {one apple} other {# apples} }. |
Consistency AI
After translating all the messages to German and French, you might have noticed that Google Translator, DeepL and Bing Translator do not correctly translate the messages that contain ICU syntax.
Some other translations might sound strange for native speakers. This sometimes happens, because there's no way to provide the translation API with more context.
We've developed a tool in BabelEdit that sends the translations to ChatGPT for verification. We call this Consistency AI
It can not only check these machine translations but also translations you get from a translation agency or other sources.
It reports issues like:
- Missing parameters
- Formatting differences in the translations
- Inconsistent translations
- Wrong translations (e.g. when using ICU syntax)
To use the feature, select several translations in the left tree view and click the Consistency AI button in the toolbar. In the dialog select the language your want to check and press Ok. It takes some time, until the data is processed.
After that, you should see a screen similar to this one:
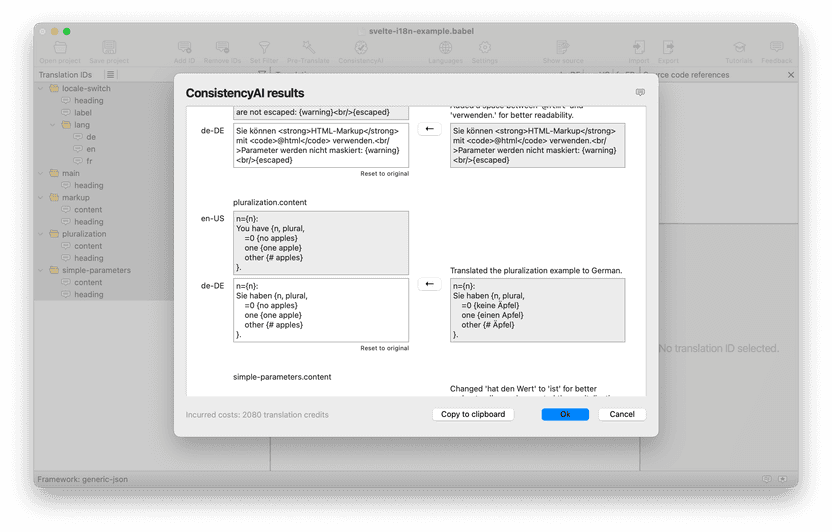
The dialog shows you
- the original message in your primary language,
- the original translation,
- the reason, why the AI thinks you should change the text
- and the proposed change
Click the left arrow button to accept the proposed changes — or leave the text unchanged if you prefer to keep the original version.