How to create physics shapes for Panda2 and P2 physics
In this tutorial you are going to learn
- How to set up Panda 2 with Physics (P2 engine)
- How to create basic physical shapes (circles, rectangles)
- How to create complex physical shapes (polygon based)
- How to use
PhsicsSpritefor a simple integration of physics - How to create your own classes which give you even more control over the physics simulation
Getting started with Physics
Creating the basic scene
Please download the tutorial repo from GitHub. It contains a sprite sheet with some object we are going to play with. If you want to replace the sprites with your own you might want to follow our Panda 2 sprite sheet tutorial
Let's start with a simple scene in main.js:
game.module(
    'game.main'
)
.require(
    'plugin.p2'
)
.body(function() {

game.addAsset('objects.atlas');

game.createScene('Main', {
    init: function() {
        this.backgroundColor = '#cceeff';
        this.makeFloor();
    },

    makeFloor: function() {
        for(var i=0; i<8; i++) {
            var floor = new game.Sprite('floor.png');
            floor.position.set(i*floor.width, game.height-floor.height);
            floor.addTo(this.stage);
        }
    }
});
This scene has nothing to do with physics yet — it's just some floor and background.
Let's now add a simple object that will be controlled by the physics engine.
First you have to initialize the physics engine. Add this line to the top of the init() method:
    init: function() {
        this.world = new game.Physics();
        this.backgroundColor = '#cceeff';
        this.makeFloor();
    },
The first physics object: A crate
Now add a PhysicsSprite object. It takes the crate sprite from the sprite sheet, places it in the
center of the screen. The shape used for this object is a rectangle in the size of the sprite.
    init: function() {
        this.world = new game.Physics();
        this.backgroundColor = '#cceeff';
        this.makeFloor();

        var crate = new game.PhysicsSprite("crate.png", game.width/2, 100);
        crate.addTo(this.stage);
    },
Nothing is happening. The crate is hovering in the air. Why? This is because the default for an object is a mass of 0 which means: Static object.
Now set the mass property:
        var crate = new game.PhysicsSprite("crate.png", game.width/2, 100, {mass:1});
        crate.addTo(this.stage);
Nice. Crate is dropping. But not stopped by the floor...
now change the Sprite class in makeFloor() into PhysicsSprite.
    makeFloor: function() {
        for(var i=0; i<8; i++) {
            var floor = new game.PhysicsSprite('floor.png');
            floor.position.set(i*floor.width, game.height-floor.height);
            floor.addTo(this.stage);
        }
    }
Hm. That's not working (currently). The floor shapes are now all top left :-(
This is because there are now 2 coordinate systems in play: The visual for the sprites and the physics
coordinate system. PhysicsSprite updates the visual coordinates from the simulation and overwrites the
position settings. I'll explain that in detail later.
For now use the constructor syntax. There's unfortunately no way to access the sprite's size since it was not yet constructed. But we know that it is 128x128 pixels.
Another difference between Sprite and PhysicsSprite is the anchor point: The default anchor point for the
physics shape is the center, this is why we have to add size/2 for the correct position:
    makeFloor: function() {
        for(var i=0; i<8; i++) {
            var size = 128;
            var floor = new game.PhysicsSprite('floor.png', i*size+size/2, game.height-floor.height+size/2 );
            floor.addTo(this.stage);
        }
    }
Banana in a box: Physics debugging
Nice! One crate is not enough? Let's add more stuff — we've got banana sprites. Add the following
method. The function mousedown() called for each mouse click (or tap) and adds a new banana to the scene:
    mousedown: function(x, y) {
        var banana = new game.PhysicsSprite('banana.png', x, y, { mass: 1});
        banana.addTo(this.stage);
    },
I agree: The result is unexpected:
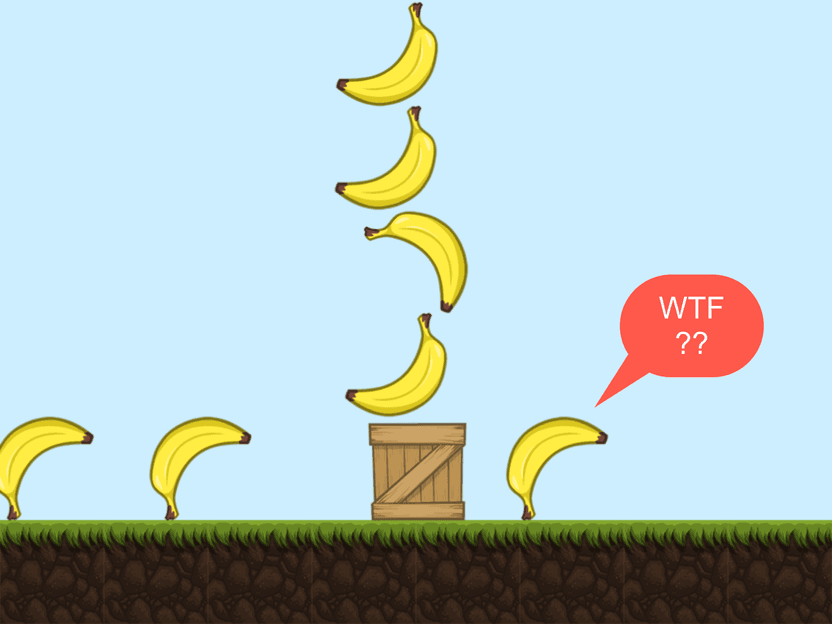
Why don't these bananas work as expected? Let's enable physics debugging in Panda2 to see what's going wrong. Click on the chain icon at the bottom of the preview.
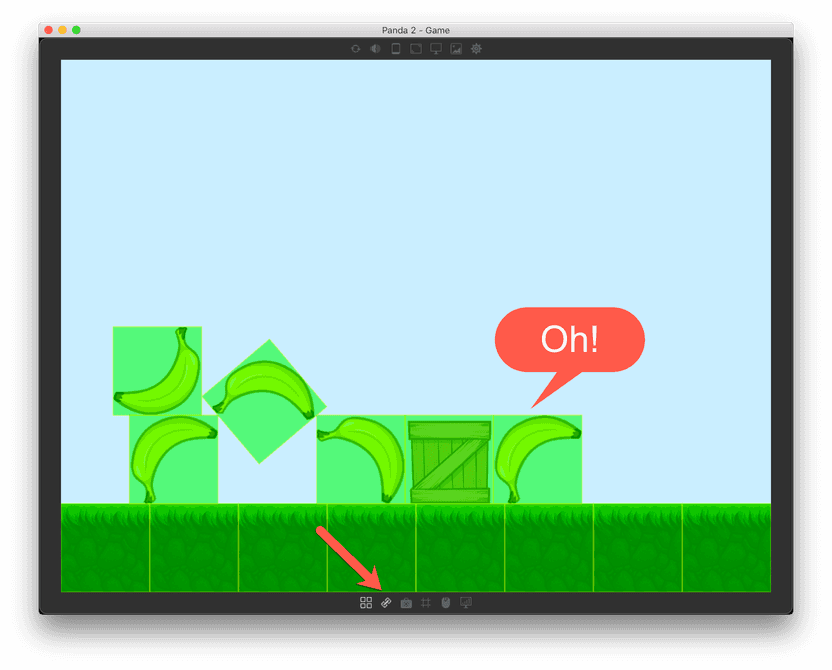
Ok — Do you remember what I've said before: PhysicsSprite uses the size of the sprite to create a box shape.
That's what we got. A banana in a box!
You now have to create a better shape for the banana. That's a bit tricky... how to do that? Using PhotoShop to pick vertex coordinates? No way!
PhysicsEditor
I've got a nice tool for you: PhysicsEditor. Please download and install it from here:
You can use the trial version for 7 days. This should be long enough for you to complete the tutorial and play with it ;-)
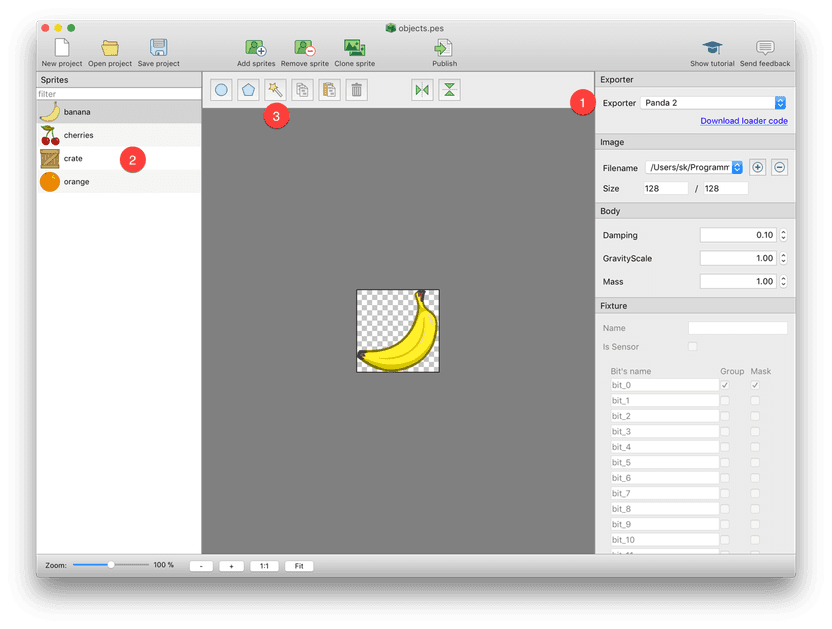
You have to perform the following steps in order:
- Select the Exporter Panda 2
- Drop all sprites from assets/objects onto the left panel. Important for this is that you add the single sprites from the asset folder. Do not add the sprite sheet from media. . Select the banana shape — it'll appear in the center screen.
- Click the magic wand icon in the tool bar
A new window opens with the shape tracer.
Tracing physics shapes
The main parameter to play with in this screen is Tolerance: It influences how the shape is created. A value too high gives you a shape that does not match your sprite too well. A value too low gives you too many vertices. This might result in very high CPU usage and bad performance of you game.
A tolerance of 4 or 5 should give you a good result:
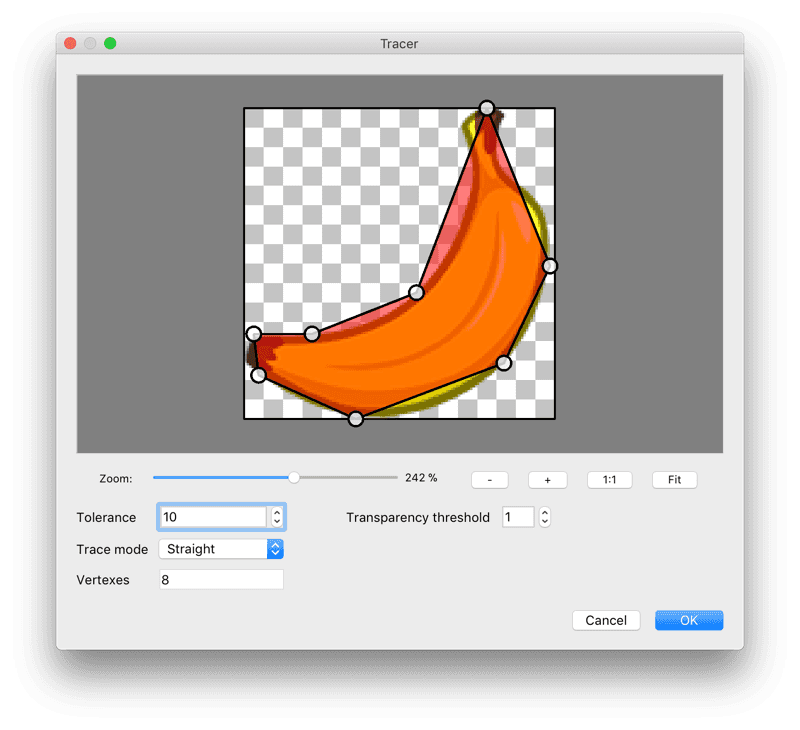
Bad shape: The polygon has not enough vertices to match the sprite.
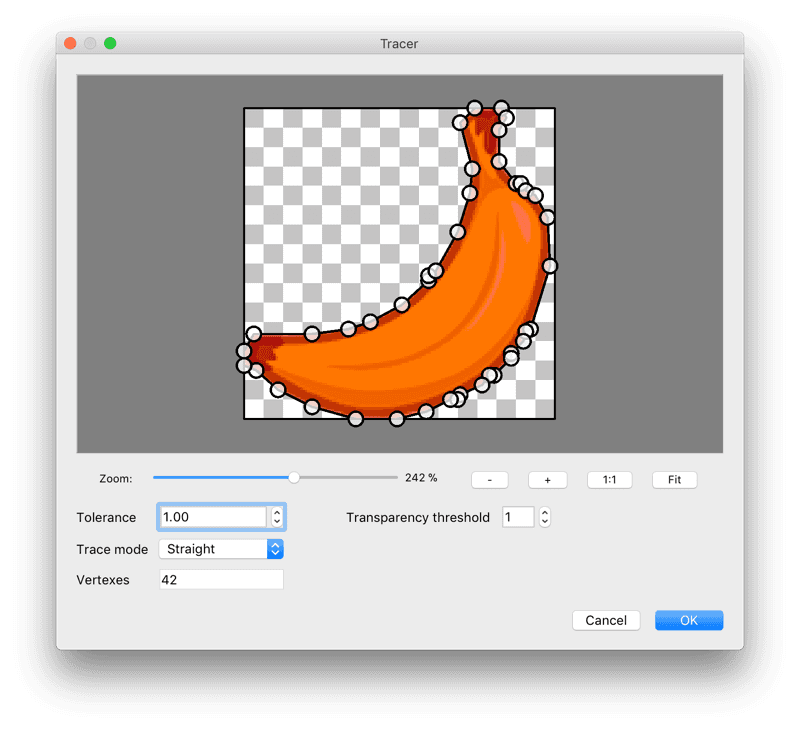
Bad shape: This polygon has too many vertices. This wastes CPU power.
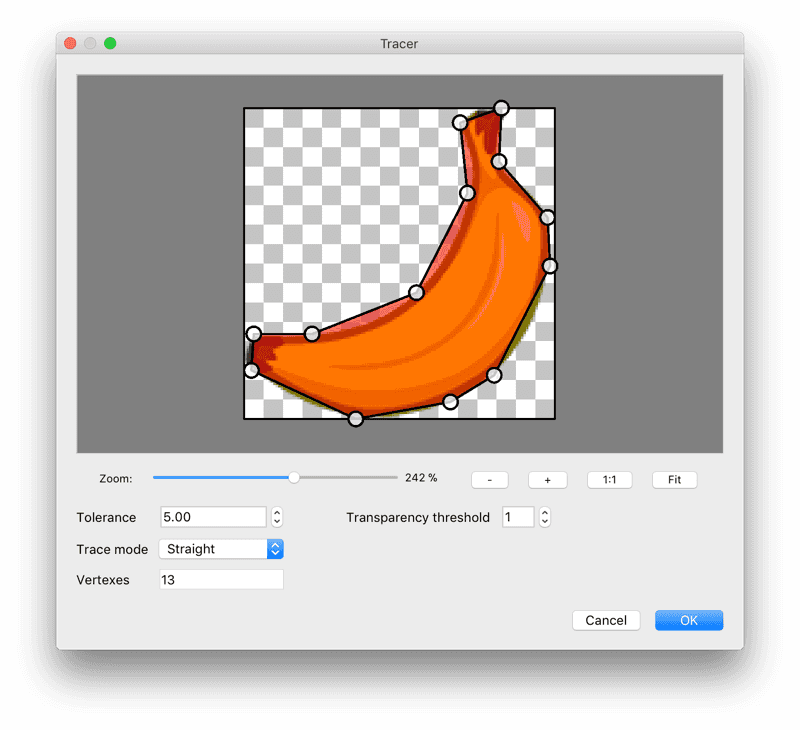
Good shape: A decent fit for the sprite.
Close the tracer. You should now see the polygon in the center screen.
To manually edit the polygon:
- Double-click near a line to create a new vertex
- Double-click a vertex to delete it
- Drag vertices to move them
If you are satisfied: Press publish. PhysicsEditor asks you where to put the .json file. Save objects.json in the project's media folder.
Use Save project to store the PhysicsEditor project in the assets folder.
Now go back to Panda. We'll do more work in PhysicsEditor later.
Loading and using shapes in Panda
First of all you have to load the created objects.json file. Add the following line
before game.createScene:
game.addAsset('objects.atlas');

game.addAsset('objects.json');

game.createScene('Main', {
...
Now change the mousedown method to the following:
    mousedown: function(x, y) {
        var banana = new game.PhysicsSprite('banana.png', x, y, {
            data: 'objects.json',
            name: 'banana'
        });
        banana.addTo(this.stage);
    },
Ah — much better now. Except that there's still some space above the crate. This is because the crate is still the old box. Another thing to notice is that the crate is easily pushed away by the bananas. Let's change that and make it heavier.
Back to PhysicsEditor and trace the crate. In PhysicsEditor's right sidebar you see shape settings. Change Mass to 100 and click Publish.
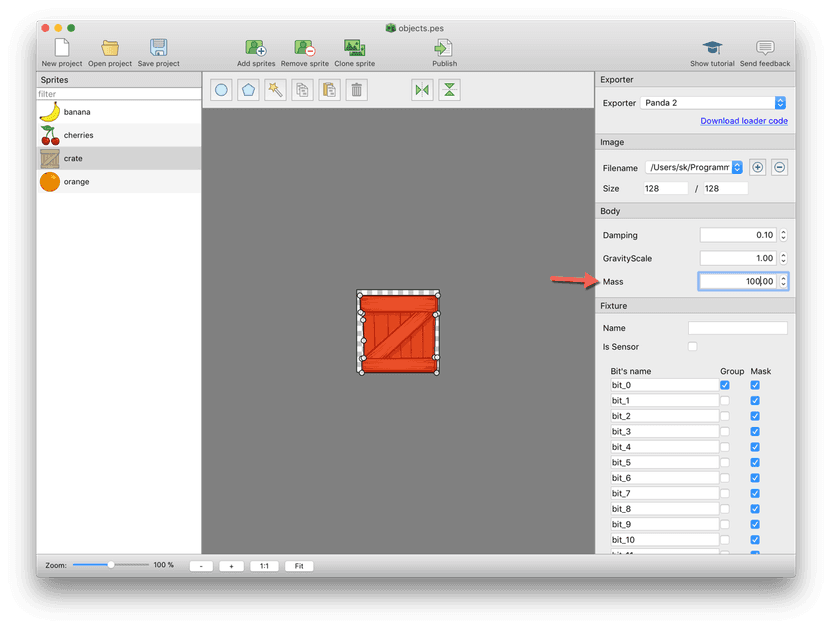
While we are here let's also add the other shapes.
For the Orange use the circle shape instead of tracing the sprite:
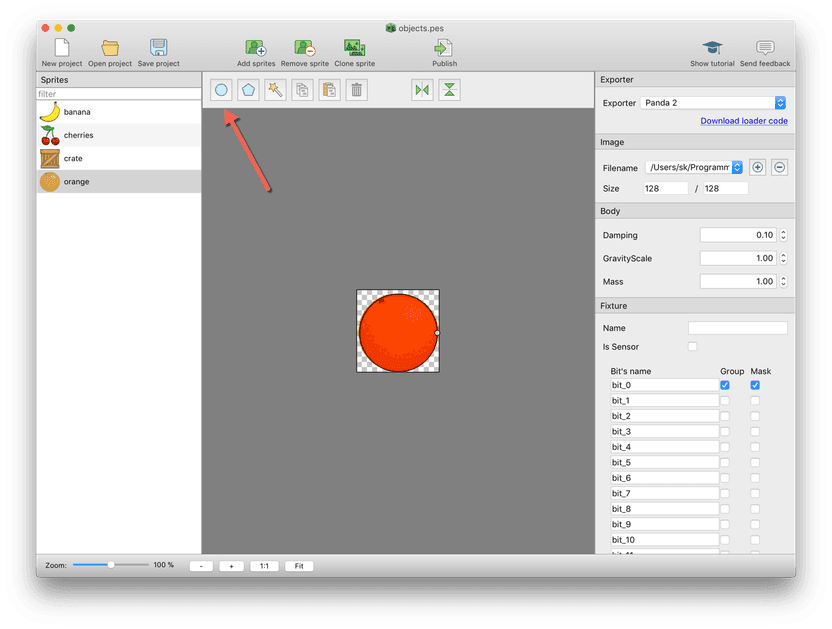
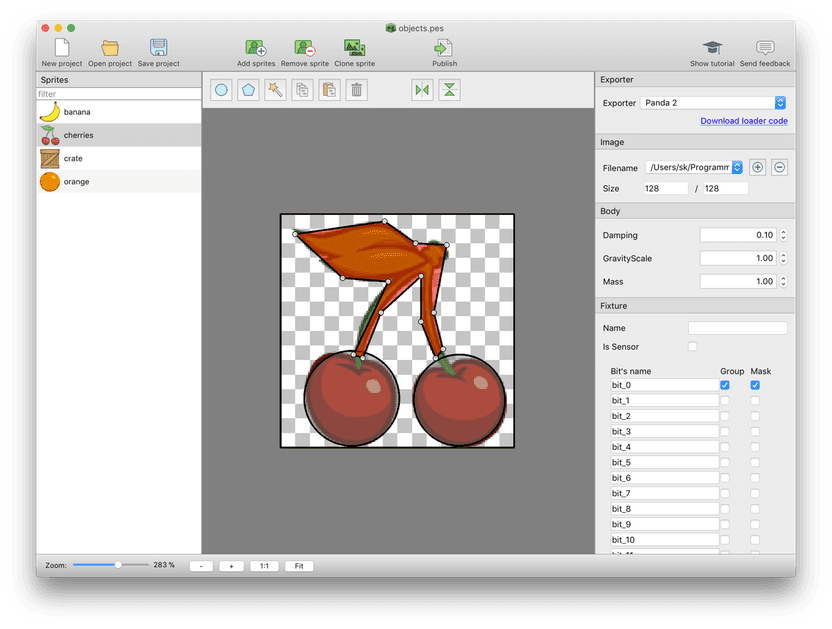
The cherries are best represented by a compound shape:
- start with tracing the cherries
- delete all vertices in the lower area by double clicking them
- add 2 circle shapes
Back in Panda hit CTRL-R / CMD-R to reload the scene.
Let's extend the mousedown method to drop random items:
    mousedown: function(x, y) {
        var shapes = ['banana', 'crate', 'cherries', 'orange'];
        var shape = shapes[Math.floor(Math.random() * Math.floor(shapes.length))];

        var banana = new game.PhysicsSprite(shape+'.png', x, y, {
            data: 'objects.json',
            name: shape
        });
        banana.addTo(this.stage);
    },
Here's the result for you to play with:
Getting more control with your own GameObject class
PhysicsSprite is a nice convenience class to speed up the development — but it also gives you less
control over the object itself. Let's create a GameObject class:
game.createClass('GameObject', {
    init: function(x, y, objectType) {
        this.sprite = new game.Sprite(objectType+'.png');
        this.sprite.anchorCenter();
        this.sprite.addTo(game.scene.stage);

        this.body = game.Body.fromData('objects.json', objectType);
        this.body.position[0] = x / game.scene.world.ratio;
        this.body.position[1] = y / game.scene.world.ratio;
        this.body.addTo(game.scene.world);
    },

    update: function() {
        this.sprite.position.x = this.body.position[0] * this.body.world.ratio;
        this.sprite.position.y = this.body.position[1] * this.body.world.ratio;
        this.sprite.rotation = this.body.angle;
    }
});
This class combines the sprite, and the physics body in one object.
The init() method creates a sprite and adds it to the game scene, it also
created the physics body and adds it to the physics world.
There are 2 important things
to note: game.scene.world.ratio and the update() method:
game.scene.world.ratio
The physics simulation and the graphics representation of it both have their own coordinate system. This is important because it makes the simulation independent of the graphics resolution. E.g. you can use big sprites for high resolutions and small sprites for low resolution devices without changing the physics behaviour.
The game.scene.world.ratio is the factor between both coordinate systems.
You have to divide all pixel coordinates by the ratio to get the physics coordinates. On the other hand multiply all physics coordinates with the ratio to get the pixel coordinates.
update()
The update method is called for each frame. It's responsible for updating the position and rotation of the sprite.
creating the new objects
Exchange the previous version of the mousedown() method to use the new game object class:
    mousedown: function(x, y) {
        var shapes = ['banana', 'crate', 'cherries', 'orange'];
        var shape = shapes[Math.floor(Math.random() * Math.floor(shapes.length))];

        new game.GameObject(x, y, shape);
    },