Panda2 sprite sheet animations tutorial
In this tutorial you are going to learn how to use sprite sheets for animations in your Panda 2 project.
You'll create a simple scene with a walking character that you can control using the keyboard: Click inside the scene, use ←︎ and →︎ to move betty:
You can follow the tutorial step by step to build this game scene, starting from an almost blank Panda 2 project.
The complete tutorial code is available on GitHub. All important stages of the project are available in the sub-folders.
Creating the basic game scene
Please open the folder 01-start in Finder / Explorer. You should see the basic project structure like this:
- media
- betty.atlas - the atlas description file
- betty.png - the sprite atlas / sprite sheet
- spritesheets
- betty - Folder containing the sprites
- betty.tps - TexturePacker project file
- src
- engine - Panda 2 engine
- game
- config.js - configuration
- main.js - the source code
The sprite atlas is already packed for you — I'll explain how to add new sprites, edit pivot points and optimize the sprite sheet for faster rendering and downloads later.
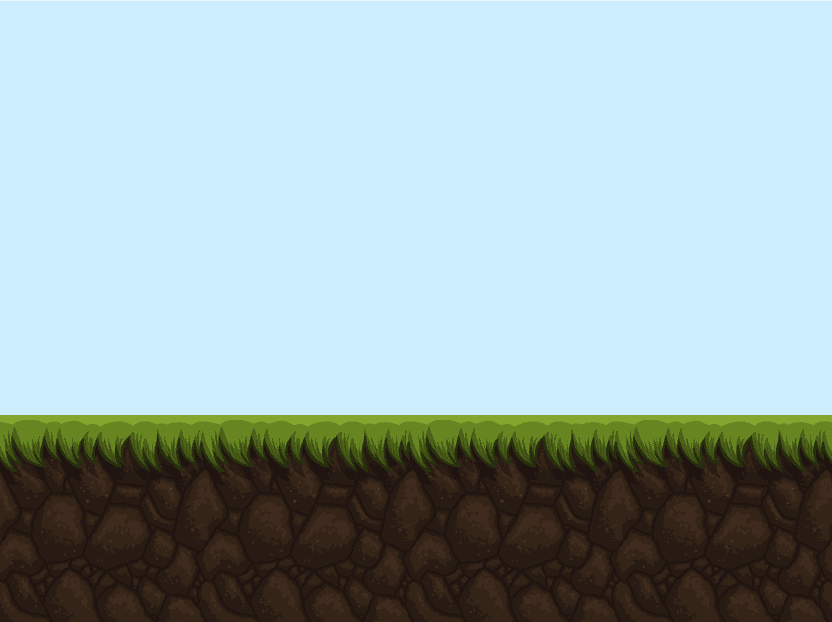
Open the project in Panda 2 — you should see a simple game scene with some floor tiles and a background:
Let's have a quick look at the source code. The project is set up for landscape mode in config.js:
game.config = {
    name: 'Sprite Sheet Demo',

    system: {
        width: 1024,
        height: 768,
        scale: true,
        center: true,
        resize: false
    },

    mobile: {
    }
};
Let's have a look at main.js:
First you have to load the sprite sheet:
// load sprite sheet
game.addAsset('betty.atlas');
This loads both — the sprite sheet data and the image. The data file contains the information about the sprites, their sizes and positions in the sheet.
Next is initializing the scene in the init method:
    init: function() {
        // set background color for the scene
        this.backgroundColor = '#cceeff';

        // create floor tiles
        var groundY = this.makeFloor();
    },
The makeFloor method places some ground floor tiles at the
bottom of the scene. It returns the y position of the
floor tiles which we need to place the character later.
    makeFloor: function() {
        for(var i=0; i<5; i++) {
            var floor = new game.Sprite("floor.png");
            floor.addTo(this.stage);
            floor.y = game.height-floor.height;
            floor.x = floor.width*i;
        }
        return game.height-floor.height;
    }
Note that it references a sprite floor.png — this is
the name of a packed in the sheet. It's not a separate file
that is loaded from file system or a server. This speeds up the
start time of your game since only 1 image has to be loaded instead of
loading each animation phase separately.
Here's the complete code of the main.js:
game.module(
    'game.main'
)
.body(function() {

// load sprite sheet
game.addAsset('betty.atlas');

game.createScene('Main', {

    init: function() {
        // set background color for the scene
        this.backgroundColor = '#cceeff';

        // create floor tiles
        var groundY = this.makeFloor();
    },

    makeFloor: function() {
        for(var i=0; i<5; i++) {
            var floor = new game.Sprite("floor.png");
            floor.addTo(this.stage);
            floor.y = game.height-floor.height;
            floor.x = floor.width*i;
        }
        return game.height-floor.height;
    }
});

}); // module
So far you've used the sprite sheet that is part of the demo source. You are not going to learn how you can create your own sprite sheet, add or remove sprites and more:
Creating your own sprite sheet
First, download TexturePacker — it's the tool you are going to use for this:
Install and start TexturePacker, activate the trial version for this tutorial.
Here's how you create the sprite sheet in 4 simple steps:
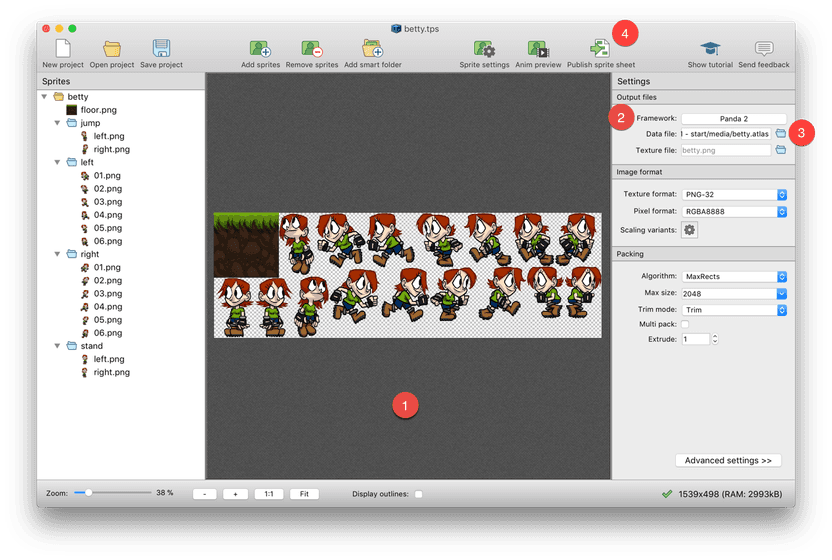
- Drag and drop the folder containing your sprites onto TexturePacker
- Select Panda 2 from the Framework dropdown
- Set the file name for the .atlas file. The name for the image is automatically updated
- Press publish
That's it. Wasn't too complicated, was it?
TexturePacker has some nice features for you: You've added the folder containing the sprites, we call this a smart folder. It checks for all sprites inside the folder and adds them to the sheet.
It also preserves the folder structure as part of the sprite names. E.g. you can access the frame stand/left.png.
TexturePacker detects if you make changes — update, add or remove a sprite and loads the new sprites simply press Publish to write the new sprite sheet.
Optimize your sprites: More FPS and faster loading
Trimming
TexturePacker already does some nice things for you out of the box: It removes additional transparency around your sprites. This is called trimming. Why that?
- It reduces the file size
- It reduced memory usage
- It speeds up the rendering of your game
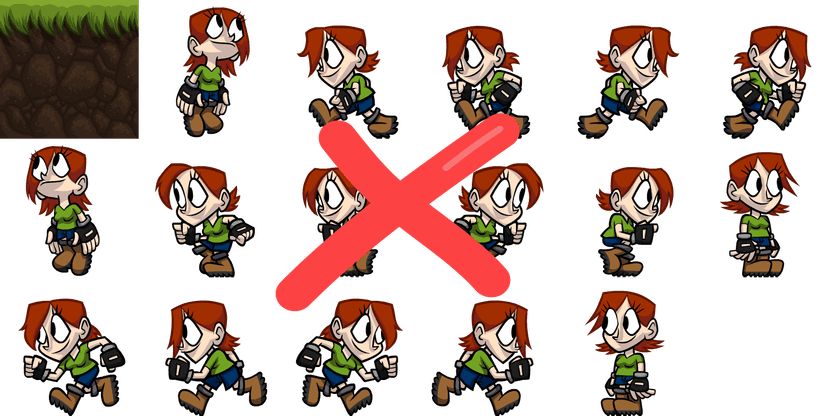
Bad sprite sheet: Untrimmed sprites contain transparency which wastes memory and performance. 4680kb RAM

Sprite sheet optimized by TexturePacker: Obsolete transparency is removed. 2993kb RAM
This is because transparent pixels are not simply nothing: They are data — costing you 4 bytes of RAM each. The graphics hardware has to read each transparent pixel event if it decides not to paint it.
In terms of RAM usage: The original sprite sheet (with untrimmed sprites) consumes 4680kb. Trimming the sprites reduces the memory usage by 36% to 2993kb.
You might now be concerned about how this will affect your game code in Panda. The good answer is: Not at all.
The .atlas file TexturePacker also creates for you contains the exact positions and the original sprite sizes. You game code behaves as if the sprites still contain the transparency.
Using 8-bit pngs (pngquant)
TexturePacker can even do more in terms of optimization: The current file size for the betty sheet is 407kb trimmed. Reducing the amount of colors to 256 also reduced the file size dramatically: 145 Kb remain — with almost no visual impact! This is a reduction in download size by 64%.
You can easily achieve this by setting Texture Format to PNG-8 (indexed).
Let's not return to the game code.
Playing an animation in Panda 2
Ok - back to our code. Let's add the Betty animation to the scene:
Add the following lines to the init method in main.js:
this.sprite = game.Animation.fromTextures('right/');
this.sprite.play();
this.sprite.addTo(this.stage)
Ok — Betty is now running in the top left corner of the screen.
Panda 2 automatically takes all sprites starting with right/ and builds an animation from them.
Just make sure to prefix the sprite names with zeros. This is important because otherwise the order will be
1,10,11,... instead of 1,2,3...
Let's put her on the ground.
As you might remember there's the groundY variable that you returned from makeFloor.
Let's use that to place the sprite. Append these lines to the previous block:
this.sprite.position.set(game.width/2,groundY);6 feet under... not what you expected? Right — Panda's default anchor point is top left.
A better anchor point would be the bottom center. The sprite is 256x256 — so the center is 128/256. Let's change that, append these lines to the previous block:
this.sprite.anchor.set(128,256);Ok. Let's change the animation to stand. Replace the first line with this:
this.sprite = game.Animation.fromTextures('stand/right.png');Why is Betty hovering above the floor? The problem is in the sprite:
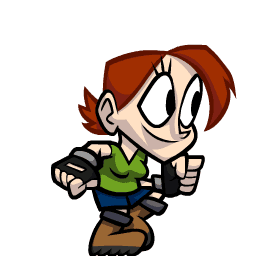
The anchor point of this sprite is in the bottom center.
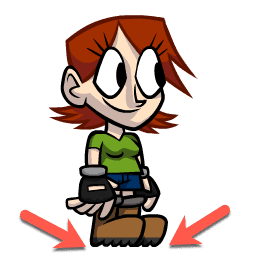
There's some space at the bottom of the sprite. The anchor point should be higher.
No problem you might say: Let's nudge the anchor point position up a bit. Maybe 5 px? No? 10? No? 9? That's it!
this.sprite.anchor.set(128,256-9);Ok. Things to remember: If you play the run animation you have to set the anchor to 128/256. If set the stand frame it's now 128/247. That's not good! There really must be a better solution...
TexturePacker's anchor point editor
Go back to TexturePacker:
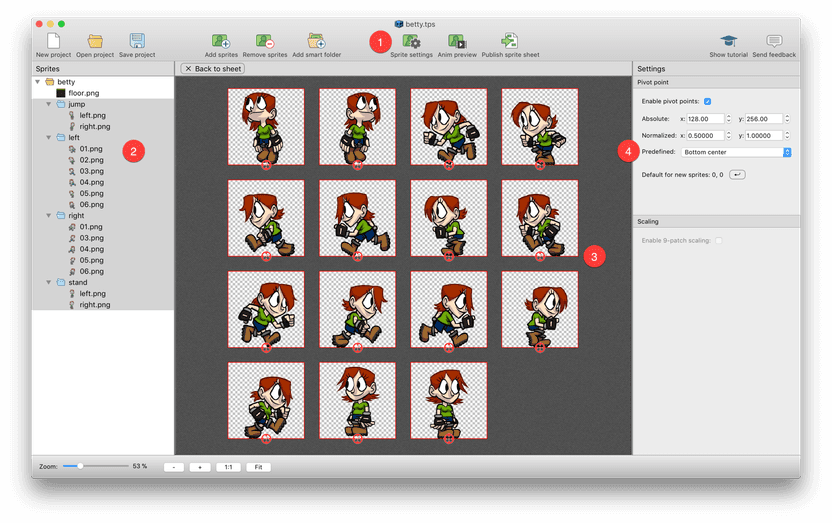
- Click Sprite settings in the toolbar to open the editor
- Select all sprites except for the floor.png
- Click in the center screen and select all anchor points by pressing CTRL-A or CMD-A. You can also use rubber band selection (press mouse button in the center screen and drag the mouse to get a selection rectangle).
- Use the right sidebar's Predefined combo box and set the anchor to Bottom center
So all sprites now have the bottom center as anchor. But we wanted to fix the stand left/right frames... let's do that:
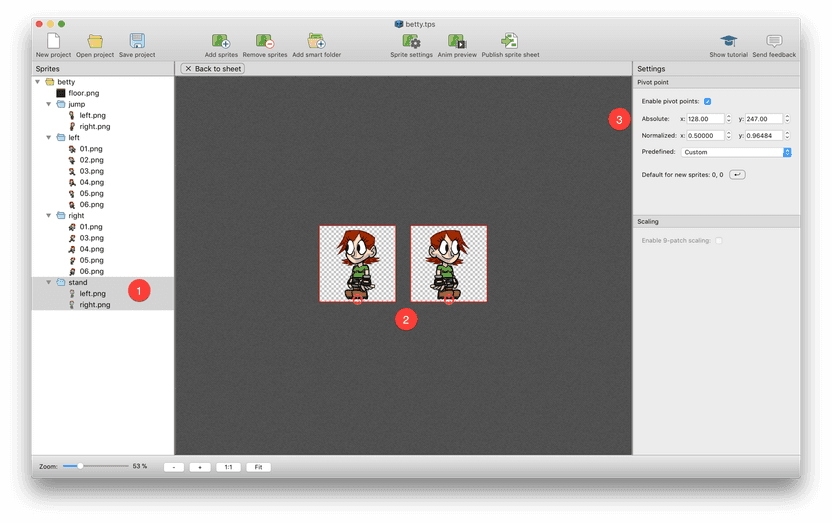
- Select the stand folder
- Select the anchor points in the middle
- Adjust the anchor point - your choice:
- by dragging the anchors with the mouse
- by pressing cursor ↑ 9 times
- by entering the coordinates
Finally, press publish to write the sprite sheet with the new pivot points.
TexturePacker also contains a realtime animation preview. Click Anim preview in the toolbar. The selected sprites are played as animation. The animation adapts to changes in the anchor points in real time.
Switch back to panda and reload the scene. CMD-R / CTRL-R. What's that? Betty is hovering? This is because you are now setting the anchor point twice.
Remove the following line from the code:
this.sprite.anchor.set(128,256-9);Ok — looks good.
Betty's animation is symmetrical, the sprite is lit from the top, not from the side. This allows you to remove the animation phases for left from the sprite sheet because you can simply flip the sprite in the code. This is not always an option — especially in games with strong lighting. E.g. if the character is drawn in a way that he's lit from the right side you can't flip him — this would look very strange — the shadow part would point into the direction of the light source...
But it's fine in our case: Delete the left animation folder, stand/left.png and jump/left.png. Go back into TexturePacker and press publish.
Improving the code
Creating a player class
In this final stage of the tutorial you'll stay in Panda. You've initialised the player animation in the main scene setup. This was ok for the first demo but would not be a good idea for a real game.
Let's create a separate player class to encapsulate all the player data. It'll also contain the sprite itself.
So you'll need the following methods:
init()— to initialize the classaddTo(container)— to add the sprite to the game scenesetPosition(x,y)— to set the initial position of the spriterun(direction)— to move the sprite and start the running animation.direction=1is right,direction=-1is leftstand()— to make betty stand still, facing in the direction of the last movement
There'll also be one method to update the animations:
changeAnimation(action)— update animation, private
So this is the skeleton of the player class. Add this to the main.js before the closing });
game.createClass('Player', {
    init: function() {
    },

    addTo: function(container) {
    },

    setPosition: function(x,y) {
    },

    run: function(direction) {
    },

    stand: function() {
    },

    changeAnimation: function(action) {
    }
});
Let's fill in the methods, start with init:
    init: function() {
        this.sprite = game.Animation.fromTextures('right/');
        this.sprite.anims.run = this.sprite;
        this.sprite.anims.stand = game.Animation.fromTextures('stand/right');

        this.direction = 1;
    },
This creates the animation as variable sprite. The next 2 lines this.sprite.anims.run and this.sprite.anims.stand
add child animations. You can later use this.sprite.play('run') to play the run animation.
You also set the starting direction to right (1).
You can't add the Player class directly to the scene because it's not derived from Container. The sprite
is a member variable. The following method adds the sprite to a container:
    addTo: function(container) {
        this.sprite.addTo(container);
    },
You also have to set the initial position of the player:
    setPosition: function(x,y) {
        this.sprite.position.set(x,y);
    },
The stand() method is also simple. It calls changeAnimation with the stand animation:
    stand: function() {
        this.changeAnimation('stand');
    },
run(direction) sets the direction and moves the player and updates the animation.
The new position is calculated using the following formula: direction * speed * game.delta.
game.deltais the time between the last game update and the current. This lets the player move with the same speed on all devices.speedis the speed value, a constantdirectionis 1 for right, -1 for left
    run: function(direction) {
        this.direction = direction;
        var speed = 400;
        this.sprite.x += direction * speed * game.delta;
        this.changeAnimation('run');
    },
The final method is changeAnimation.
The first line this.sprite.scale.x = this.direction; flips the animation if direction=-1.
The second line avoids restarting the animation if it's already playing.
    changeAnimation: function(action) {
        this.sprite.scale.x = this.direction;
        if (this.sprite.currentAnim === this.sprite.anims[action]) return;
        this.sprite.play(action);
    }
Add the player to the scene and add controls
Remove the test code from the previous chapter and update the init() method of the game scene:
    init: function() {
        this.backgroundColor = '#cceeff';

        var groundY = this.makeFloor();

        this.player = new game.Player();
        this.player.addTo(this.stage);
        this.player.setPosition(game.width/2, groundY);
    },
The last thing missing are the controls. Add the following method to the scene:
    update: function() {
        if (game.keyboard.down('LEFT')) {
            this.player.run(-1);
        }
        else if (game.keyboard.down('RIGHT')) {
            this.player.run(1);
        }
        else {
            this.player.stand();
        }
    },
Ok that's it: