A beginner's guide to lossless and lossy PNG optimization


Why should I optimize my PNG sprite sheets?
Optimizing your sprite sheets can greatly reduce the download size and start-up time of your game.
By using index (8bit) PNG images, you can achieve a significant reduction in file size without sacrificing much in terms of image quality. This can be especially beneficial for games with a large number of graphics, as it can reduce the download time by a similar amount.
How can I optimize the PNG files?
To optimize your PNG files, you can use one or both of the following methods:
- Lossless optimization: This method uses advanced compression algorithms and removes unnecessary metadata from the file to reduce its size without degrading the image quality.
- Lossy optimization: This method involves reducing the number of colors in the image. This can be especially effective if the image has a large number of colors that are similar. By reducing the number of colors, the PNG file can be written as an indexed file, which takes up significantly less space.
Optimizing PNGs with TexturePacker
TexturePacker provides a built-in, state-of-the-art PNG compressor that can be used to optimize your sprite sheets without the need for additional tools or services. To use this feature, you can adjust the following settings in TexturePacker:
- TextureFormat: This setting allows you to choose between two different PNG formats: PNG-32 and PNG-8 (indexed). PNG-32 provides higher quality but is also larger in size, while PNG-8 (indexed) offers a smaller file size but may sacrifice some image quality.
- Dithering (PNG-8 only): This setting determines how colors are approximated when reducing the number of colors in the image. The options are
PngQuantLow,PngQuantMedium, andPngQuantHigh, which represent different levels of color accuracy. PngQuantLow produces the smallest file size but may result in visible color artifacts, while PngQuantHigh offers the best color accuracy but may result in a larger file size. - PngOptLevel: This setting controls the level of optimization applied to the PNG file. The options range from 0 (no optimization) to 7 (maximum optimization), with higher levels offering better compression but potentially longer processing times.
By adjusting these settings, you can fine-tune the balance between file size, image quality, and processing time for your sprite sheets.
PNG-32 vs PNG-8 (indexed PNGs)
PNG-32 is a lossless format, which means it retains the same quality as the original sprite images. Images in this format can use the full range of 16.777.216 colors and do not change any pixels or reduce the number of colors. This mode is useful if you want the best possible image quality at the expense of a larger file size. It also allows you to set Transparency Handling: Reduce Border Artifacts, which can help prevent rendering issues at the borders of sprites.
PNG-8, also known as indexed PNG, reduces the number of colors from 16.777.216 to 256 by selecting the most relevant colors. When using this mode, TexturePacker automatically enables the Dithering setting, which can help reduce banding artifacts in gradients.
IMPORTANT: Switching from PNG-32 to PNG-8 does not reduce the amount of RAM required to display the images. The PNG file size is reduced, but the amount of RAM required remains the same (width * height * 4 bytes). To reduce the RAM usage, other strategies must be employed.
Lossy optimizations
What are banding artifacts?
When reducing the number of colors in an image, smooth transitions between colors in gradients may become impossible. This can result in clusters of pixels with the same color, separated by hard transitions between clusters.
The image on the left side shows an example of these artifacts:

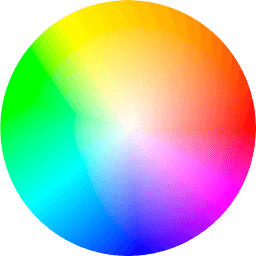
By using the Dithering setting, you can reduce the visibility of these artifacts and improve the appearance of gradients in indexed PNG images.
Reducing banding artifacts with dithering
To reduce the visibility of banding artifacts, pixels from one color cluster can be exchanged with pixels from neighboring clusters. This process, known as dithering, mixes the colors on a pixel-by-pixel basis and can improve the appearance of gradients in indexed PNG images.
The artifacts in the example above are not completely eliminated, because the original image used 34,112 colors in almost equal amounts, which were reduced to 256 when using indexed PNG. The original color wheel was 64KB, while the optimized one is 15KB.
In a real-life scenario, these artifacts are less noticeable in static images and almost invisible in moving sprites.
Take a look at these two images: The left one is the original with 240KB, while the right one is the 8-bit dithered version, which is 91KB. For me, it's almost impossible to see a difference:
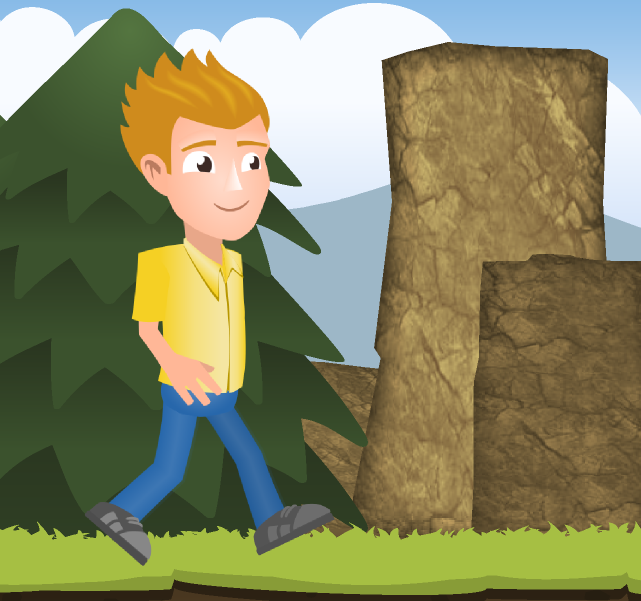

By using dithering, you can reduce the visibility of banding artifacts and improve the appearance of gradients in indexed PNG images without significantly increasing the file size.
To improve the quality of the compressed sprite sheet, try to reduce the number of colors used in the sheet. Group your sprites by color and place them on different sprite sheets. This can help reduce the number of colors in each sheet and improve the quality of the indexed PNGs.
Lossless optimization
PngOptLevel: 0-7
TexturePacker includes additional lossless optimizations that are applied when writing PNG images. These optimizations do not change the pixel data, but instead optimize how the file is written.
| PngOptLevel | Description |
|---|---|
| 0 | Writes the image without any optimizations |
| 1 | Converts a 32bit image to 8bit if a lossless conversion is possible |
| 2..7 | Tries different strategies to reduce the compressed size of the image. Higher levels may take longer to process. |
By adjusting the PngOptLevel setting, you can control the level of optimization applied to the PNG file and trade-off between file size and processing time.
Optimizing sprite sheets with TexturePacker: A practical example
In that chapter, we provide an example of using TexturePacker with specific graphics. This will help you see how much you can expect to gain in terms of performance and file size reduction.
This is an already optimized version of an input image that we will use in this tutorial to keep the file size small:
The sprite sheet in this example has the following properties:
- 1808x988 pixels
- 833076 bytes
- 32bit
- 5285 colors
The sprite sheet may not appear to have many colors, but this is because most of them are used for anti-aliasing to smooth areas between different colors and the borders of the sprites.
I've compressed the sprite sheet with TexturePacker using multiple settings. In the chart below, you can see how the file sizes change with different optimization levels and dithering settings.
The blue bars represent the 32bit original version of the sprite sheet, compressed with different PngOpt settings.
The green, orange, and red bars show the 8bit lossy compression of the image with different dithering settings.

This chart chows the compresion times used for the same sprite sheets:

If you want your sprite sheets at full quality, you can achieve a significant reduction in file size by setting the PngOptLevel to 2. Higher levels may further reduce the file size, but they also increase the processing time.
A much larger reduction in file size can be achieved by switching from lossless (32bit PNGs) to indexed 8bit PNGs. For 8bit PNGs, setting the PngOptLevel to 1 is sufficient to achieve a significant reduction with optimal performance. If you want to squeeze out even more bytes, you can try PngOptLevel 4, but this comes at a cost of increased processing time.
The chart also shows that dithering has almost no impact on the compression time.
Comparison of TexturePacker and TinyPNG
Both TexturePacker and TinyPNG provide similar image quality and size when
using PngQuantHigh and PngOptLevel 4. However, TexturePacker often produces
smaller images with slightly less quality when using PngQuantLow or PngQuantMedium.
One advantage of TexturePacker is that it optimizes images while creating the sprite sheets, eliminating the need for an additional processing step or uploading images to a server. This can save time and effort for developers, and also makes the build process more stable by removing the reliance on external services.
Additionally, you can optimize as many sprite sheets as you want without incurring additional fees. This makes TexturePacker a cost-effective solution for optimizing images in your projects.
Recommended settings for lossless and lossy compression
The following table summarizes the recommended settings for optimizing PNG sprite sheets with TexturePacker, depending on whether you are using lossless or lossy compression.
These settings offer a good balance between performance and file size.
Lossless compression
| Setting | Value |
|---|---|
| TextureFormat | PNG-32 |
| PngOptLevel | 2 |
These settings will produce a good file sizes without sacrificing any image quality, as the full range of colors will be preserved.
Lossy compression
| Setting | Value |
|---|---|
| TextureFormat | PNG-8 |
| Dithering | PngQuantHigh |
| PngOptLevel | 1 or 4 |
These settings will produce a smaller file sizes while still maintaining good image quality. The PngQuantHigh setting for the Dithering parameter will ensure that colors are approximated accurately, while the PngOptLevel setting of 1 or 4 will provide a good balance between file size and processing time.
Overall, the best settings for optimizing PNG sprite sheets with TexturePacker will depend on your specific requirements and preferences. Experiment with different settings to find the combination that works best for your project.
Conclusion
In conclusion, optimizing PNG sprite sheets with TexturePacker can significantly reduce the file size and start-up time of your game or application without sacrificing too much in terms of image quality.
By using the built-in PNG compressor and adjusting settings for lossless and lossy optimization, you can fine-tune the balance between file size, image quality, and processing time for your sprite sheets. Overall, optimizing your sprite sheets with TexturePacker can improve the performance and accessibility of your game or application.