How to use sprite sheets with GameMaker
In this tutorial you are going to learn:
- How to pack sprite strips and grids with TexturePacker
- Import these strips/grids into GameMaker Studio
- Tightly pack sprite sheets with TexturePacker
- Load tightly packed texture + data files in GameMaker
The complete tutorial project is available on GitHub.
Install TexturePacker
With TexturePacker you can easily create sprite sheets for GameMaker. Download TexturePacker, it is available for macOS, Windows and Linux. You can test it within a 7-day trial period before purchasing a license:
Create a sprite strip
Start TexturePacker and drop the sprites that should be packed on TexturePacker's main window. You can also drop folders, TexturePacker will automatically scan them for image files and add them to the sheet.
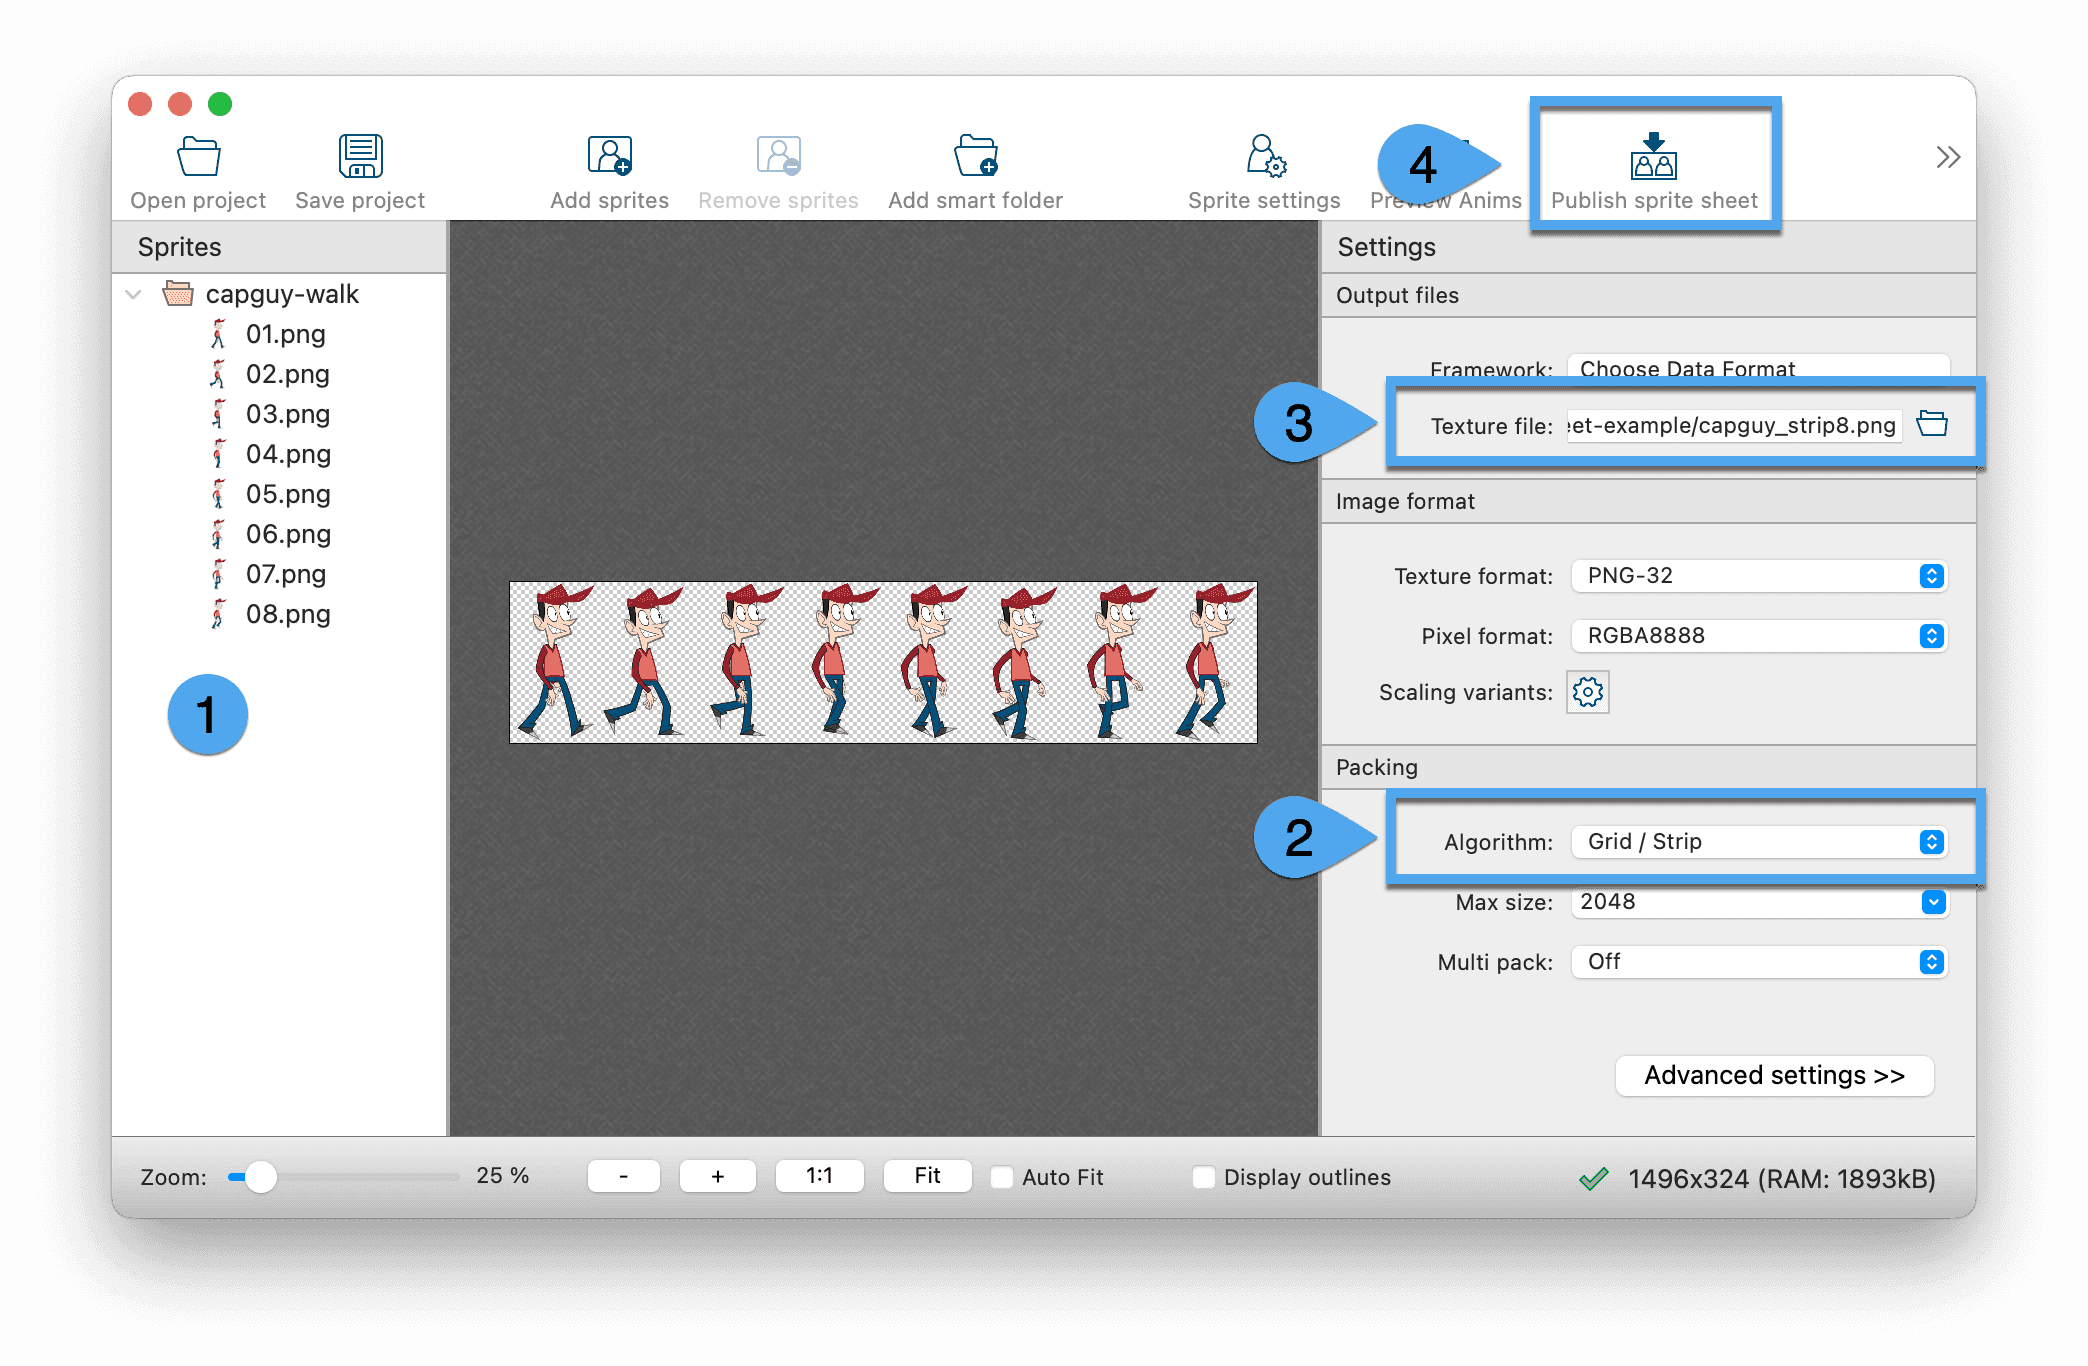
- After dropping your animation sprites on TexturePacker, in the center view a preview of the packed sprite sheet is displayed.
- Select algorithm Grid / Strip. TexturePacker will pack the sprites in alphabetical order from left to right, until the maximum texture size is reached.
- Use the folder icon to open a file selector and set the file name for the packed Texture file.
- Publish sprite sheet will save the sprite sheet texture on disk.
Please make sure that the texture file name has a _stripN suffix. The number N tells GameMaker Studio the
number of frames in which the strip should be split during import.
Import sprite strip in GameMaker Studio
In GameMaker Studio simply drop the sprite sheet on the Sprites folder of the Asset Browser:
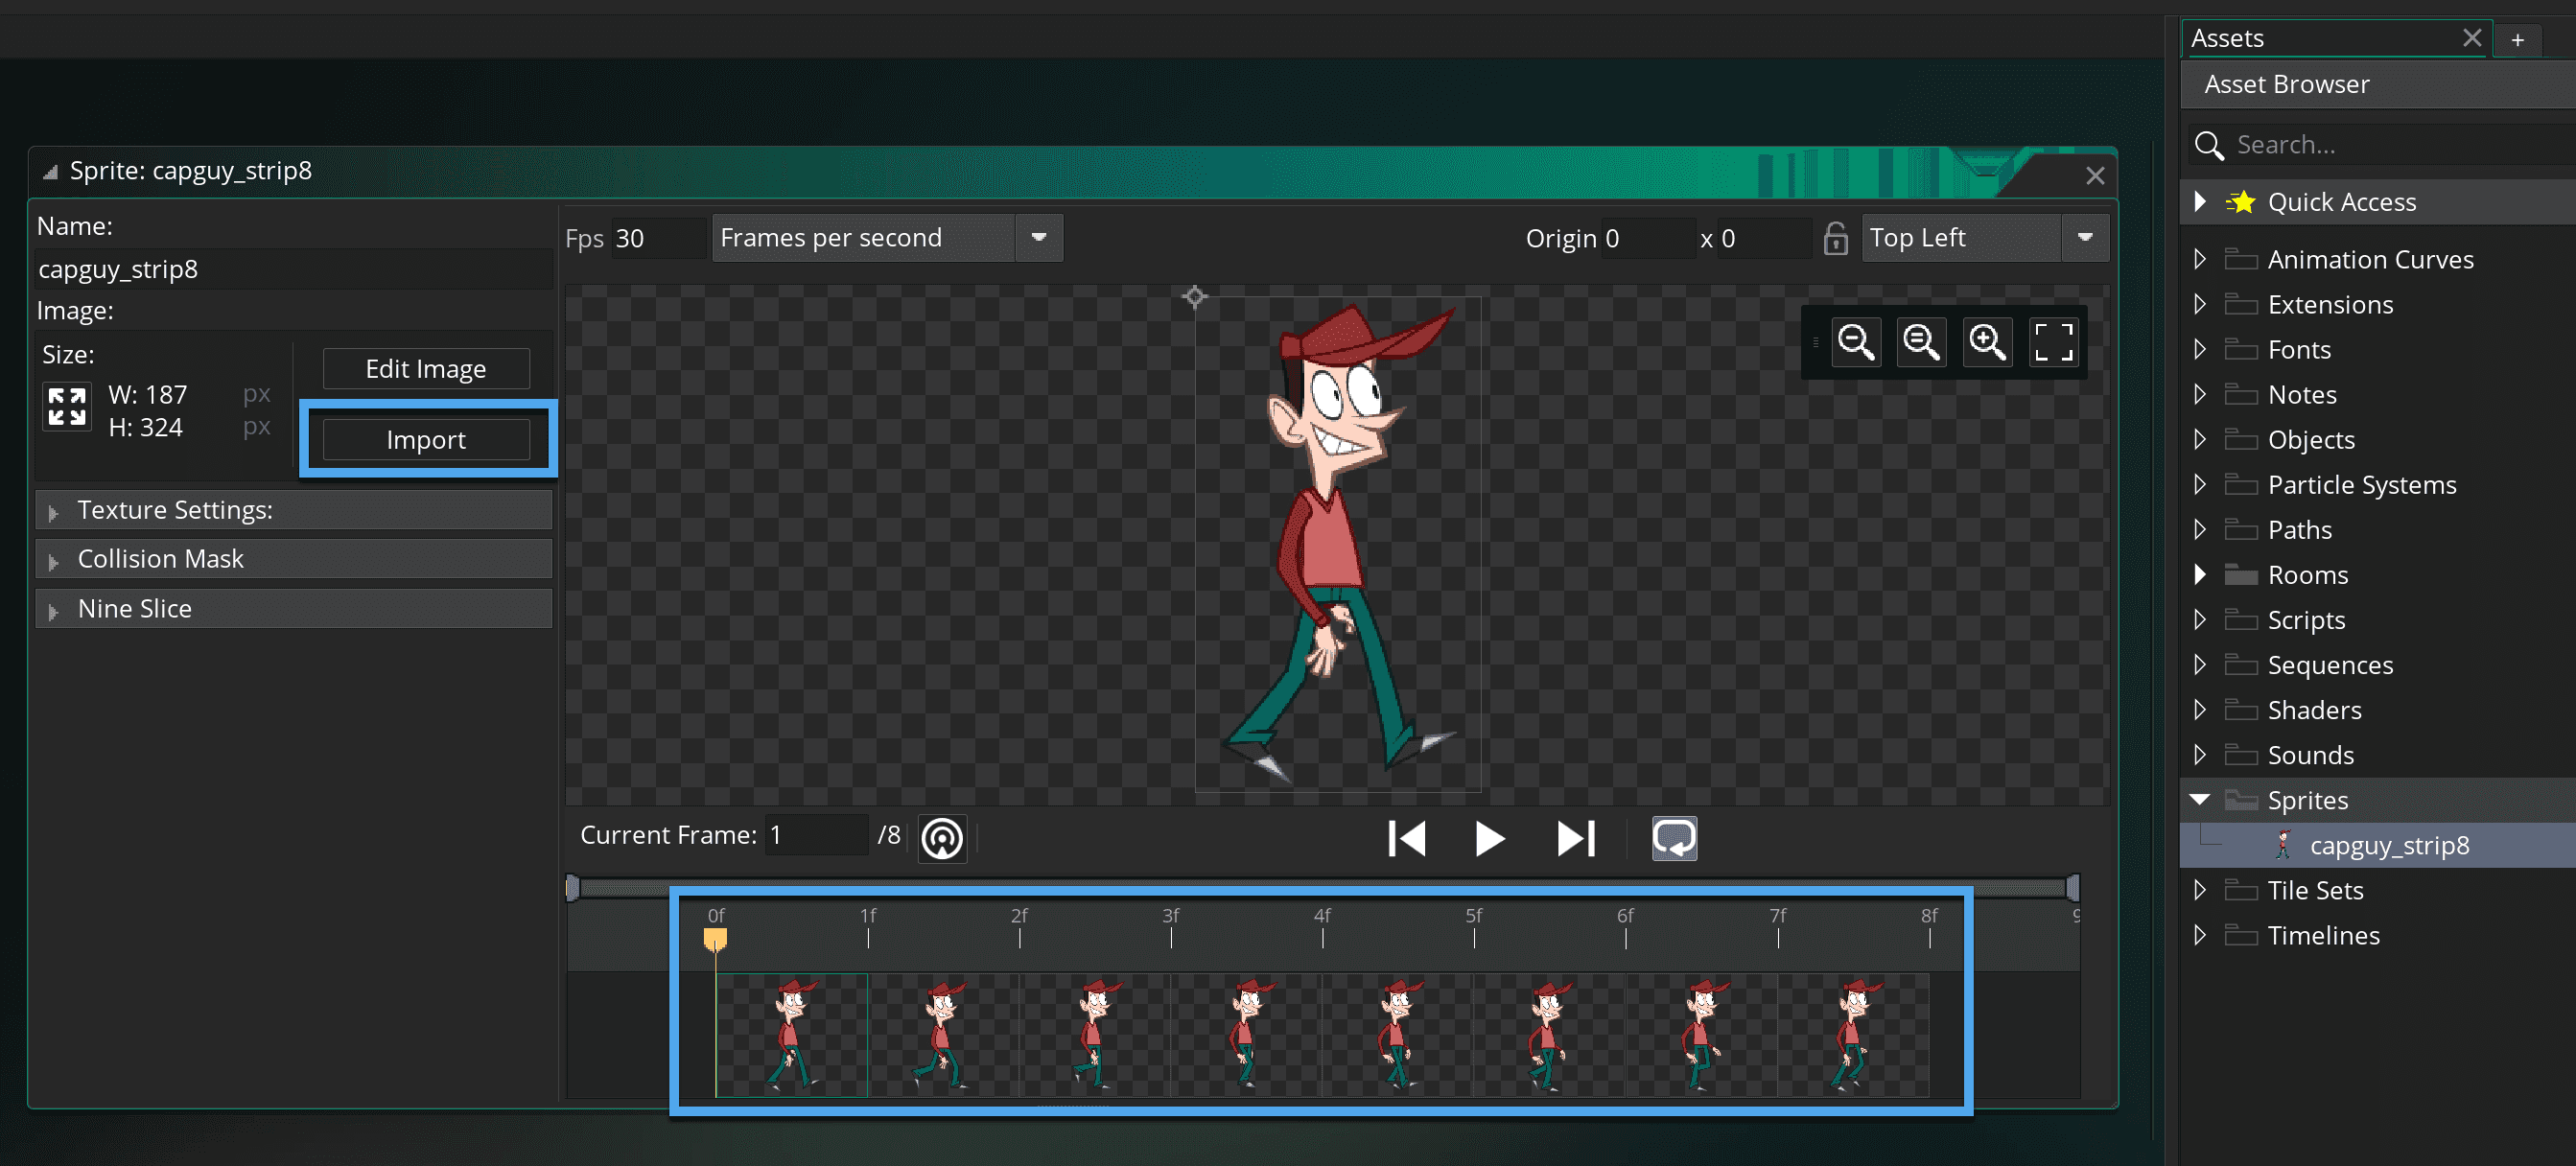
GameMaker Studio automatically imports the sprite sheet and opens the sprite editor. At the bottom of the sprite editor window you can see the individual sprite frames in which the sheet has been split, according to the file name suffix.
If you've changed the sprite sheet, use the Import button to re-import the new sprite sheet.
Pack sprites with grid layout
In TexturePacker's Grid / Strip mode, sprites are packed as strip from left to right until the maximum texture width is reached. Then a new line of sprites is started, and the sprites are placed on a grid:
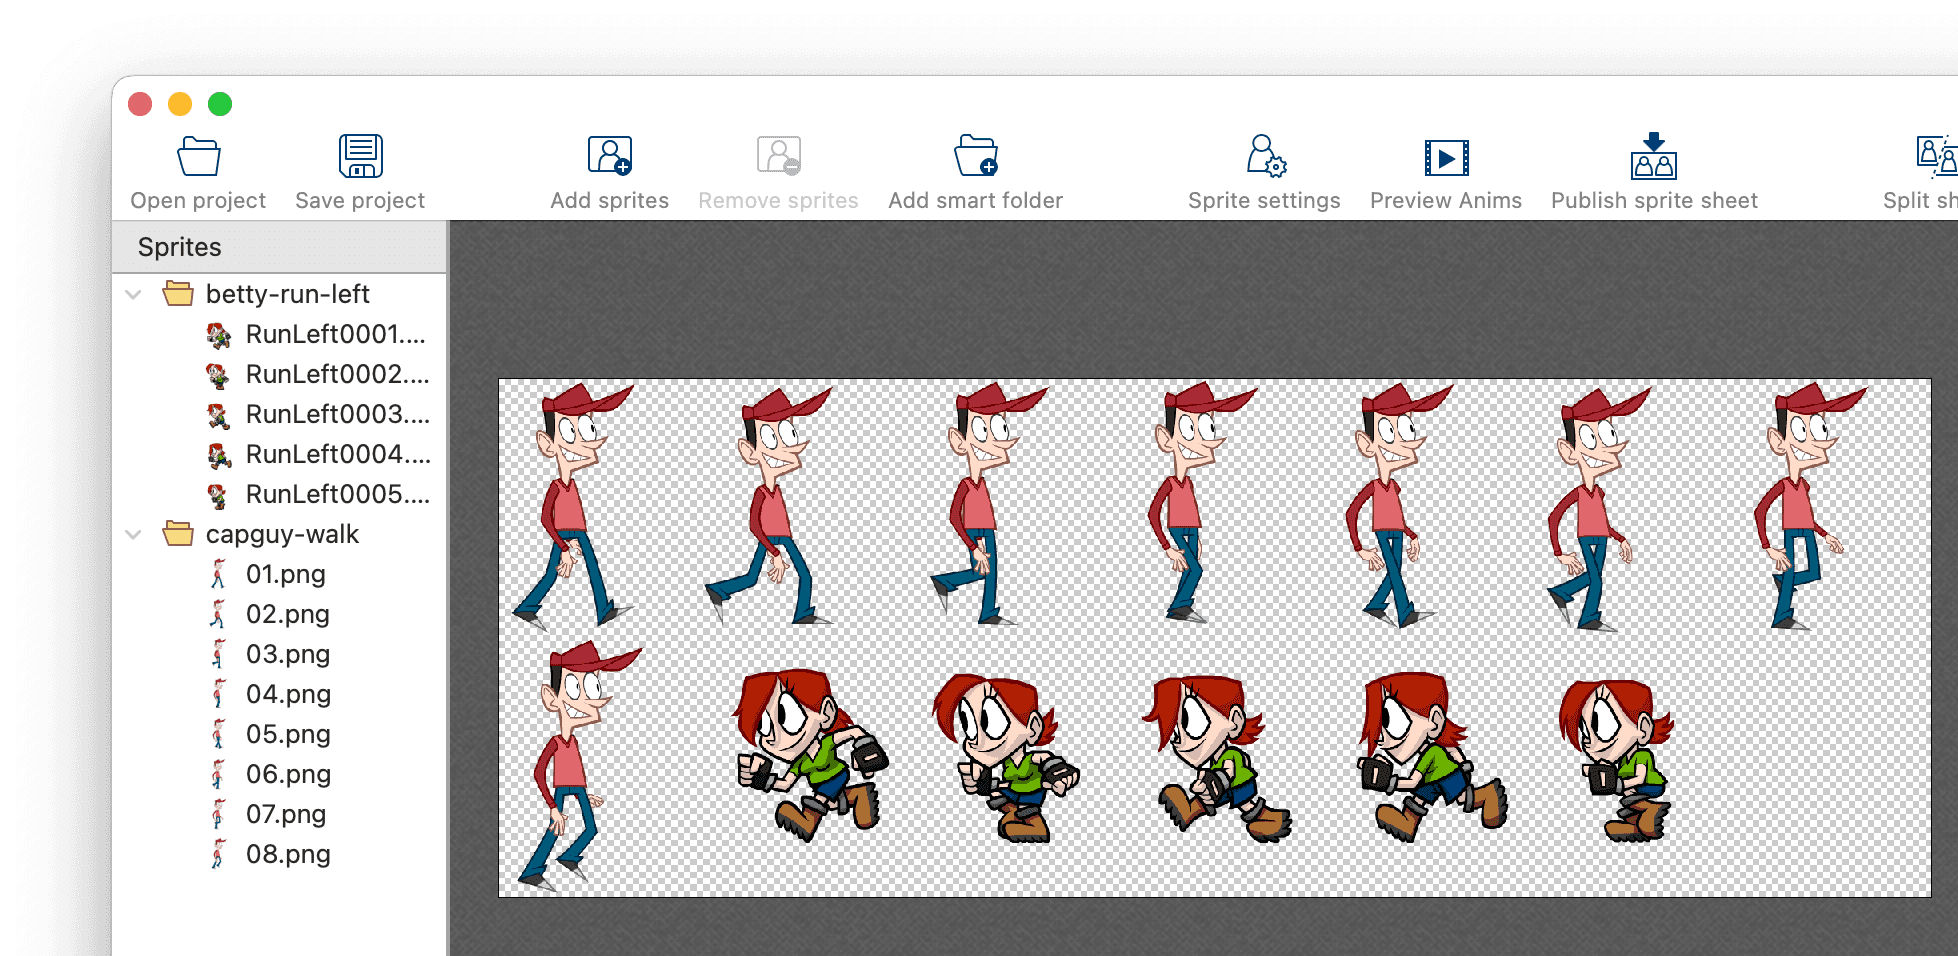
Of course, you can increase the Max size of the texture to get all sprites packed as strip. But in this section we will learn how to import a sprite sheet with grid layout.
First, don't add a _stripN suffix to the sprite sheet's file name, because we don't want GameMaker Studio
to split the sheet automatically.
Import sprite sheet with grid layout in GameMaker Studio
After importing the sprite sheet in GameMaker Studio, click on Edit Image in the sprite editor. Then select Convert to Frames from the Image menu:
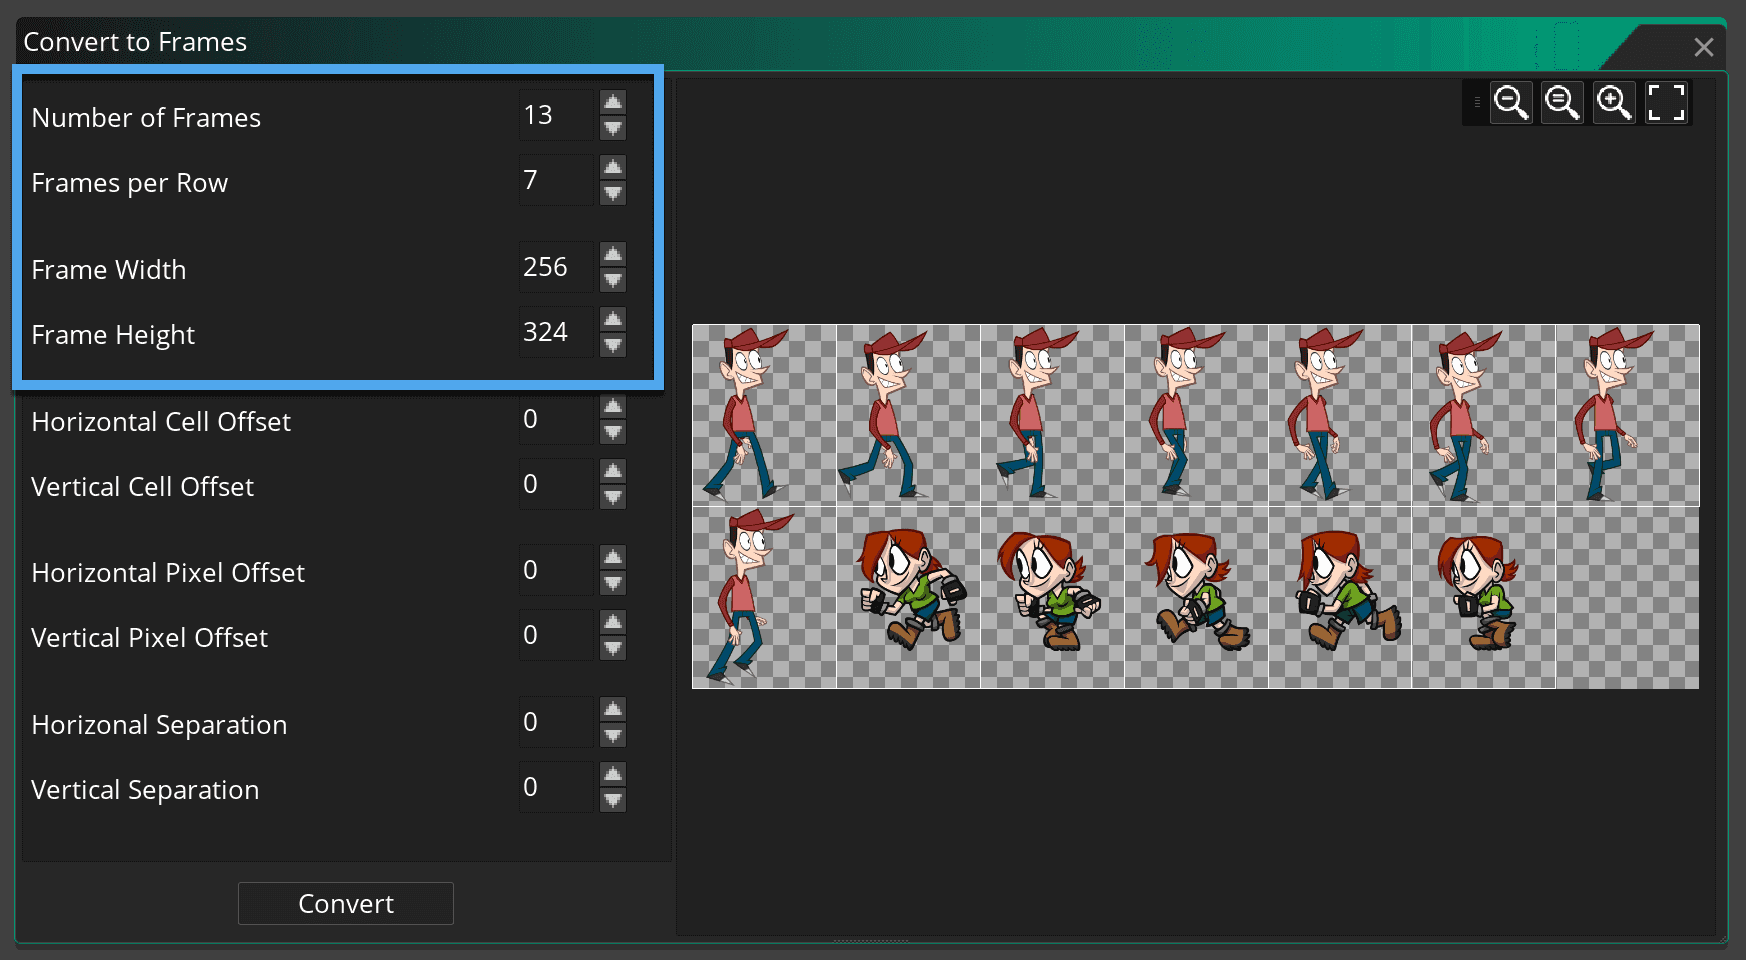
To split the sheet in sprite frames you have to enter...
- the total number of sprite frames
- the sprites per row
- the size of a sprite frame
On the right side of the window a preview of the sprite frames is displayed.
With the Horizontal / Vertical Offset the top-left corner of the grid can be set.
To extract the "betty-run-left" sprites in our example, we skip the first column and row by setting
the cell offsets to 1 and reduce the number of frames to 5:
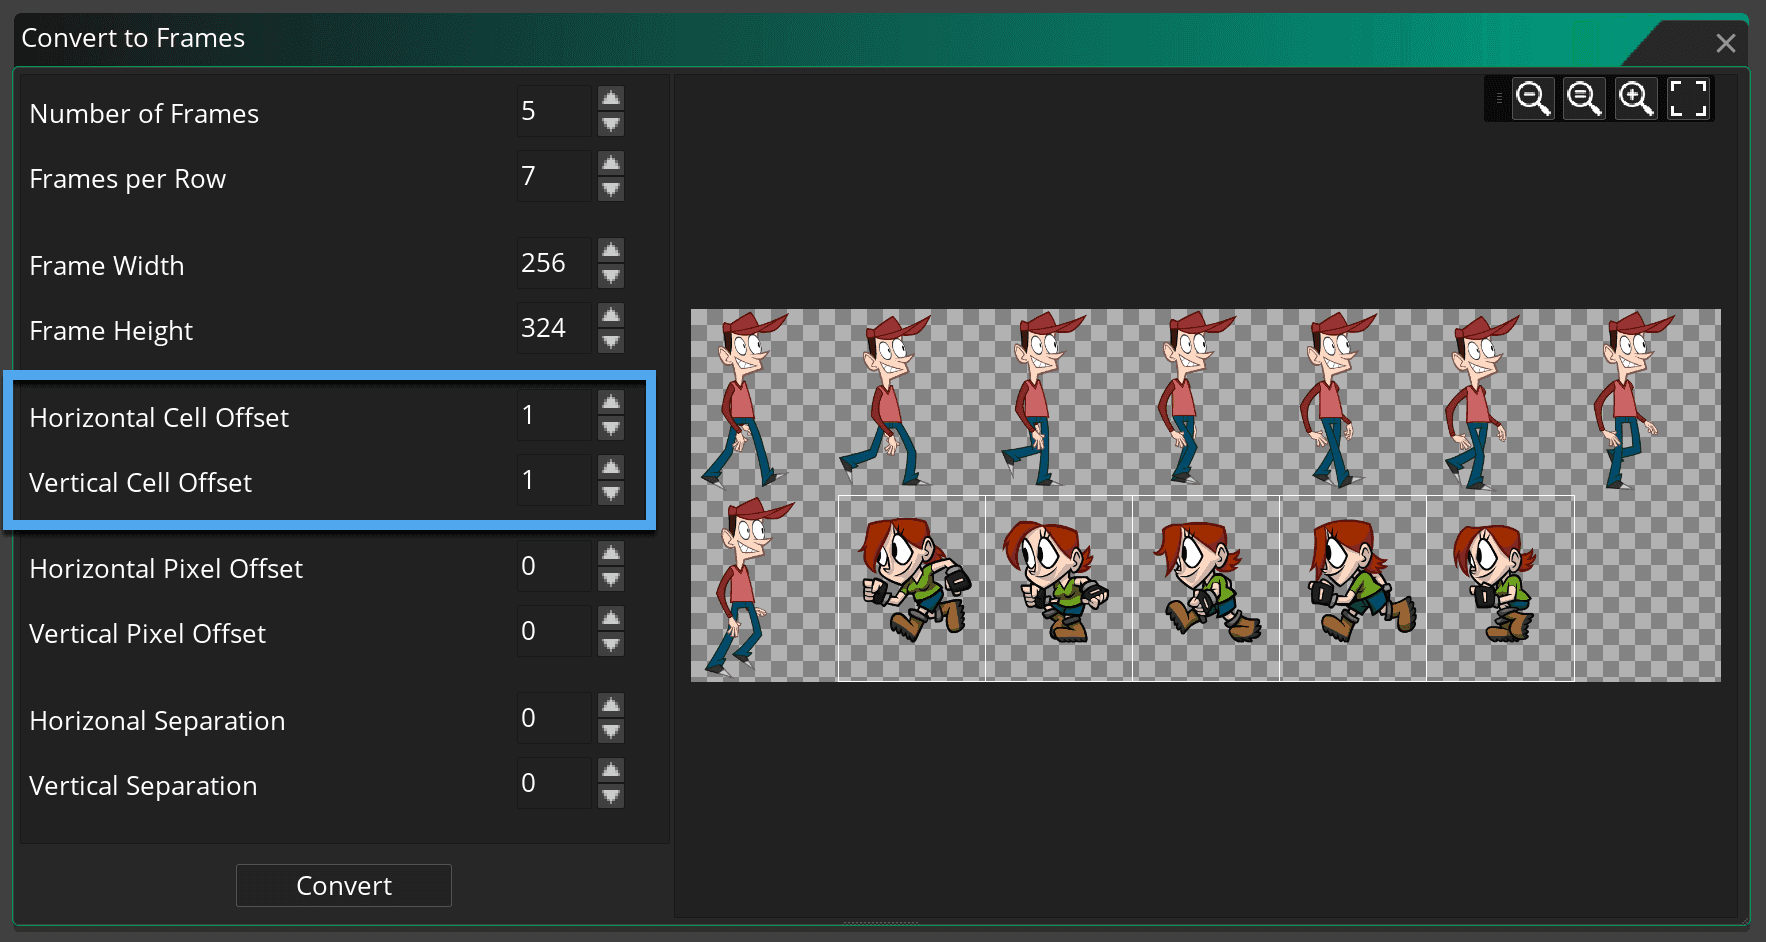
Drawbacks
... of the strip/grid layout as described above:
-
Equal sized frames:
All cells of a strip or grid have the same size. If your sprites differ in size, a lot of space is wasted. -
Only a convenient solution for animations:
All sprites of a sprite sheet are grouped in one GameMaker Sprite as animation frames. But individual sprites of the sheet cannot be accessed independently, and they cannot be referenced by name. -
Sprite sheets are re-packed:
When a sprite strip sheet is imported and split by GameMaker Studio, the individual sprite images are saved in your project directory. The sheet image is no longer needed after importing it. During the build, the sprites are packed on internal sprite sheets, which are squared and have a "power-of-two" size (e.g. 2048x2048). This size constraint often wastes memory due to unused texture space. -
Texture embedding:
For some platforms, GameMaker embeds the internally generated sprite sheets in the executable. For large games, the executable will get very big. If memory, address space, or loader performance is limited, this might be a problem.
Create a tightly packed sprite sheet
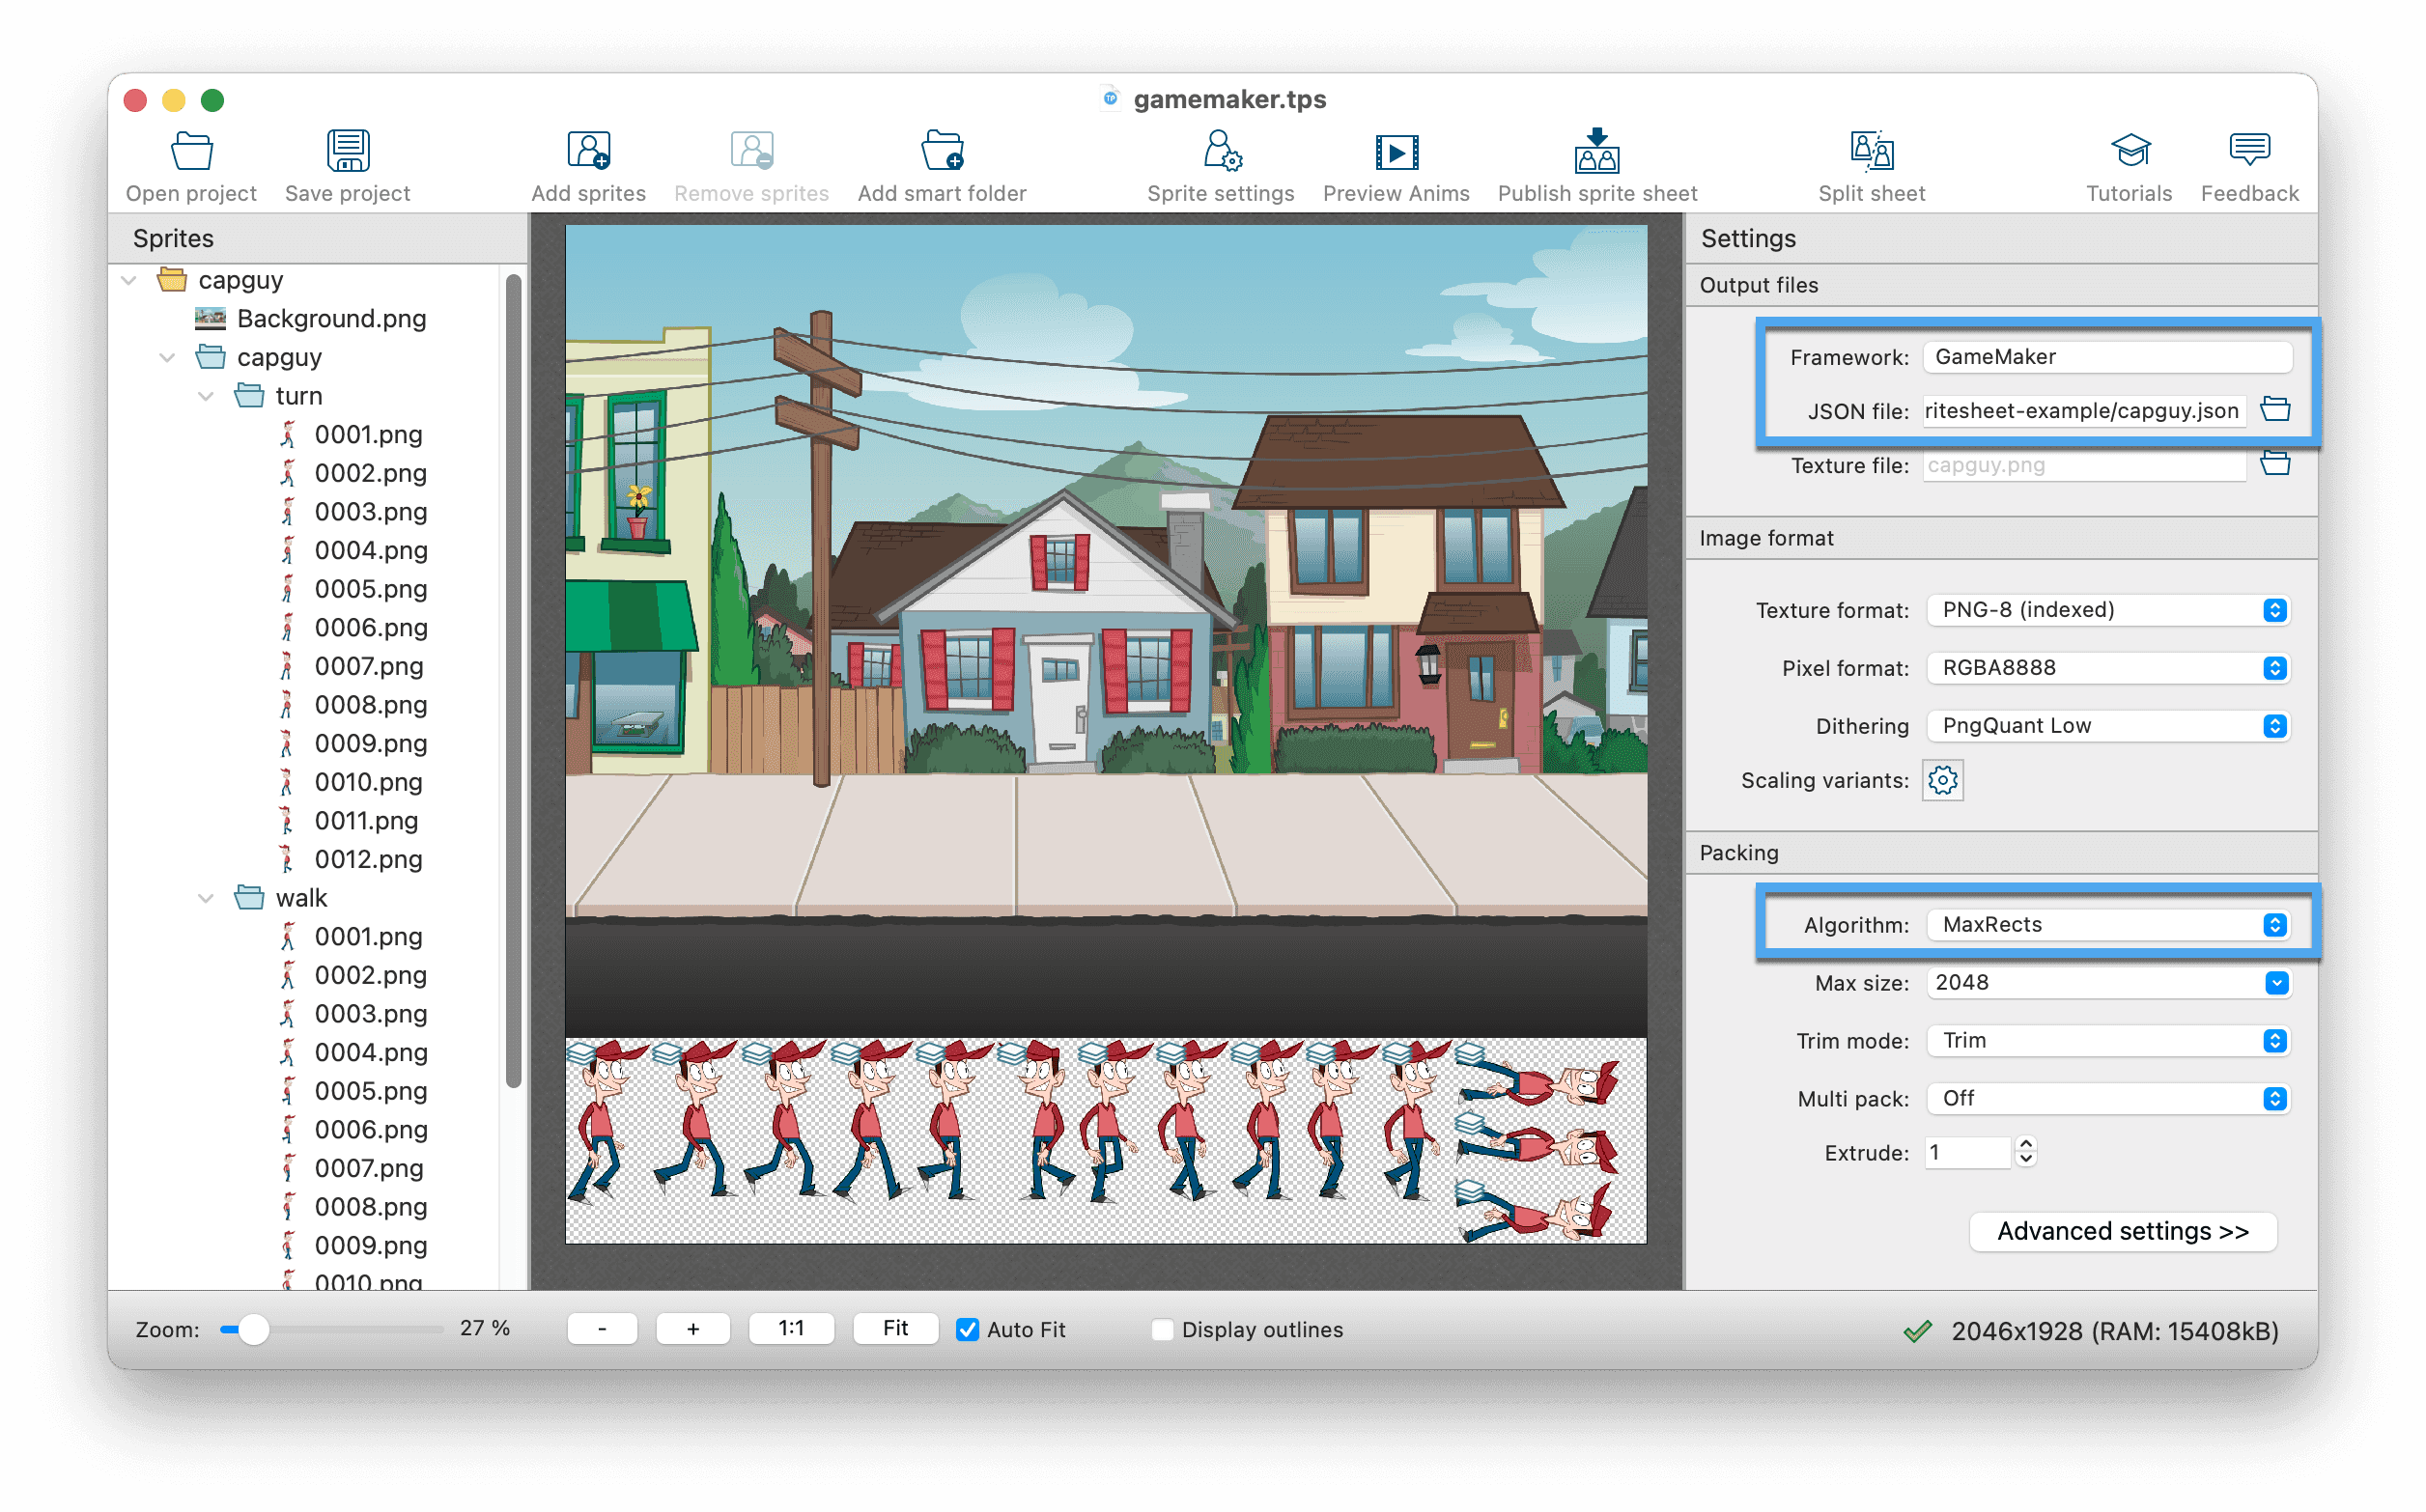
With TexturePacker you can pack your sprites more tightly than using a grid layout. The sprite name and the position on the sprite sheet are written to a JSON data file.
- Select GameMaker as Framework
- Specify the file name for the JSON file. By default, the Texture file will be saved in the same directory.
- Choose MaxRects as Algorithm.
Load sprite sheet with GameMaker
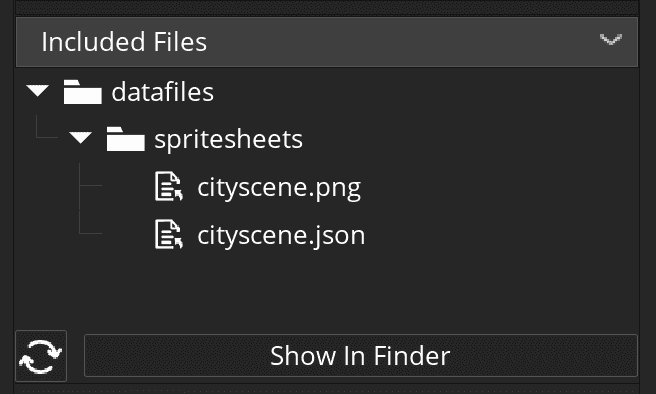
To make the generated sprite sheet and data file accessible during runtime, add them as Included Files in your GameMaker project. If you copy them to the datafiles directory of the project (or publish them with TexturePacker directly to this location), they will be automatically included.
In GameMaker Studio they will be displayed in the Included Files panel:
To load the sprite sheet, add the following script from our GitHub example repository to your project:
The script provides two methods, the first one is used to load the JSON data file and the texture image. You can call it in the creation code of your room or scene, and store the handle in a global variable:
global.atlas_cityscene = tp_load_texture_atlas("spritesheets/cityscene.json");To draw a sprite from the atlas, use the following function:
tp_draw_sprite_from_atlas(global.atlas_cityscene, "Background.png", 0, 0);
...

tp_draw_sprite_from_atlas(global.atlas_cityscene, "capguy/walk/0001.png", x, y);
If the atlas is no longer needed, it should be released to avoid memory leaks. This can be done in the cleanup event handler:
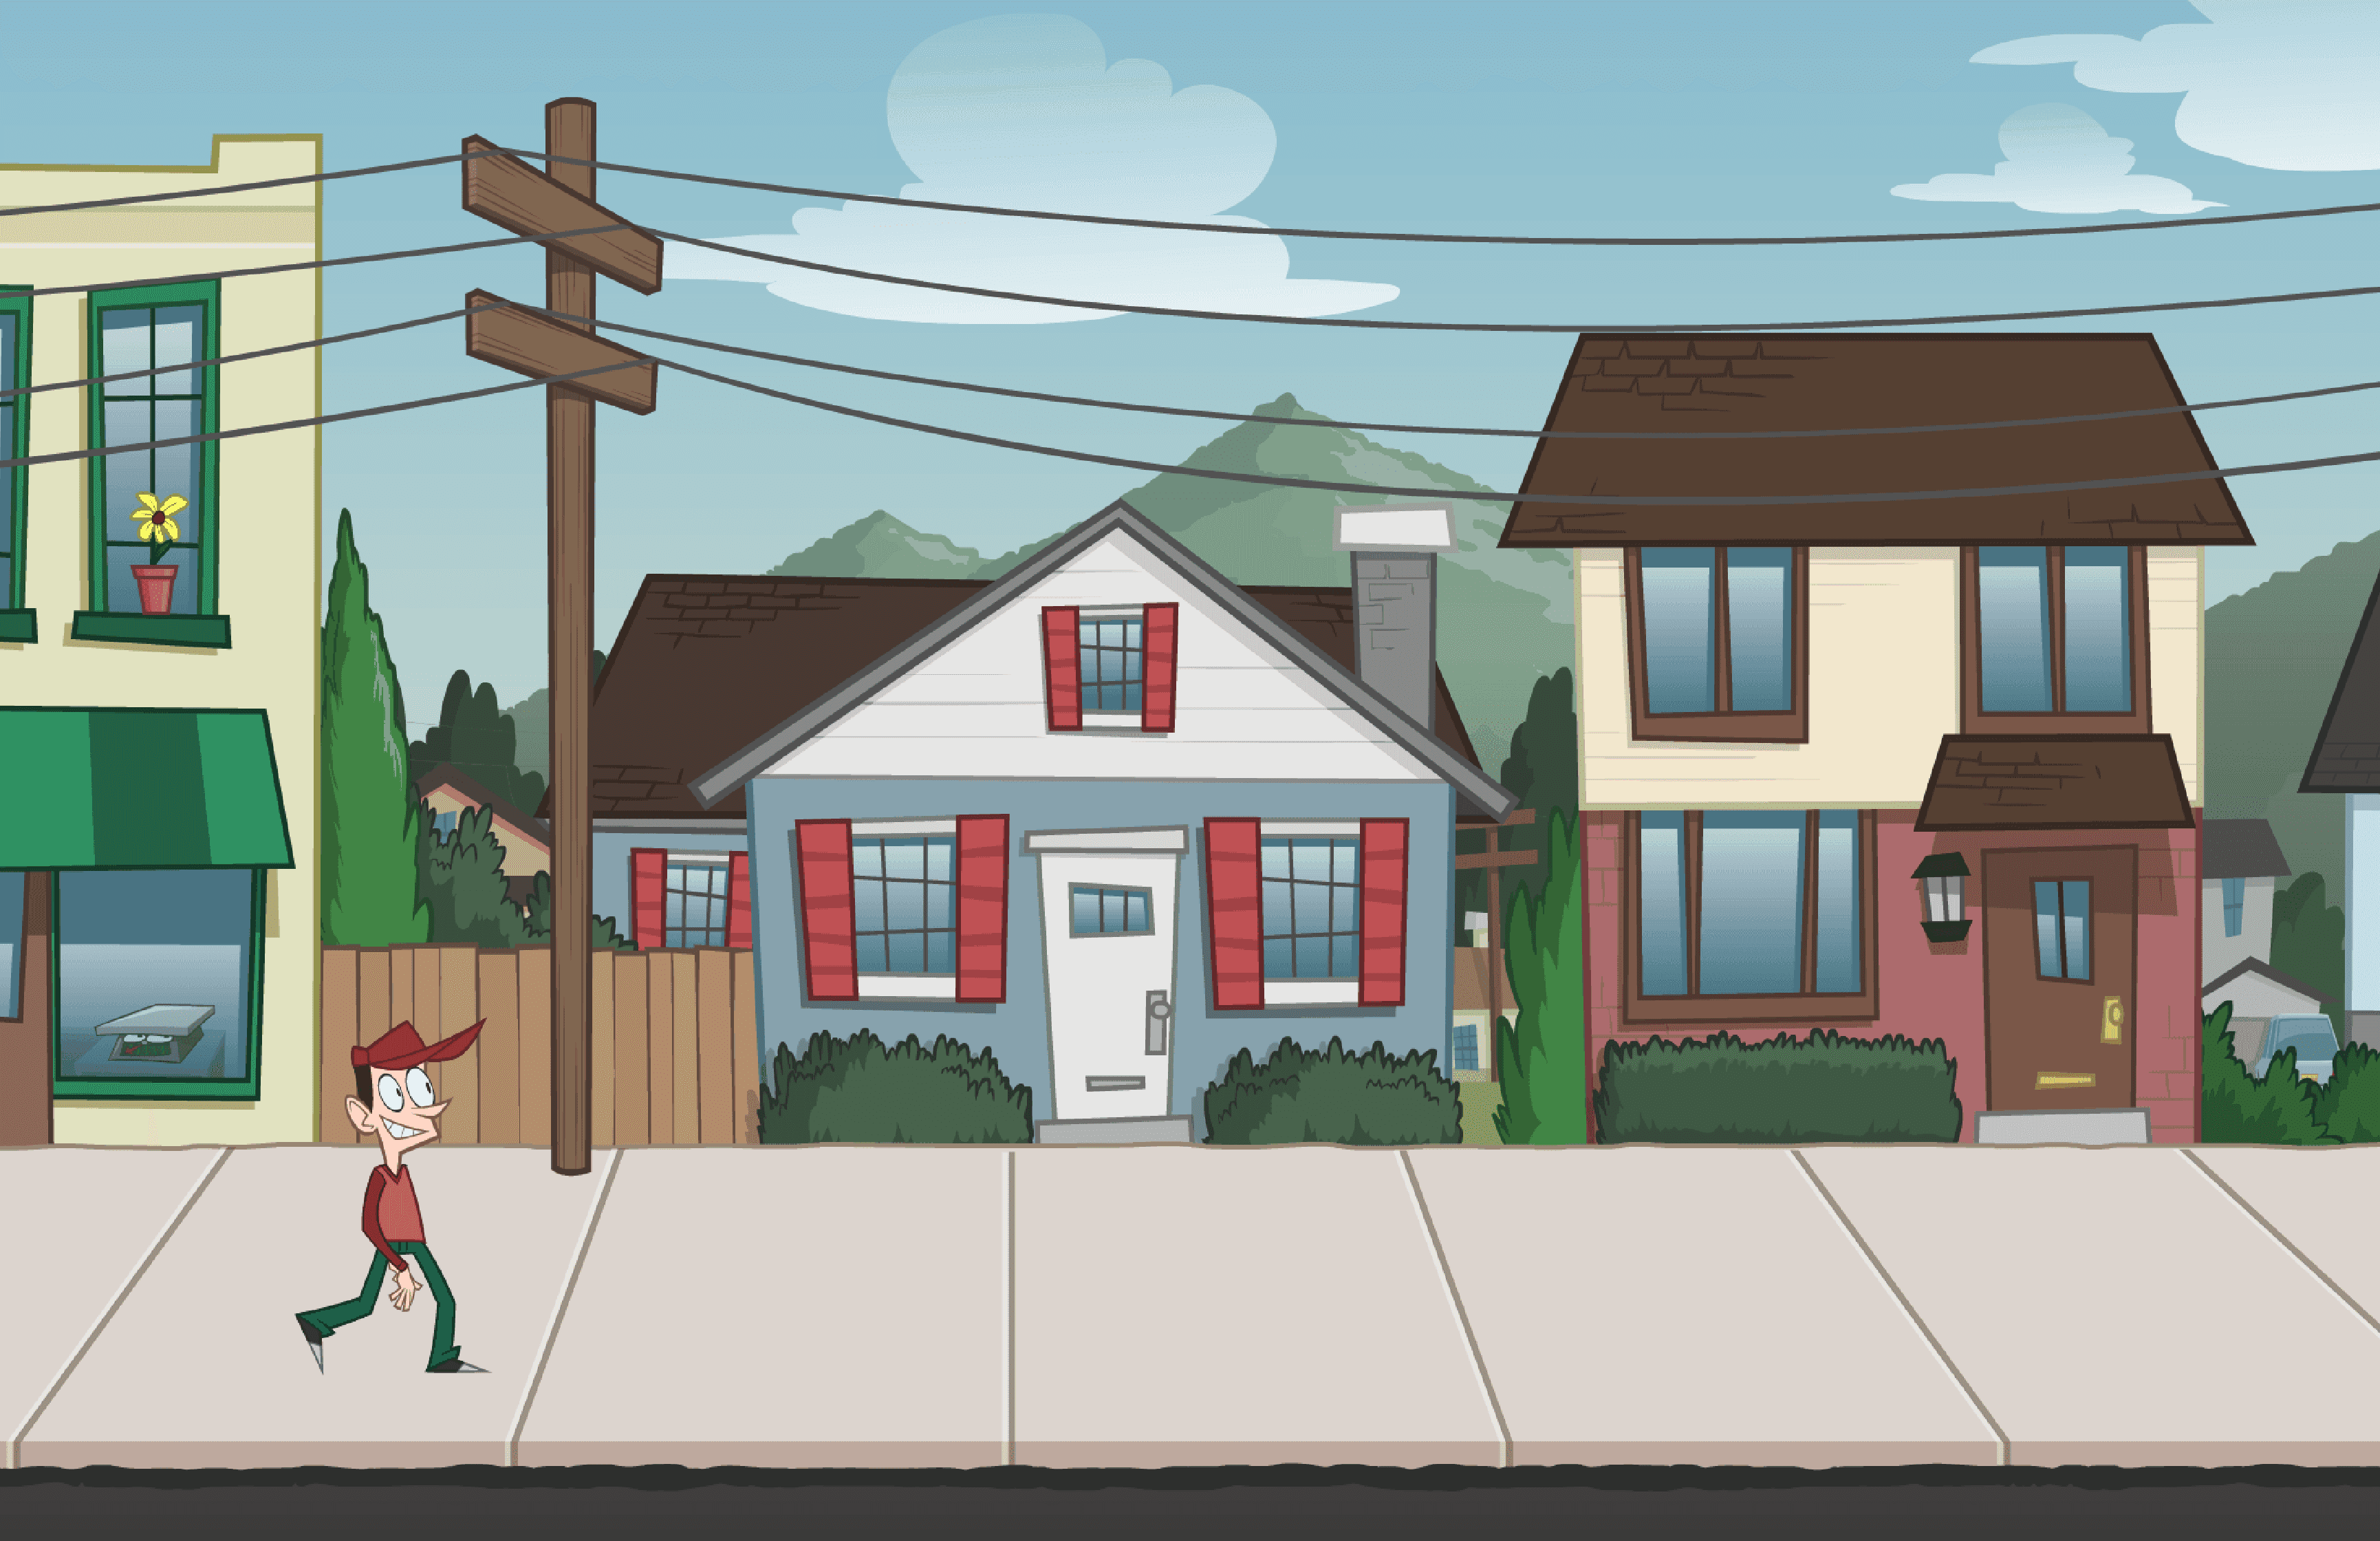
tp_release_texture_atlas(global.atlas_cityscene);For a demo application please check out this GitHub repository. It displays a scene background and an animated player character:
Advantages
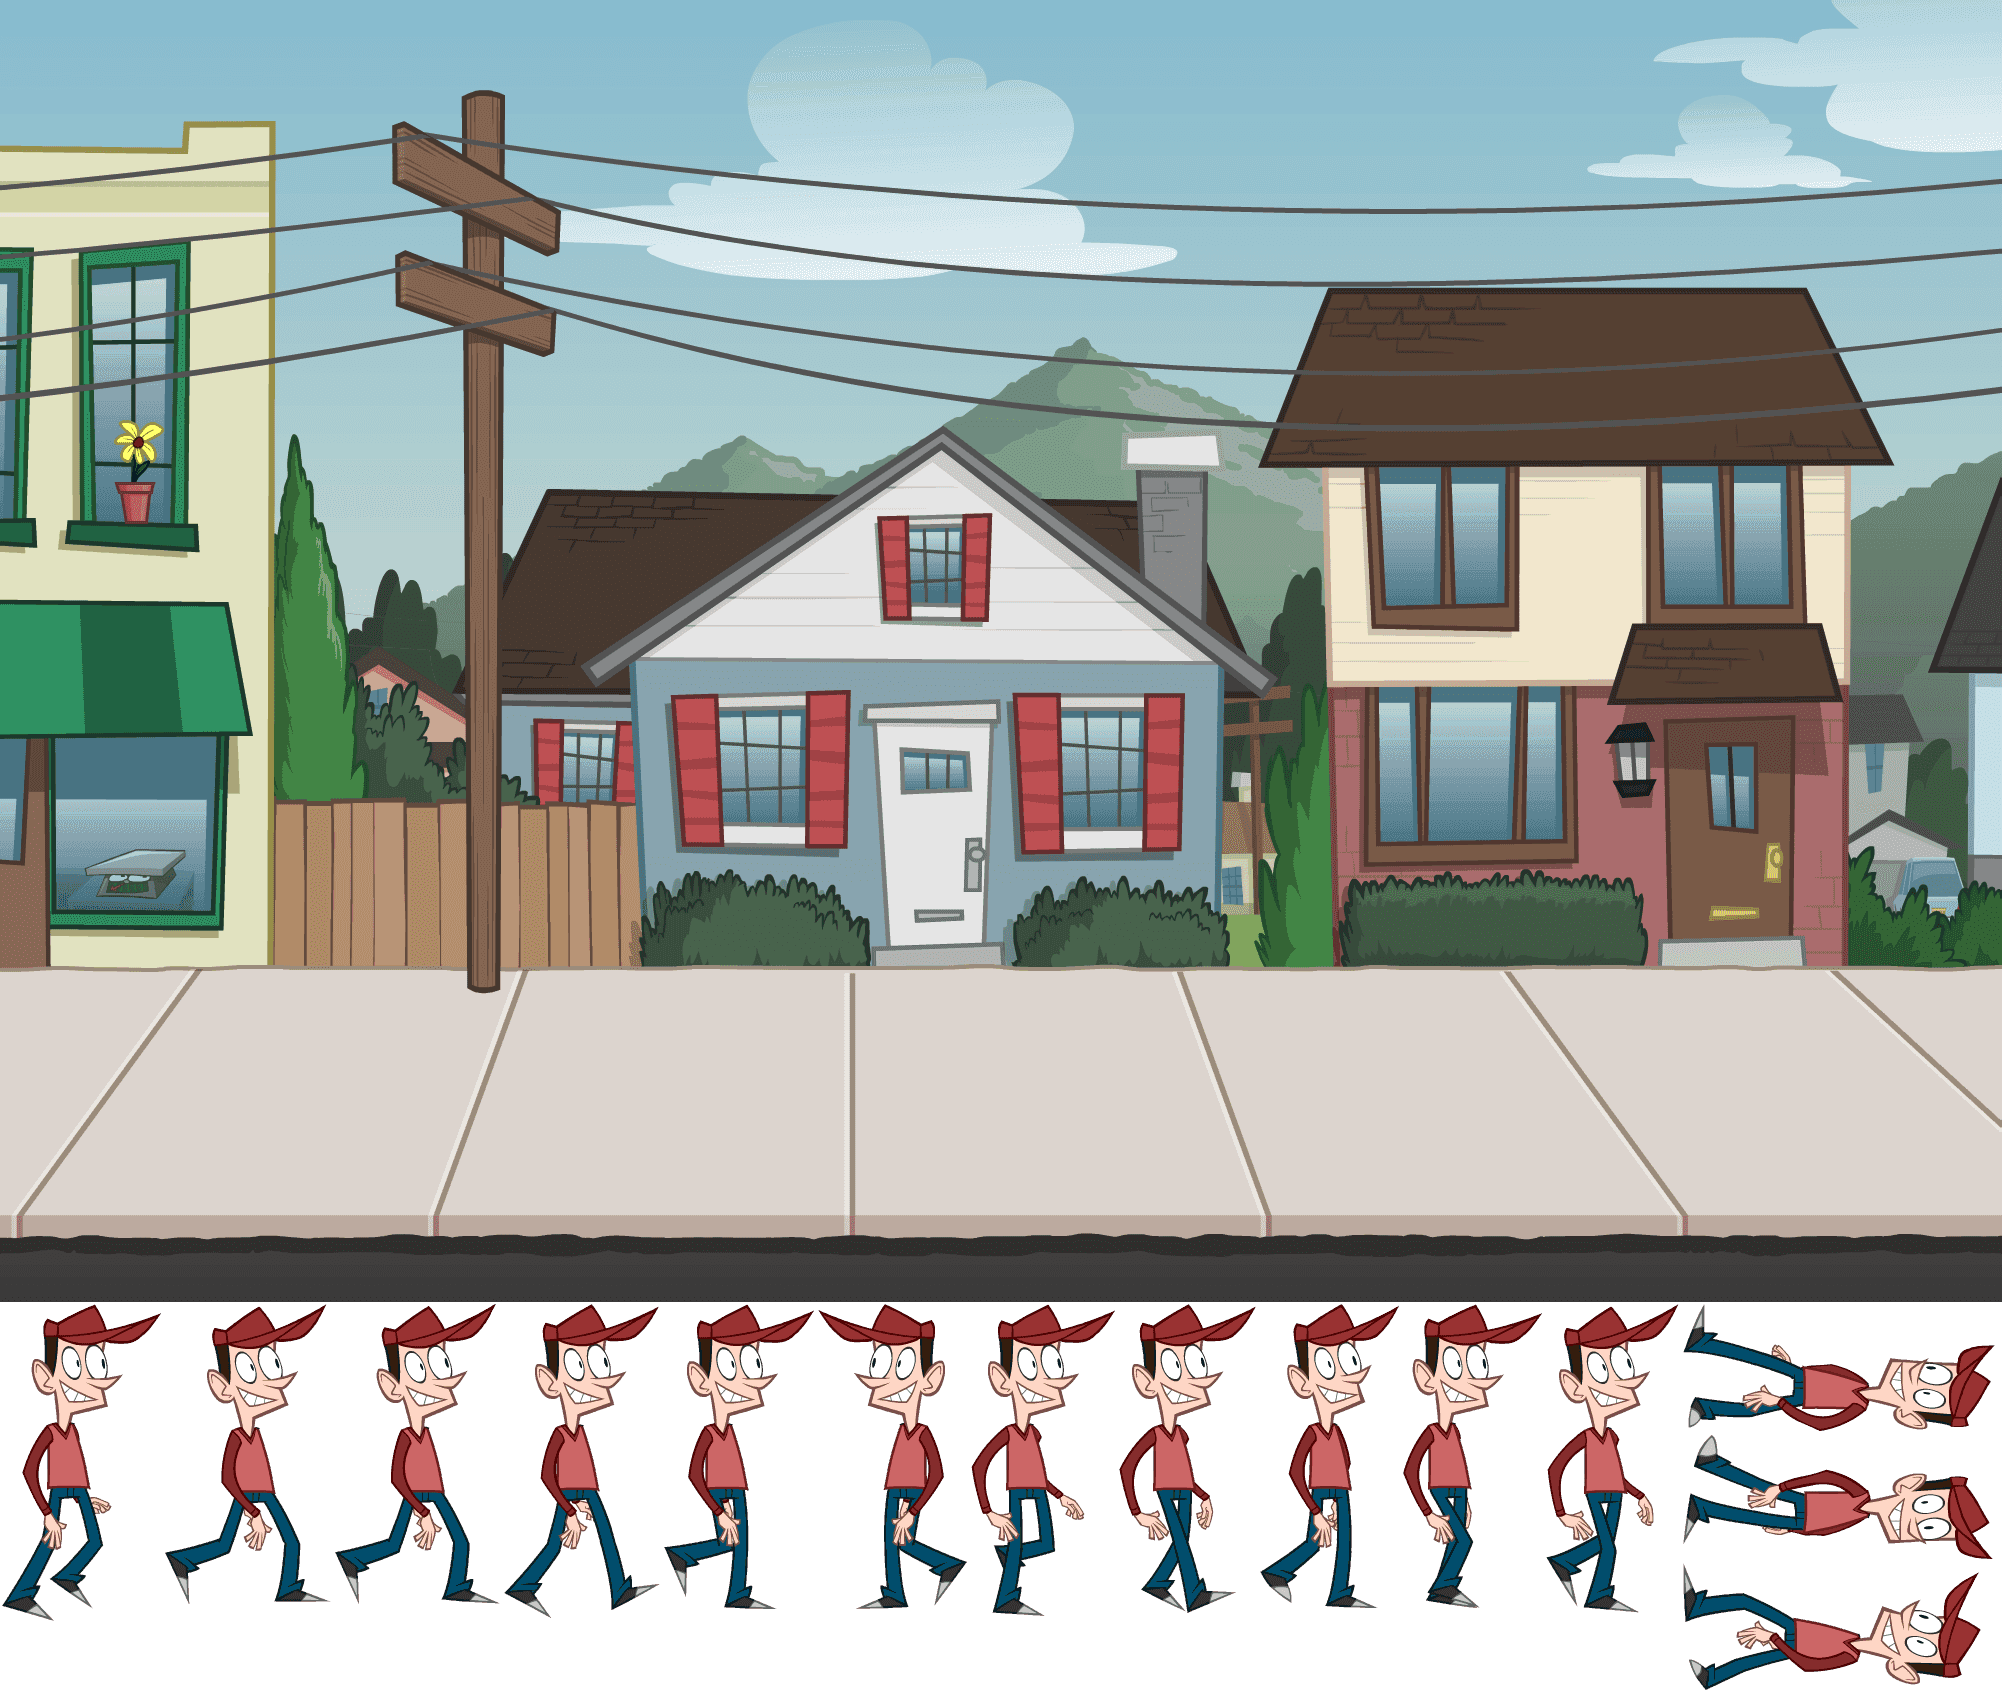
TexturePacker provides a large number of packer options to reduce the size of the resulting sprite sheets:
- Sprite sheet size need not be squared or power-of-two.
- Sprites can be rotated for improved pack ratios.
- Texture image can be saved with reduced color space to optimize file size.
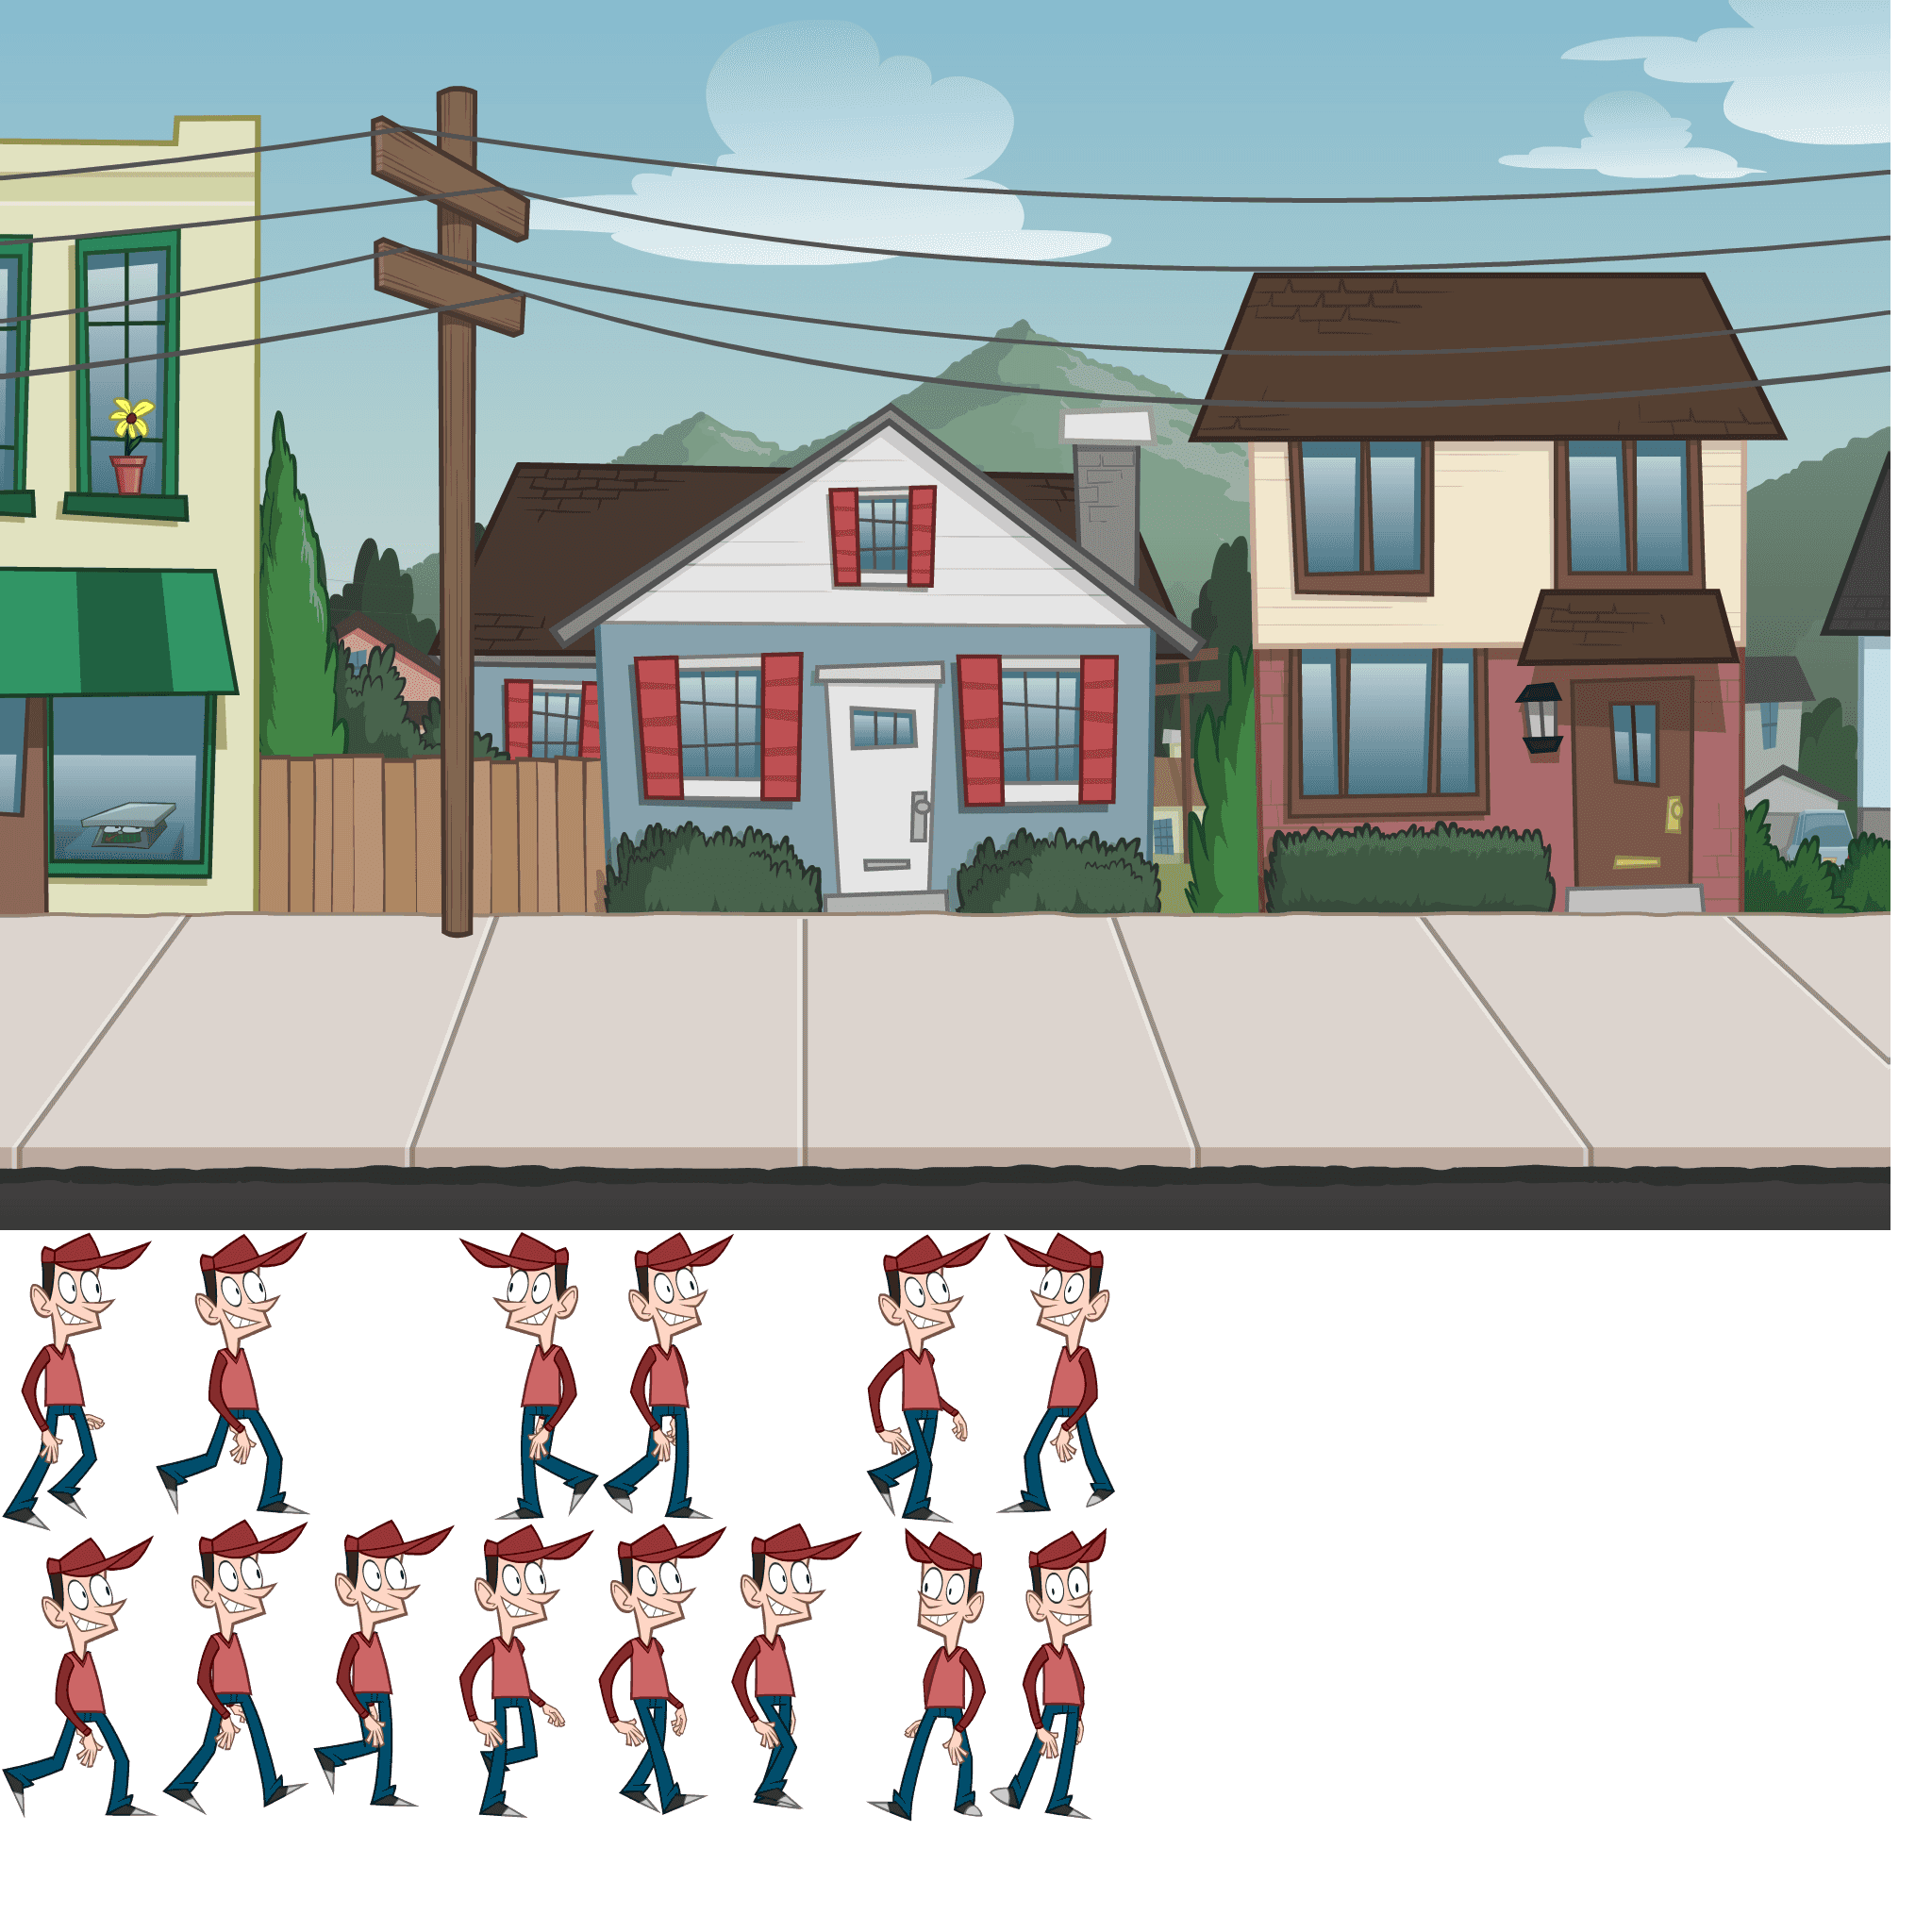
Here's a comparison of the sprite sheets GameMaker would generate internally vs packed with TexturePacker:
packed with GameMaker
2048 x 2048, RGBA8888 PNG
2472 kB (on disk)
packed with TexturePacker
2002 x 1692, 8-bit indexed PNG
196 kB (on disk)
Drawbacks
Loading external sprite sheets at runtime comes also with some drawbacks:
- Since the sprites of the sprite sheet are not accessible as Sprite objects in GameMaker Studio, they cannot be added to a layer via drag-and-drop.
- The sprite sheet loader cannot add multiple animation frames to one sprite object, that's why animations must be implemented manually. However, as demonstrated in our GitHub example, this is quite simple.