How to create and use sprite sheets with CocosCreator 3.x
Who is this tutorial for?
This tutorial is designed for developers who want to create games using Cocos Creator and want to optimize their game's performance by using TexturePacker. We will cover how to use TexturePacker to create and optimize sprite sheets, and how to use Cocos Creator to bring your game to life with animations. Whether you're a beginner or an experienced game developer, this tutorial will provide you with the skills and tools you need to create stunning games with ease. Let's get started!
How to create and use sprite sheets with Cocos Creator
This tutorial guides you through the following steps
Optional: Install Cocos Creator
If you haven't yet installed Cocos Creator 3.7.2 or a newer version, you'll need to do that before we can proceed. To get started, head over to https://www.cocos.com/en/creator-download and download the Cocos Dashboard. Once you have that, you can use it to install Cocos Creator.
It's important to use version 3.7.2 or newer, as older versions had some issues reloading sprite sheets after they were updated.
Optional: Create a new project
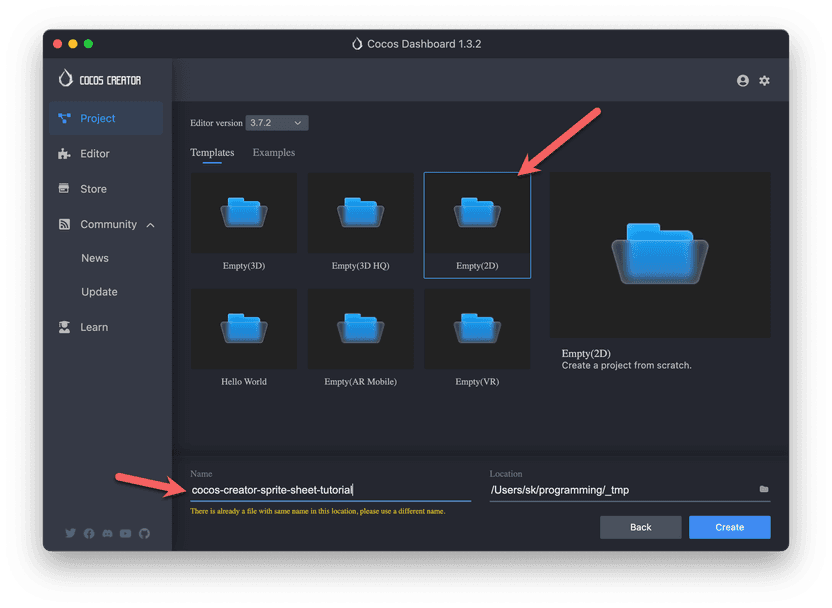
Once installed, launch Cocos Creator and create a new Empty (2D) project.
Install TexturePacker
Download TexturePacker using the provided button:
To install, follow these steps:
For Windows:
- Double-click the
TexturePacker.msifile to start the installation process.
For macOS:
- Open the
TexturePacker.dmgfile. - Drag and drop the TexturePacker icon into the Applications folder.
Start TexturePacker, in the startup-screen select Try TexturePacker Pro. This enables all features and optimizations for 7 days. After that, you can still create sprite sheets for Cocos but some of the advanced features are disabled.
Once installed, start TexturePacker. In the startup screen, select Try TexturePacker Pro. This enables all features and optimizations for 7 days. After that, you can still create sprite sheets for Cocos Creator, but some of the advanced features will be disabled.
Download Assets
Download the assets for this tutorial using the following link: raw-assets.zip
Next, extract the assets into your project in a folder called raw-assets.
Be careful not to put them into the existing assets folder in the project.
The assets folder is used for the files that Cocos Creator
works with directly. We'll create the sprite
sheets outside of Cocos Creator and then import the already-packed spritesheets.
Create Your Sprite Sheet
To create the sprite sheet, follow these steps:
- Open TexturePacker.
- Drag and drop the
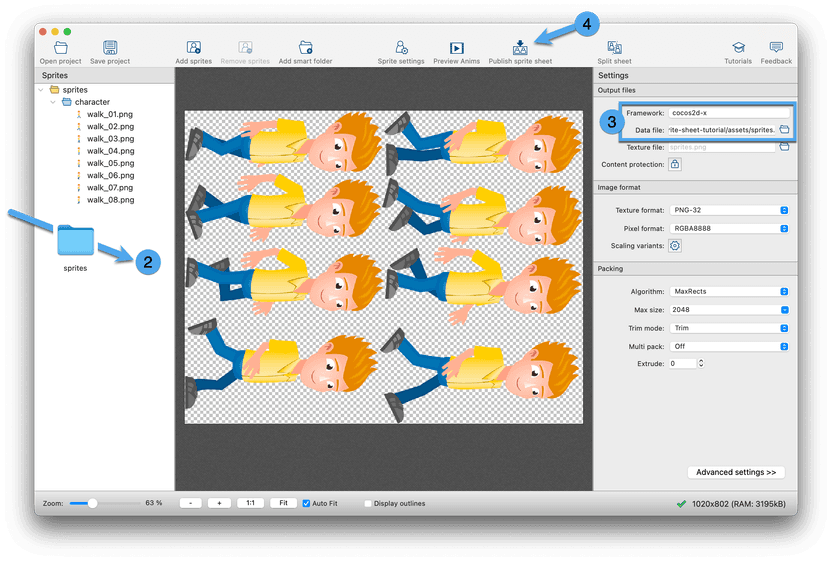
spritesfolder (it's inside the raw-assets) onto it. You should see a layout similar to the following:
- Click the
Data Formatbutton in the top right corner and selectcocos2d-x. - Click the folder icon next to the
Data filewidget and save the file assprites.plistinside theassetsfolder of the project.
The default settings should work just fine. Click Publish sprite sheet in the
toolbar to finalize the process.
The sprite sheet might look strange at first sight: All sprites are rotated, and they don't even align
properly in the sheet. That's ok and done on purpose. TexturePacker detects transparency and removes it
from the sprites. It also rotates sprites if needed to get a better layout. Cocos Creator knows these
optimizations from the sprites.plist. When using the sprites in the editor, they behave like the
original sprites. The removed transparency speeds up rendering the sprites because the game engine does not
have to "draw" the transparency.
Adding a Sprite to Your Scene in Cocos Creator
Switch back to Cocos Creator. In the Assets panel at the bottom left, you should already see the sprite sheet. Cocos Creator automatically detects the sprite sheet and displays all the sprites it contains.
-
To use a sprite, simply drag & drop it from the Assets panel (bottom left) onto the scene. Place it inside the thin white rectangle, which represents the Canvas.
-
There are two important settings you have to adjust on the sprite to make it work properly:
- Size Mode: Set this to Custom
- Trim: Turn this setting off
If you don't change these settings, your sprites may still work, but they might not behave as expected. This is because the sprites will be trimmed by Cocos Creator. It's usually not a problem as long as you don't play animations.
If you see stretched or distorted sprites or the animations are wobbly - check these settings.
Animating the Sprites
To create an animation, select the sprite in the scene.
Click Add Component -> Animation -> Animation
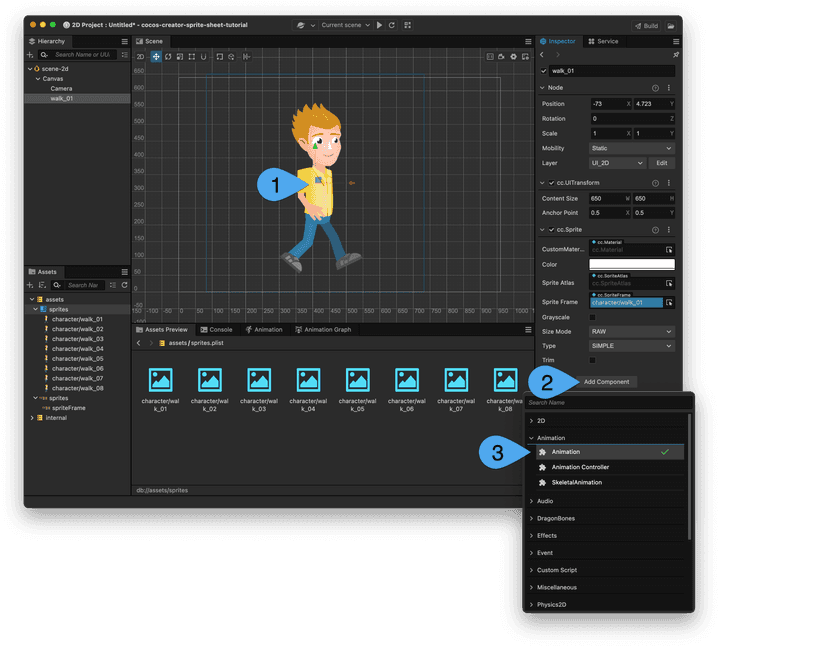
Click the button with the mouse pointer in the edit field next to Default Clip. In the panel that opens, click Create and type walk.anim. Save it inside the assets folder.
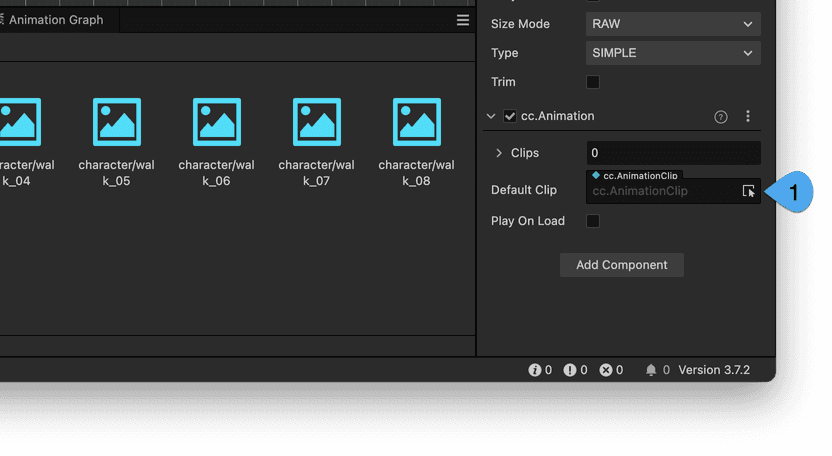
Keep the sprite selected in the scene and click the Default Clip button again to select the animation.
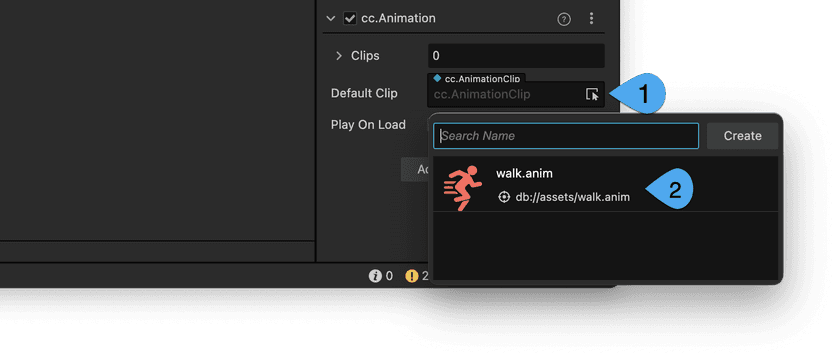
With the sprite selected in the scene, switch to the Animation panel at the bottom. Click Enter animation editing mode.
Click the + next to Property List. Select cc.Sprite -> spriteFrame

Ensure the timeline cursor is at position 0. If not, sprites will be inserted at unexpected positions.
Select the character/walk_01 — "character/walk_08" animation frames in the left panel and drop them onto the timeline's
left side. You should see a tooltip with frame:0 offset:0
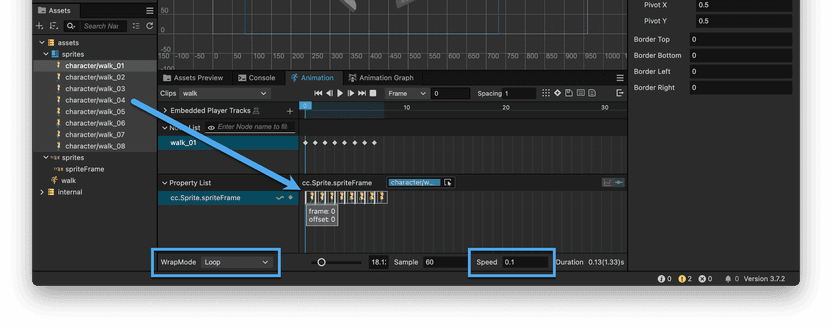
Change the WrapMode to Loop and set the Speed to 0.1.
Click the Play button in the panel's toolbar to preview the animation. Your character should now be animated and running in place.
Now that you have successfully created a sprite sheet, imported it into Cocos Creator, and animated a sprite, you can continue experimenting and adding more complex animations and interactions to your game. Good luck, and have fun creating your game!
Final Notes
TexturePacker has several optimization options that worked with cocos2d-x but are unfortunately not supported in Cocos Creator.
Please make sure to use these settings:
- Trim mode: Trim - the first 4 all work depending on your needs - but you must not select Polygon outline.
- Multipack: Off or Manual both work. Manual allows you to pack multiple sprite sheets at the same time in a single TexturePacker project. Auto seems to work, too but does not work properly in Cocos Creator. As soon as a sprite switches from a sheet to another, the link in Cocos Creator to that sprite is broken!
What's next?
Read our A beginner's guide to PNG optimization to learn how you can reduce the size of your game.