How to create sprite animations for EaselJS
In this tutorial you are going to learn...
... how to ...
- create sprite sheets for EaselJS/CreateJS
- load assets using PreloadJS
- use animations from a sprite sheet
- set/edit pivot points visually
- optimize your sprite sheet for fast downloads
Here's the final result of the tutorial:
Why you have to use sprite sheets for your game
Here are some reasons why sprite sheets are a big win for your game:
1. Sprite sheets reduce the download time
You are building a game or application for the web. This means that all data has to be loaded from your web server somewhere on the internet. The more files you have the bigger is the overhead for building connections to the server and requesting the data.
Your game starts faster if you download a smaller number of big files instead of many small files.
2. Smaller memory footprint
Obsolete transparency around the sprites can be removed automatically to reduce the amount of RAM used while displaying your game. This is very important on mobile devices.
3. Make use of animations and pivot points
The sprite sheet can be combined with a data file that contains additional information like animations and pivot points. This makes game development faster and easier for you.
Download the demo project from GitHub
Let's start by downloading the demo project from GitHub.
The project contains the following files and folders:
- assets - A folder containing the sprites used in this demo
- createjs - EaselJS and PreloadJS
- demo.html - The demo source code
- easeldemo.tps - TexturePacker project file used to create the sprite sheet
- sheet.json and sheet.png - Pre-built sprite sheet
How to create sprite sheets for EaselJS / CreateJS
Using Photoshop® or Gimp to create your sprite sheets
You can of course create sprite sheets with Photoshop® or Gimp — simply put all your sprites into a big image and that's it...
But creating sprite sheets with a painting tool is a bad choice for game development.
EaselJS has to know where a sprite is and how big it is. You'll have to work with the sprite coordinates in your game. You'll also have to update the coordinates with each change.
That's not a good solution.
The better choice: TexturePacker
TexturePacker is a tool specialized in creating, managing and optimizing sprite sheets for game development — and it's the best too you can get for this job.
TexturePacker supports EaselJS's own sprite sheet data format including support for animations and pivot points. EaselJS loads the sheet and the data file you can reference the sprites by their names.
Please download TexturePacker from here:
After installing and starting TexturePacker (and accepting the license agreement) you should see the main window.
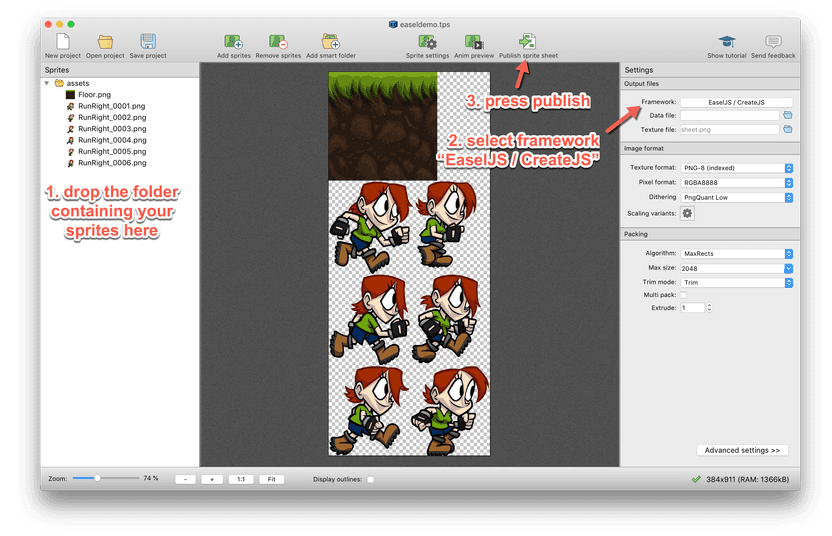
- Drag & drop the assets folder containing your sprites on the left or center panel.
- Set the Framework to EaselJS / CreateJS in the top right panel
- Press publish and select your game folder to write the sheet.json and sheet.png file
(You can also open the existing easeldemo.tps file. It's a TexturePacker project file with the basic setup.)
The file demo.html contains the demo source code. Please be aware that opening the file in your browser directly does not work. The reason is that the sprite sheet is loaded dynamically which is not permitted with the browser's default settings. You have to serve the files from a web server.
If you have PHP installed on your computer you can use
php -S localhost:8080to serve the demo. It's available from http://localhost:8080/demo.html
Another option is to use Node.js:
npm install http-server -g
http-server .
The demo now runs on http://localhost:8080/demo.html.
The basic skeleton file looks like this.
<!DOCTYPE html>
<html lang="en">
<head>
    <meta charset="utf-8">

    <!-- load EaselJS and PreloadJS -->
    <script src="./createjs/easeljs.js"></script>
    <script src="./createjs/preloadjs.js"></script>

    <script>
        function init()
        {
        }
    </script>
</head>

<body onload="init();">
<div>
    <canvas id="testCanvas" width="960" height="540"></canvas>
</div>
</body>
</html>
The code consists of:
- the
<script>tags to load the libraries (EaselJS and PreloadJS) - the
<script>block with the code (currently only theinit()function) - the
<body>with theonload='init()'to start the demo code - the
<canvas>element which is used to render the scene
How to load assets from using PreloadJS
PreloadJS is responsible for loading the assets from the server. You could create a much easier version for this demo, but I've decided to keep the full-featured loader code. This is useful if you want to extend code demo and add your own content later.
Let's start with the init() function:
function init()
{
    var manifest = [
        {src: "sheet.json", id: "sheet1", type: "spritesheet"}
    ];

    var loader = new createjs.LoadQueue(true, "./");
    loader.on("fileload", handleFileLoad);
    loader.on("complete", handleComplete);
    loader.loadManifest(manifest);
}
The manifest contains the stuff you want PreloadJS to fetch from the server.
{src: "sheet.json", id: "sheet1", type: "spritesheet"} tells it to load a sprite sheet file called
sheet.json with the id sheet1. The image file sheet.png is loaded automatically — it's referenced
in the json file.
The next line creates a LoaderQueue. true tell PreloadJS to use XHR by default, "./" is the default resource path
to use for loading the data.
The next two lines define event handlers that are triggered during the loading process:
fileloadis triggered after a single file is completedcompletedis triggered after all files are loaded
There are other events you can listen to — e.g. error or progress but we'll ignore them for this demo.
The final line passes the manifest to the loader and starts loading data.
Let's implement the function handleFileLoad() which is called after loading a single file:
var assets = [];

function handleFileLoad(event)
{
    assets.push(event);
}
This function simply appends the result event to our assets array. The array is processed
after all files are loaded in handleComplete():
var betty;
var stage;
var spriteSheet;

function handleComplete()
{
    for (var i = 0; i < assets.length; i++)
    {
        var event = assets[i];
        var result = event.result;

        switch (event.item.id)
        {
            case 'sheet1':
                spriteSheet = result;
                break;
        }
    }

    initScene();
}
The code iterates through the loaded assets and assigns the sprite sheet to the variable spriteSheet.
I've kept this code for the tutorial because you can easily add more case blocks for other assets in the future.
The final line initScene() starts the main scene.
How to build a game scene with animations with EaselJS
Creating a basic scene with some static sprites
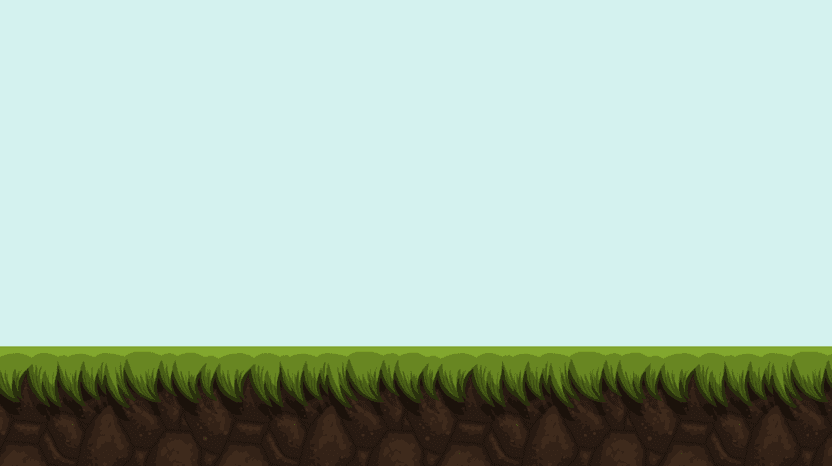
Let's start with a simple scene: Some ground tiles:
function initScene()
{
    stage = new createjs.Stage(document.getElementById("testCanvas"));

    for (var i = 0; i < 5; i++)
    {
        var floor = new createjs.Sprite(spriteSheet, "Floor");
        floor.x = i * 256;
        floor.y = 400;
        stage.addChild(floor);
    }

    createjs.Ticker.timingMode = createjs.Ticker.RAF;
    createjs.Ticker.addEventListener("tick", stage);
}
The first line initialises a Stage object. The parameter passed is the <canvas> element in the
html file. It's referenced by the id testCanvas.
The second block creates 5 floor sprites using the image called Floor from the spriteSheet.
The sprites are placed at increasing x positions and added to the stage.
The name Floor is derived from the Floor.png file that you added in TexturePacker.
The final 2 lines create a timer event that updates the stage in regular intervals. You need this for animations — coming in the next section.
You should see the following scene after reloading the demo in your browser:
Adding an animation
Adding animations is easy because TexturePacker has already done most of the work for you.
The asset folder contains a bunch of animation frames of our game character Betty:
- RunRight_0001.png
- RunRight_0002.png
- RunRight_0003.png
- RunRight_0004.png
- RunRight_0005.png
- RunRight_0006.png
TexturePacker detects the _0001 — _0006 in the file names as animations and builds an animation
object called RunRight (taken from the base name of the files).
To play the animation it's sufficient to pass its name to the createjs.Sprite() method, set the coordinates
and add the object to the stage. Add the following code to the initScene method:
betty = new createjs.Sprite(spriteSheet, "RunRight");
betty.x = stage.canvas.width / 2;
betty.y = 400;
stage.addChild(betty);
Ok — this plays the animation, but it's too low in the scene:
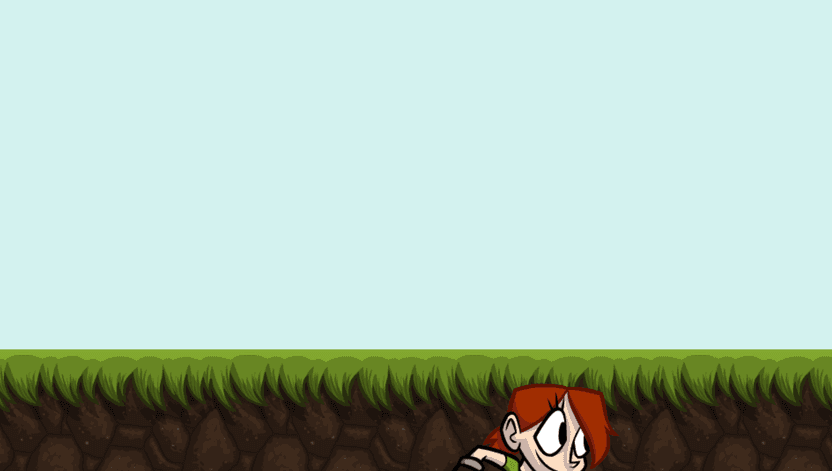
This is because pivot points in EaselJS are at top left by default, and we've placed the floor and Betty on the same y coordinate.
You could now start adjusting the Betty's y coordinate until it has the right position. But there's also another option which can save you a lot of time in your game projects...
Use TexturePacker to visually edit the pivot points
TexturePacker gives you an easier way: The pivot point editor.
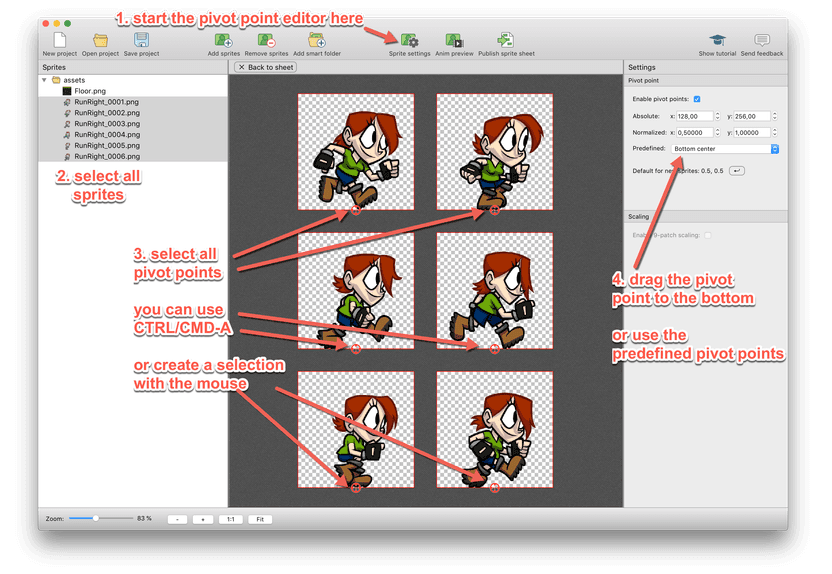
- Select all animation frames of the Betty sprite
- Click Sprite settings in the toolbar
- Check Enable pivot points in the right panel
- Select all pivot points in the center view by pressing CMD-A (Mac) or CTRL-A (Windows)
- Drag the pivot points down to the bottom center or user the Bottom center preset in the right panel.
- Press publish and reload your demo
Betty should not be positioned above the floor.
Moving the sprite
Nice... but Betty is not moving.
Simply add the following line to the end of the initScene() function:
createjs.Ticker.on("tick", tick);This adds a tick handler that is called in regular intervals. You also have to add the function that is called as the handler:
function tick(e)
{
    betty.x = (betty.x + e.delta * 0.5) % stage.canvas.width;
}
This updates Betty's x position. The modulo operation % makes sure that betty re-enters the scene from
the left after leaving on the right...
Refresh your browser to see Betty moving!
Changing animation speed and animation preview
You can set the default speed for the animations in TexturePacker's advanced settings. Click the Advanced settings at the bottom of the right panel.
The frame rate settings are at the top right of the panel:

TexturePacker also comes with an animation preview that you can start from the toolbar. Select some sprites to preview the animation.
The animation preview works ins real time — you can even watch the animation change while you edit your pivot points.
Faster downloads: Reducing the size of your sprite sheet
You've already done a lot to optimize the download for this scene: Instead of loading 7 single images you only load one sprite sheet.
But there's more you can do to reduce the amount of memory and speed up downloads.
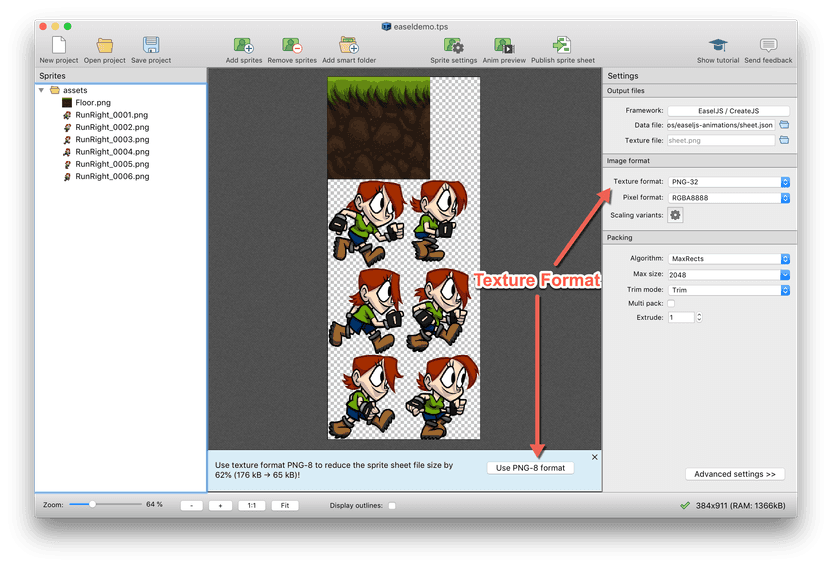
TexturePacker comes with a high quality image optimizer (based on pngquant). It can reduce your sprite sheet's size by 62%!
You can enable it by switching the texture format from PNG-32 to PNG-8:
Conclusion
TexturePacker is the best companion tool for you EaselJS development:
- Pack sprite sheets
- Edit pivot points
- Preview animation
- Optimize image size