How to create sprite sheets & animations for PixiJS 6
Who is this tutorial for?
This tutorial is for all readers who want to use PixiJS. The tutorial covers the basics of adding sprites and animations to a scene. It also covers advances techniques like setting pivot points, packing sprite sheets, optimizing loading times.
This tutorial uses PixiJS 6.x. An updated version of the tutorial is available here: How to create sprite sheets and animations for PixiJS 8.x
This tutorial uses PixiJS 6. Read this if you are still using older versions of PixiJS: How to create sprite sheets and animations for PixiJS 5.x
Here are the steps we cover in this tutorial:
How to create and use sprite sheets with PixiJS 6
This tutorial guides you through the following steps
... and this is the scene you'll create:
Create a simple PixiJS game scene
You can download the assets for this tutorial from here: sprites.zip
Getting started with a simple scene
Start by creating an index.html file that:
<!doctype html>
<html lang="en">
    <head>
        <title>PixiJS Demo</title>
    </head>
    <body>
        <script src="pixi.min.js"></script>
        <script src="demo.js"></script>
    </body>
</html>
Download the current version of PixiJS. You need the pixi.min.js and pixi.min.js.map files. Save these files in the same folder as your saved the index.html.
Create your game file: demo.js in the same folder:
// create a Pixi application
let app = new PIXI.Application({ width: 800, height: 450 });

// add the canvas that Pixi automatically created for you to the HTML document
document.body.appendChild(app.view);

let background;

// load the sprite, call setup() when completed
app.loader
    .add("images/sprites/background.png")
    .load(setup);

function setup() {
    let resources = app.loader.resources;

    // initialize background sprite
    background = new PIXI.Sprite(resources["images/sprites/background.png"].texture);
    app.stage.addChild(background);

    // scale stage container that it fits into the view
    app.stage.scale.x = app.view.width / background.width;
    app.stage.scale.y = app.view.height / background.height;
}
Let's take a look at this code:
- It starts by initialising the PixiJS application
- Next, it adds the canvas created by PixiJS to the body of the html page
- The background sprite is loaded using the
app.loader - PixiJS calls
setup()after the loading is finished
The setup() function receives the background image from the loader and creates
a background sprite. The sprite is added to the stage.
Finally, some smaller adjustments to scale the background to fit the stage size.
Testing the scene in your browser
You can't open the application in the browser directly by opening the HTML file. This is because of security restrictions. PixiJS loads the resources dynamically which is not permitted in HTML files loaded from the file system.
The easiest way to display the application is using a local web browser... but you
don't have to install Apache on your computer to do so. A simple server like the
npm module http-server is sufficient.
If you already have node installed, it's simply opening a command prompt in the folder where your index.html is located. Type
npx http-server -c-1 .The -c-1 option disables caching.
And open http://localhost:8080 in your browser. You should now see the background of the game scene:

Add your animation
Now add the animation to the scene. Start by loading the sprites. For this, you have to define which sprites to load — and let the loader know about it:
// create a Pixi application
let app = new PIXI.Application({ width: 800, height: 450 });

// add the canvas that Pixi automatically created for you to the HTML document
document.body.appendChild(app.view);

let background, animatedCapguy;

const capguyFrames = [
    "images/sprites/capguy/walk_01.png",
    "images/sprites/capguy/walk_02.png",
    "images/sprites/capguy/walk_03.png",
    "images/sprites/capguy/walk_04.png",
    "images/sprites/capguy/walk_05.png",
    "images/sprites/capguy/walk_06.png",
    "images/sprites/capguy/walk_07.png",
    "images/sprites/capguy/walk_08.png"
];

app.loader
    .add("images/sprites/background.png")
    .add(capguyFrames)
    .load(setup);
Next you have to add the animation to the stage to make it visible:
function setup() {
    let resources = app.loader.resources;

    // initialize background sprite
    background = new PIXI.Sprite(resources["images/sprites/background.png"].texture);
    app.stage.addChild(background);

    // scale stage container that it fits into the view
    app.stage.scale.x = app.view.width / background.width;
    app.stage.scale.y = app.view.height / background.height;

    // create an animated sprite
    animatedCapguy = new PIXI.AnimatedSprite.fromFrames(capguyFrames);

    // configure + start animation:
    animatedCapguy.animationSpeed = 1/6;                  // 6 fps
    animatedCapguy.position.set(0, background.height - 350); // almost bottom-left corner of the canvas
    animatedCapguy.play();

    app.stage.addChild(animatedCapguy);
}
Ok — the animation is now playing but CapGuy is not moving. For this, add a ticker function. The ticker function is called in regular intervals from PixiJS.
The function receives the time difference since the it was called. Why that? Because there are devices with different refresh rates... and a computer or hand held device might be slower in some situations where a high CPU load prevent the app from running fast.
Use the time difference to calculate the distance CapGuy is moving. This makes him equally fast on all devices. He's not reaching the right side of the screen faster on some devices.
The % sign is a modulo division. It resets the x position of CapGuy when he passes the right border of the scene.
function setup() {

    // ...

    // add it to the stage and render!
    app.stage.addChild(animatedCapguy);
    app.ticker.add(delta => gameLoop(delta));
}

function gameLoop(delta) {
    animatedCapguy.x = (animatedCapguy.x + 5*delta) % (background.width + 200);
}
So... now everything is working... but....
Looks good.... but what's bad about this solution?
There are several things which are bad about this solution:
- Loading time — many individual load requests are sent to the server
- Manual listing of sprites to create an animation and for loading the sprites
- The performance on slower devices might not be good when adding more sprites
You can easily fix all of these issues by using a sprite sheet. What is a sprite sheet? In one sentence: It's one big image that contains all your sprites.
Instead of loading many single files, it now only loads one image and a data file (json). The data file contains the information, which sprites are on the sheet and where they are located. It also contains arrays that contain all sprites with similar names that make up an animation. And finally, it contains pivot points.
Don't worry — you don't have to create the data file manually. TexturePacker can do that for you.
Choose the right tool for the Job
One way is to use your favorite graphics tool and place all the sprites into a big sheet manually... But this is not an ideal solution. It's time-consuming and requires a lot of manual work because you have to tell PixiJS where each sprite is located on the sprite sheet.
The best tool for the job: TexturePacker
The easiest way to create a sprite sheet is using TexturePacker. It's a desktop application for Windows, macOS and Linux that handles the creation process for you.
Btw. TexturePacker exists since 2010, and we consistently update it to support new frameworks and features.
For this tutorial, download TexturePacker from here and start the trial version. With this, you can use all pro features for 7 days.
TexturePacker is a sprite sheet packer which is directly supported by PixiJS. But it does not only pack the sprite sheets for you, it also makes your life easier in several ways:
- removes obsolete transparency around your sprites to speed up rendering and create better packed sprite sheets
- converts images to 8-bit png for faster loading
- contains a visual pivot point editor with real time preview
- collects animation frames in a way that you can playback animation easily in PixiJS
... and if you don't want to spend the money
TexturePacker comes with a free version, the so-called "essential" mode. For this you have to choose the JSON Hash exporter. In this mode, the pivot point editor, trimming and PNG optimizations are not supported. You don't need these features to get started with PixiJS - however using them makes your life much easier :-)
If you decide to use the advanced features later you don't have to change your whole workflow. It's just switching the framework in TexturePacker and everything else stays the same.
We also have an online tool that you can use: It's called TexturePacker Online. With this tool, JSON Hash is also the right data format.
As written above, for this demo, please use the trial version:
Pack the sprite sheet
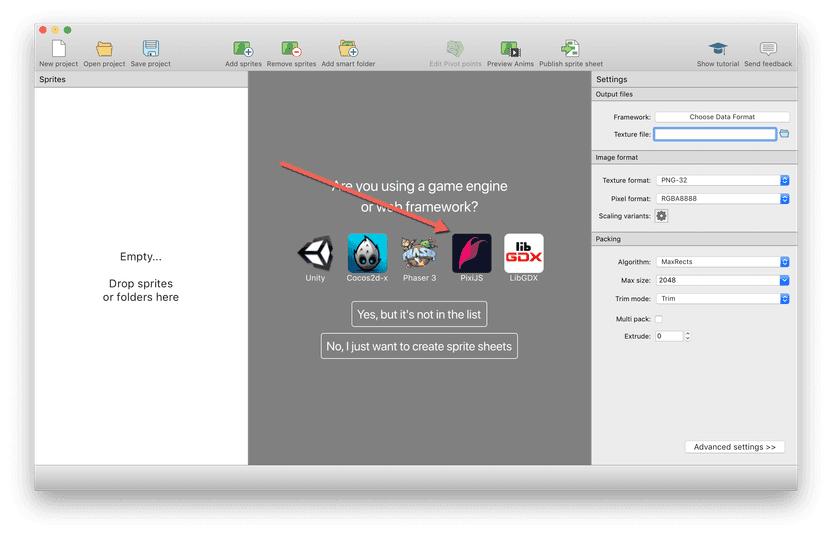
After installing and starting TexturePacker select the PixiJS framework from the start screen:
Drop the folder containing your sprites onto TexturePacker:
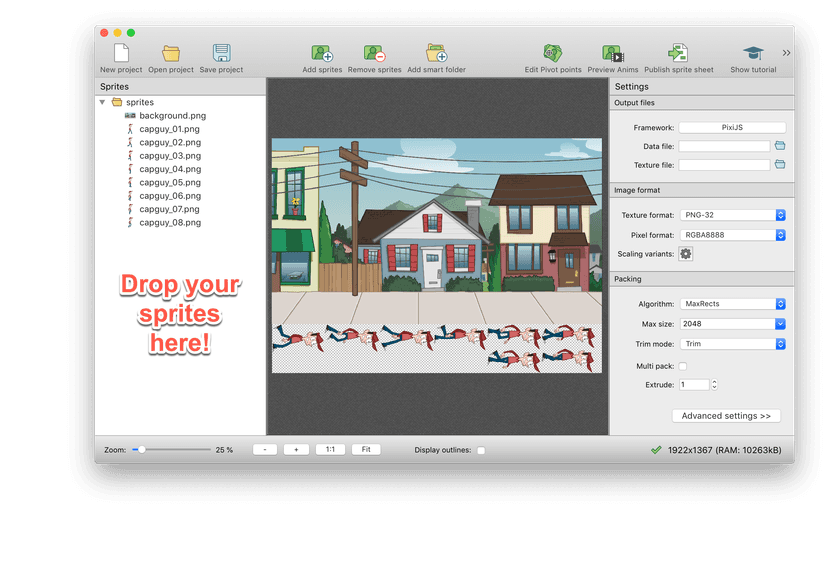
TexturePacker packs the sprite sheet for your and displays it in the center of the screen. Some sprites might be rotated to allow tighter packing — and some sprites might appear without transparency. Don't worry — that's fine because PixiJS knows about these optimizations.
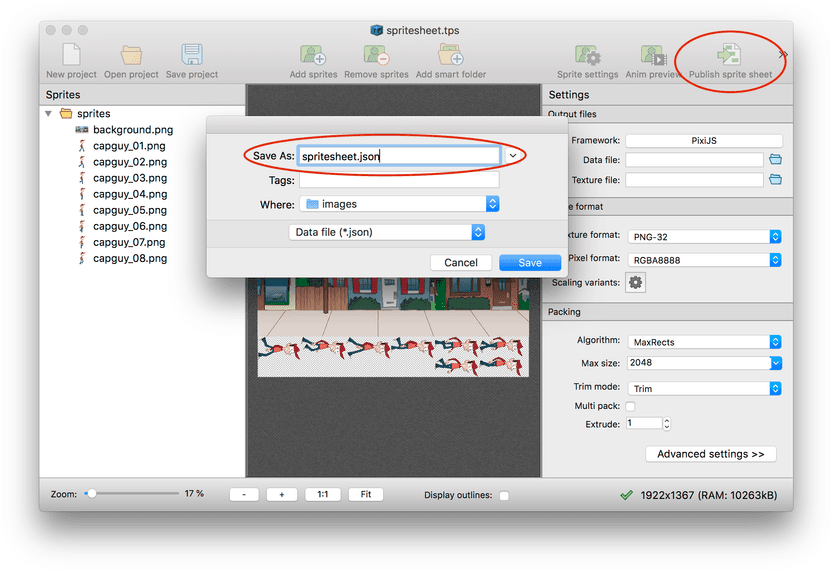
Finally, press Publish sprite sheet to create the sprite sheet in PixiJS format. Save the sprite sheet as spritesheet.json in a folder called spritesheets in your project.
Use the sprite sheet in your PixiJS game scene
Load the sprite sheet
Instead of passing all your image file names to the Pixi loader, it's now sufficient to just pass the name of the JSON data file TexturePacker has generated. The sprite sheet file is loaded automatically:
PIXI.loader
    .add("images/spritesheet.json")
    .load(setup);
The texture objects for the individual images of the sheet can be fetched from the sprite sheet resource:
function setup() {
    // get a reference to the sprite sheet you've just loaded:
    let sheet = PIXI.loader.resources["images/spritesheet.json"];
    ...
}
Create a single sprite form the sprite sheet
To create a sprite simply retrieve its data from the sheet using sheet.textures['<name>']:
    // initialize background sprite
    background = new PIXI.Sprite(sheet.textures["background.png"]);
    app.stage.addChild(background);
As you see, it's not complicated at all. It even saves you listing all the sprites and passing them to the loader.
Create an animation from a sprite sheet
Another incredible useful feature is that TexturePacker detects sprite animations.
It checks for sprite names that contain numbers and follow this pattern <name>_<number>.png and <name>-<number>.png.
E.g.
capguy/walk-01.pngcapguy/walk-02.pngcapguy/walk-03.pngcapguy/walk-04.png
The frames are stored as array in the sheet data. You can access the animation simply by using sheet.animations['<name>']:
    // create an animated sprite
    animatedCapguy = new PIXI.AnimatedSprite(sheet.animations["capguy/walk"]);

    // set speed, start playback and add it to the stage
    animatedCapguy.animationSpeed = 0.167;
    animatedCapguy.play();
    app.stage.addChild(animatedCapguy);
You don't have to list each frame manually anymore. And if your artist decides to add or remove frames, the animation also updates automatically.
Set pivot points for your PixiJS sprites
If you're using sprite sheets you can also use TexturePacker's graphical pivot point editor. Just click on Sprite settings and select the sprites you want to edit:
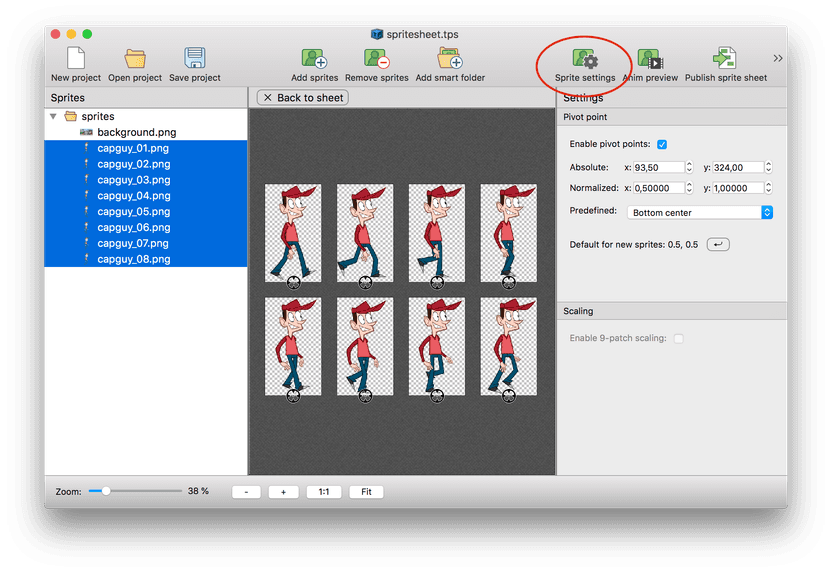
The pivot point is the circle displayed with each sprite. You can move it by dragging it with your mouse or by setting it to fixed position like in the right panel.
The pivot point coordinates are written to the sprite sheet data file and automatically used as default anchor point if a sprite is initialized with a sprite sheet. Of course, you can overwrite the anchor point default in your javascript code.
To load sprite animations and pivot points from the sprite sheet file, make sure that you are using the latest version of PixiJS and TexturePacker.
In TexturePacker select the PixiJS framework, don't use the generic JSON formats — they can't be used with the pivot point editor.
Reduce loading time with optimized png files
TexturePacker can optimize your sprite sheets even further by reducing the number of colors and writing 8-bit png files instead of 32 bit.
It uses an algorithm based on pngquant for this which can easily reduce the download size by 50% without sacrificing too much of the visual quality of your game.
Apply the following settings:
- TextureFormat = PNG-8 (indexed)
- Png Opt Level = 3
- Dithering = PngQuant High
Here's a comparison of the file sizes with different settings:
| Texture Format | PngOptLevel | Dithering | Size |
|---|---|---|---|
| PNG-32 | 0 | - | 1.1M |
| PNG-32 | 3 | - | 809K |
| PNG-8 | 0 | High | 373K |
| PNG-8 | 3 | High | 372K |
| PNG-8 | 0 | Low | 312K |
| PNG-8 | 3 | Low | 311K |
I'd not recommend to use PngQuant Low with this sprite sheet - it introduces banding artifacts in the gradients. If your sprites don't have gradients, the "Low" setting might indeed be a good choice.
I've also compressed the file with on online compression tool called TinyPng: The result is 420k. TexturePacker's high quality result is 11% smaller than TinyPng's result!