Learn how to easily create a CSS sprite sheet and include it into your webpage.
Why using sprite sheets?
CSS sprite sheets reduce loading times for web pages - especially if they contain many small graphics and icons. Instead of loading each individual sprite separately, the complete sheet is loaded as one big image. A CSS stylesheet assigns the different images to the elements on the web page.
Creating a sprite sheet
The easiest way to create a sprite sheet is using TexturePacker — available for Windows, macOS and Linux:
If you want to create a button with a hover effect, you simply need two files:


For sprite names ending with -hover, TexturePacker automatically generates a :hover CSS selector.
With this, the sprite toggles its visuals when hovered with the mouse - without the need of Javascript.
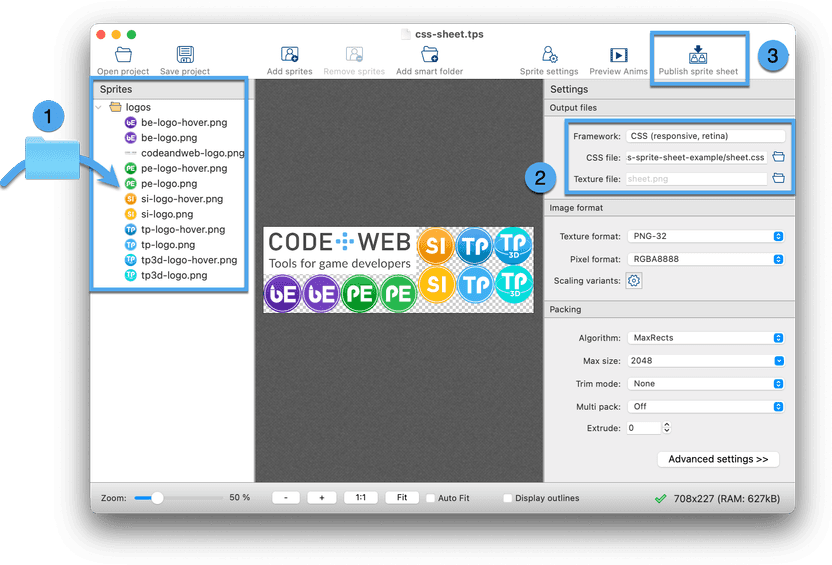
Creating a sprite sheet with TexturePacker is quite simple:
- Drag all the files you want to add to the left pane of TexturePacker
- Select the CSS (responsive, retina) framework and set the file paths for the generated CSS file and Texture file. The Texture file can be left empty; TexturePacker will automatically save the PNG containing the sprite sheet next to the CSS file.
- Click on Publish sprite sheet

This will create a CSS stylesheet containing class styles for each sprite name. If a -hover file was
added to the TexturePacker project, it is used with the :hover selector:
.codeandweb-logo { ... }

.be-logo { ... }
.be-logo:hover { ... }

.pe-logo { ... }
.pe-logo:hover { ... }

...
Using a sprite sheet
Using the sprites is simple - just add the sprite sheet to the header of your web page and use the sprite name as a CSS class.
Use
<div>to use the images as block level element<i>or<span>to use the image as inline element
<html>
    <head>
        <link rel="stylesheet" href="sheet.css">
    </head>
    <body>
        <h2>Images as block elements</h2>
        <div class="codeandweb-logo"></div>
        <h2>Images as inline elements with hover effect</h2>
        <i class="tp-logo"></i>
        <i class="tp3d-logo"></i>
        <i class="pe-logo"></i>
        <i class="si-logo"></i>
        <i class="be-logo"></i>
    </body>
</html>
Sprites inserted as block-level elements are responsive, meaning they are automatically resized according to the browser width. In contrast, inline elements have a fixed size.
The result looks like this. Move your mouse cursor over the product logos to see the hover effect. Drag the handle on the right side to see the responsiveness:
Supported CSS selectors
In addition to :hover the following CSS selectors are supported:
| CSS selector | File suffix | Activated if the image… |
|---|---|---|
:link | -link | … is an link that has not been visited yet |
:visited | -visited | … is a link that has been visited |
:focus | -focus | … has focus |
:active | -active | … is activate - e.g. while clicking on the image |
:hover | -hover | … the mouse pointer is hovering the image |
In case you want to use sprites in varying resolutions depending on the screen size, please take a look in our How to create Responsive Retina CSS sprites tutorial!
