How to create sprite sheets & animations for PixiJS 7
Who is this tutorial for?
This tutorial is for all readers who want to use PixiJS. The tutorial covers the basics of adding sprites and animations to a scene. It also covers advances techniques like setting pivot points, packing sprite sheets, optimizing loading times.
This tutorial uses PixiJS 7. An updated version of the tutorial is available here: How to create sprite sheets and animations for PixiJS 8.x
This tutorial uses PixiJS 7. Read this if you are still using older versions of PixiJS: How to create sprite sheets and animations for PixiJS 6.x
Here are the steps we cover in this tutorial:
How to create and use sprite sheets with PixiJS
This tutorial guides you through the following steps
... and this is the scene you are going to create in this tutorial:
Creating a simple PixiJS game scene
Downloading the assets
Download the sprites and background images from here: assets.zip. You can use these assets for learning purposes. Please don't publish them in your own blog, tutorial or use them in a game or app without my written consent.
We also offer you the full source code for this tutorial on GitHub.
Extract the contents into a folder that you now use for development of this demo.
The archive contains the graphics you see in the demo above:
- scene
- background.png
- middleground.png
- sprites
- character
- 01.png ... 08.png
- character
Downloading PixiJS
Download the current version of PixiJS. You only need the pixi.js file for this tutorial. Save the files in the same folder as the assets.
Getting started with a simple scene
Start by creating an index.html file that:
<!doctype html>
<html lang="en">
    <head>
        <title>PixiJS Sprite Sheet Demo</title>
    </head>
    <body>
        <script src="pixi.js"></script>
        <script src="pixijs-spritesheet-example.js"></script>
    </body>
</html>
Create your game file: pixijs-spritesheet-example.js in the same folder:
// Create a PixiJS application
const app = new PIXI.Application({width: 960, height: 540});

// add the view that Pixi created for you to the DOM
document.body.appendChild(app.view);

// load the assets and start the scene
PIXI.Assets.load([
    "scene/background.png"
]).then(() => {
    // initialize background image
    const background = PIXI.Sprite.from("scene/background.png");
    app.stage.addChild(background);

    // scale stage container to match the background size
    app.stage.scale.x = app.view.width / background.width;
    app.stage.scale.y = app.view.height / background.height;
});
Let's take a look at this code:
The first lines initialize the PixiJS application with a width of 960 and a height of 540. It then adds the application's view to the DOM.
The next lines load the background.png image, when done, the function is called.
PIXI.Sprite.from("scene/background.png") creates a sprite from that resource, the
next line adds it to the stage.
The stage is resized to match the background images size. We have to do this because I included high-resolution versions of all images. I'll show you how you can resize them to match different device resolutions later.
Testing the scene in your browser
You can't open the application in the browser directly by opening the HTML file. This is because of security restrictions. PixiJS loads the resources dynamically which is not permitted in HTML files loaded from the file system.
The easiest way to display the application is using a local web browser... but you
don't have to install Apache on your computer to do so. A simple server like the
npm module http-server is sufficient.
If you already have node installed, it's simply opening a command prompt in the folder where your index.html is located. Type
npx http-server -c-1 .The -c-1 option disables caching - which is important during development. Otherwise,
you might not see changes after editing files in the browser.
And open http://localhost:8080 in your browser. You should now see the background of the game scene:

Creating a sprite sheet
To create the sprite sheets, we use TexturePacker, a robust desktop application, for creating sprite sheets and optimizing images for game development. Since its initial release in 2010, TexturePacker has been continually updated with new features and bug fixes, making it a reliable and efficient tool for game developers.
Please download TexturePacker from here:
After installation, activate the trial by clicking on Try TexturePacker Pro. You can now use all features of TexturePacker for the next 7 days. After that, you can still use TexturePacker for free, but only with a reduced set of features.
In the main screen:
- Choose PixiJS from the center screen
- Drop the sprites folder onto the left panel
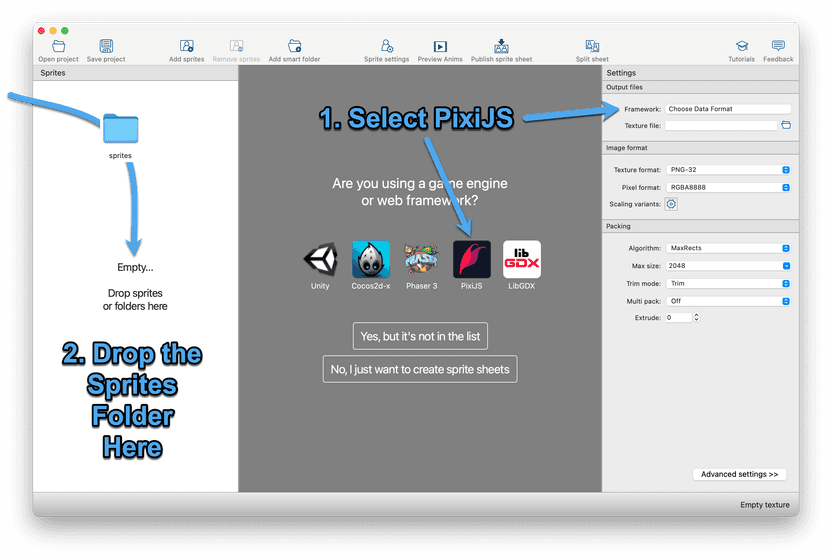
In case you dropped the sprites first, or you already used TexturePacker for a project, click on Framework and select PixiJS from the dialog that opens here.
TexturePacker collects all sprites in that folder. A sub-folder in that main folder is pre-ended to the sprite name. So your sprites will be accessible using the names character/walk_01.png, character/walk_02.png and so on.
The main folder name (sprites) is by default omitted - if you want to include it as part of the sprite name use Prepend folder name from the Advanced settings. You can also remove the .png extension from the filenames by enabling Trim sprite names, also in the Advanced Settings.
Create a new folder called spritesheets in the demo directory.
In TexturePacker, click on the folder icon next to Data file and navigate to your spritesheets folder. Name the file character.json.
Finally, press Publish sprite sheet to write the sprite sheet to your project folder.
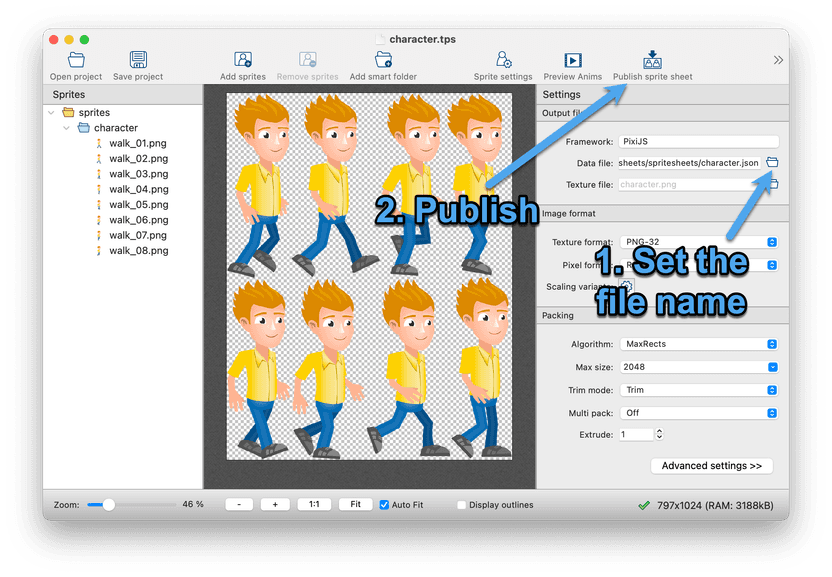
This automatically creates 2 files:
- character.png - the sprite sheet image
- character.json - the sprite sheet data file that contains the positions and names if your sprites
Optimizing your sprite sheets for faster loading
The resulting character.png is now about 327kb in size. But we can do better here. TexturePacker can dramatically reduce the file size of your sprite sheets and with this, make loading of the game faster.
The only thing you have to do is to change the Texture format from PNG-32 to PNG-8 (indexed) and press Publish sprite sheet again. The result is a sprite sheet that (almost) looks identical but now only has 95kb.
That's less than 1/3 of the original sprite sheet size — and it works right out of the box by simply changing a setting in TexturePacker. If you want to learn more about this, read A Beginner's Guide To PNG Optimization.
Loading the sprite sheet in your game
Back to your pixijs-spritesheet-example.js. Add the spritesheets/character.json to the list of assets to load:
PIXI.Assets.load([
    "spritesheets/character.json",
    "scene/background.png"
]).then(() => {
Adding a sprite to your scene
Adding the sprite from the sprite sheet looks identical to adding the background image:
    // add the middle ground from the sprite sheet
    const middleground = PIXI.Sprite.from("middleground.png");
    app.stage.addChild(middleground);
The background and middle ground images are perfectly aligned because the middle ground contains transparency at the top.
But is adding transparency not a bad thing? Doesn't it waste RAM and cost performance? Usually it would — that's right. But thanks to TexturePacker, that is not the case. When you add an image with transparency to a sprite sheet, the transparency is removed - — we call this feature trim. PixiJS is smart enough to compensate for that. When working with the sprite, it's like working with the original sprite.
Adding and playing animations
TexturePacker detects animations in your sprites and creates lists of all frames. This makes creating animations in PixiJS very simple.
This works with files named 01.png, 02.png, ... but also for files ending with a
_ or - and a number. E.g. character/walk-01.png, character/walk-02.png will also be detected.
The animations are named in the same way as the sprites - but without the numbers and the .png. In our case: character/walk.
First, you have to get the animations from the texture. You can do this by accessing the Asset cache.
    // get the sheet json data, required for resolving animations
    const animations = PIXI.Assets.cache.get('spritesheets/character.json').data.animations;
Now create a new AnimatedSprite from the animation data. Configure the main parameters for it:
The position and the speed. Finally, start playing the animation by calling play() and
add it to the stage:
    // create an animated sprite
    const character = PIXI.AnimatedSprite.fromFrames(animations["character/walk"]);

    // configure + start animation:
    character.animationSpeed = 1 / 6;                     // 6 fps
    character.position.set(150, background.height - 780); // almost bottom-left corner of the canvas
    character.play();

    // add it to the stage and render!
    app.stage.addChild(character);
Go back to your browser and refresh the scene. You should see the character doing a moon-walk in place.
Add these lines to make him walk from left to right:
    // move the character to the right, restart on the left
    app.ticker.add(delta => {
        const speed = 6;
        character.x = (character.x + speed * delta + 400) % (background.width + 800) - 400;
    });
This function is called at regular intervals. We use it to update the x position of the
sprite. The function has a parameter called delta which is the time passed since the last call of the function.
We use this to calculate the distance to move the character by multiplying the value with the speed.
This makes the character move at the same speed on all devices — no matter what the frame rate on that device is.
If you do not use the delta for that calculation, there might be computers or mobile phones on which
the character walks faster or slower.
The final trick is the % which is a modulo division that makes the character appear on the left side
after it disappears on the right (x greater or equal to background.width + 800). The +400 and -400 center
the walk animation on the screen, so that the guy disappears on the right and enters the scene on the left.
Setting anchor points for your PixiJS sprites
The anchor point is the
point around which the sprite rotates and scales, and it also determines the position
of the sprite when it is placed on the x and y coordinates. Essentially, the anchor point
acts as the center of the sprite and is used to control its orientation and movement in the game.
To show you what I mean, please update the ticker function to the following and refresh your browser:
    app.ticker.add(delta => {
        const speed = 6;
        character.x = 500;
        character.rotation += delta/100;
});
At first glance, the sprite may appear to rotate around a point that seems disconnected
from the sprite itself. This is due to the default anchor point being set to the coordinate (0,0),
and the presence of large areas of transparency within the sprite's frame.
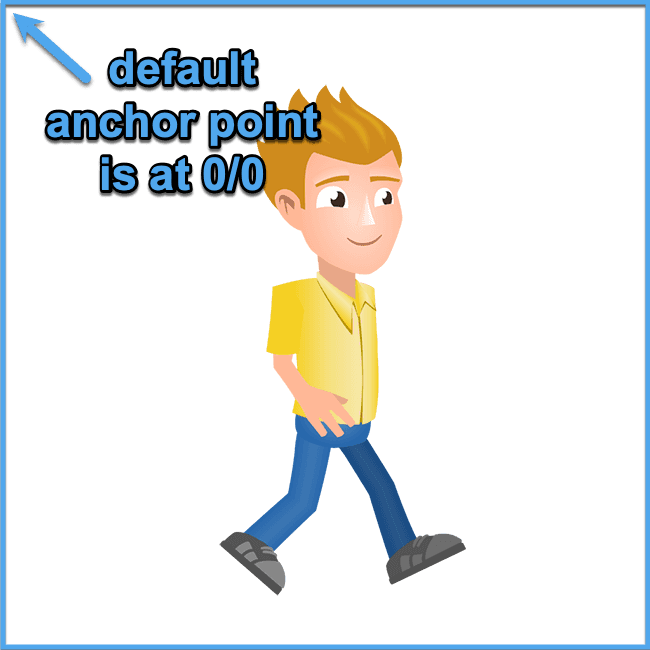
To overcome this issue, it is important to adjust the anchor point to a suitable location within the sprite. This can be done in TexturePacker and will ensure that the sprite rotates and scales correctly in PixiJS.
To do so, click on Sprite settings in TexturePacker's toolbar and select all sprites in the left panel. Click Fit to see all sprites at once in the center view.
Select all sprites in the center view by pressing the mouse button at the top left of the first sprite and dragging to the bottom right of the last sprite.
The circle in the sprite frames is the anchor point - which are called pivot points in TexturePacker. Move these to the bottom center of the sprite:
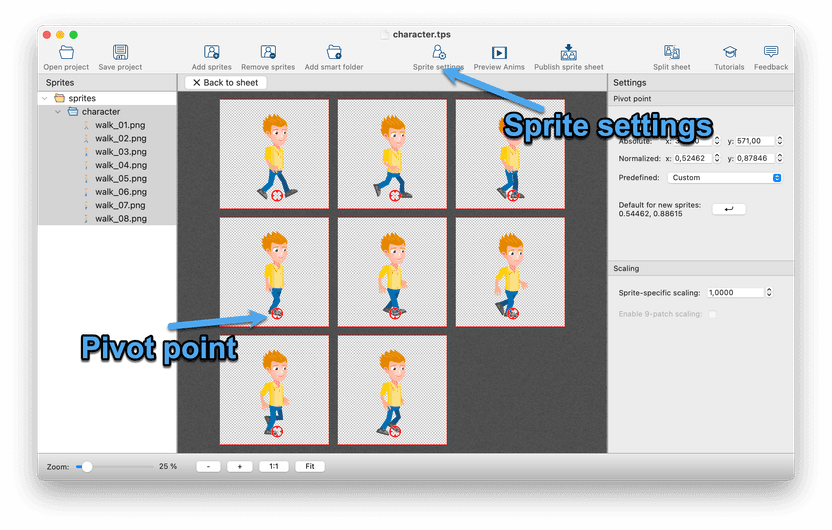
Back in the game scene, you should now see the character rotating around this point.
Change the code to this to make him walk again:
    // configure + start animation:
    character.animationSpeed = 1 / 6;                     // 6 fps
    character.position.set(150, background.height - 180); // almost bottom-left corner of the canvas
    character.play();

    // Enable this to update the anchor points with each animation frame
    character.updateAnchor = true;

    // add it to the stage and render!
    app.stage.addChild(character);

    app.ticker.add(delta => {
        const speed = 6;
        character.x = (character.x + speed * delta) % (background.width + 200);
    });
TexturePacker allows you to set individual anchor points for each frame of the animation. This isn't enabled by default.
To update the anchor pont for each sprite frame, set the updateAnchor property on the AnimatedSprite to true.
Using 9-slice / 9-scale sprites in PixiJS
PixiJS provides support for 9-slice scaling, a technique designed to enhance image scalability. If you're unfamiliar with the concept: It divides an image into nine segments — four corners, four edges, and the center. When scaling, only the center and edges adjust in size, leaving the corners unchanged. This ensures that elements like buttons or panels retain their original visual appeal even when scaled across various aspect ratios.
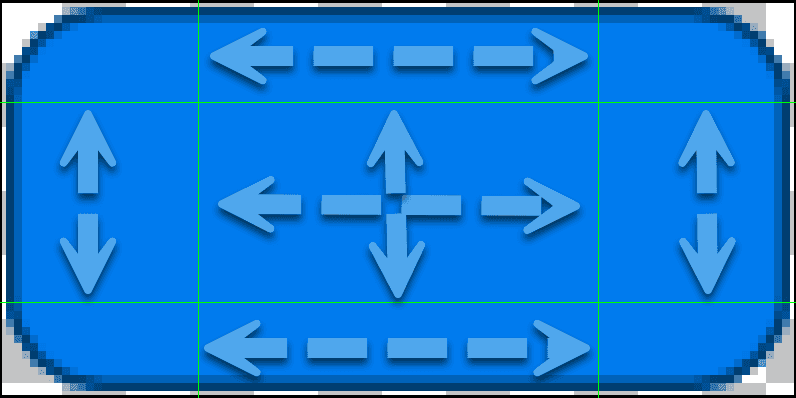
In TexturePacker, click Sprite Settings in the toolbar and select the button. In the right panel, activate the checkbox Enable 9-patch scaling.
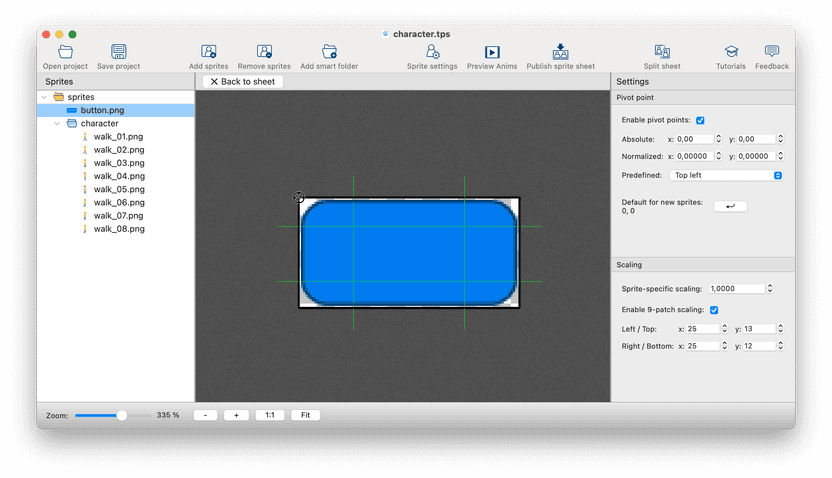
You can drag the green lines to match the scaling and non-scaling parts of your sprite. Finally, publish the sprite sheet.
Adding the sprite is straight forward:
    const sprite9a = new PIXI.NineSlicePlane(PIXI.Texture.from("button.png"));
    sprite9a.position.set(10,10);
    sprite9a.width = 100;
    sprite9a.height = 100;
    app.stage.addChild(sprite9a);
Change the width and height to whatever you need — the border of the button image stays crisp and is not blurred when the sprite is resized.
Using MultiPack with PixiJS
MultiPack is a feature of TexturePacker that allows you to pack many sprites at once. It automatically adds new sprite sheets if the space is not sufficient. This makes handling many sprites much easier for you.
Enabling MultiPack in TexturePacker
To enable the feature, you have to use TexturePacker 7.0.2 or newer because older versions are not fully compatible.
To enable MultiPack, you have 2 choices:
Auto- if you use this variant, TexturePacker does the whole work for you.Manual- you can have to add sprite-sheets manually and can than assign folders or sprites to a sheet. This is great — e.g. if you have multiple levels that don't share sprites. To assign the sprites, use the tree view on the left. The limitation is that you can't move sprites inside a smart folder. You can only move the smart folder itself.
TexturePacker requires a name extension for the base name of the sprites sheet. {n} now has to be part of the
file name and is either replaced with the sheet number (auto multipack) or the sheet name (manual multipack).
E.g. you can now name your sprites sheet-{n}.png and sheet-{n}.json which creates sheet-0.png, sheet-1.png
or sheet-level1.png, sheet-level2.png,...
Make sure that all your sprite names are unique - using the same name is not possible.
Using MultiPack in PixiJS
In PixiJS it's now sufficient to only load the first sprite sheet:
PIXI.Assets.load([
    "spritesheets/sheet-0.json",
]).then(() => {
Make sure to only load the first sprite sheet of your multipack set. If you load more than one sheet from the same set, PixiJS deadlocks and does not complete the loading process.
TexturePacker stores all animation frames in the first sprites sheet of the multipack set — no matter on which sprite sheet they are located.
To receive the animation array, use
// get all animations from of the multipack set (stored in the first sprite sheet)
const animations = PIXI.Assets.cache.get('spritesheets/sheet-0.json').data.animations;
To create the animation, use
// create an animated sprite
const character = PIXI.AnimatedSprite.fromFrames(animations["character/walk"]);
Restrictions in PixiJS
PixiJS works with multipack — but there are some calls that won't work.
const sheet = PIXI.Assets.cache.get('spritesheets/sheet-0.json');When you create a Sprite, always use the static method PIXI.Sprite.from():
// this works 👍
const sprite = PIXI.Sprite.from("image.png");

// this does not work 👎
const sprite = new PIXI.Sprite(sheet.textures["image.png"]);
There are also restrictions for the NineSlicePlane. You have to use PIXI.Texture.from()
to get the texture to pass into the constructor. Accessing the textures on the sheet directly
might lead to null in case the sprite is not located on the first sheet of the multipack set.
// this works 👍
const sprite9 = new PIXI.NineSlicePlane(PIXI.Texture.from("button.png"));

// this does not work 👎
const sprite9 = new PIXI.NineSlicePlane(sheet.textures["button.png"]);
And for the AnimatedSprite you have to go through sheet.data.animations[] to
get the frame names. sheet.animations[] is null for all frames that at not located
on that sheet.
// this works 👍
const anim = PIXI.AnimatedSprite.fromFrames(sheet.data.animations["character/walk"]);

// this does not work 👎
const anim = new PIXI.AnimatedSprite(sheet.animations["character/walk"]);